

Key Takeaways
- Use high-grade Zardosi and Kundan to prevent premature tarnishing.
- Always anchor center flowers before working outward on lattice patterns.
- Diagonal vine patterns are effective for visually elongating the arm.
- Use 3mm pearls as a buffer around sharp bugle beads for a refined look.
- Strong nylon thread is essential for fringe loops to ensure durability.
- Accuracy in the initial tracing stage determines the final quality of the embroidery.
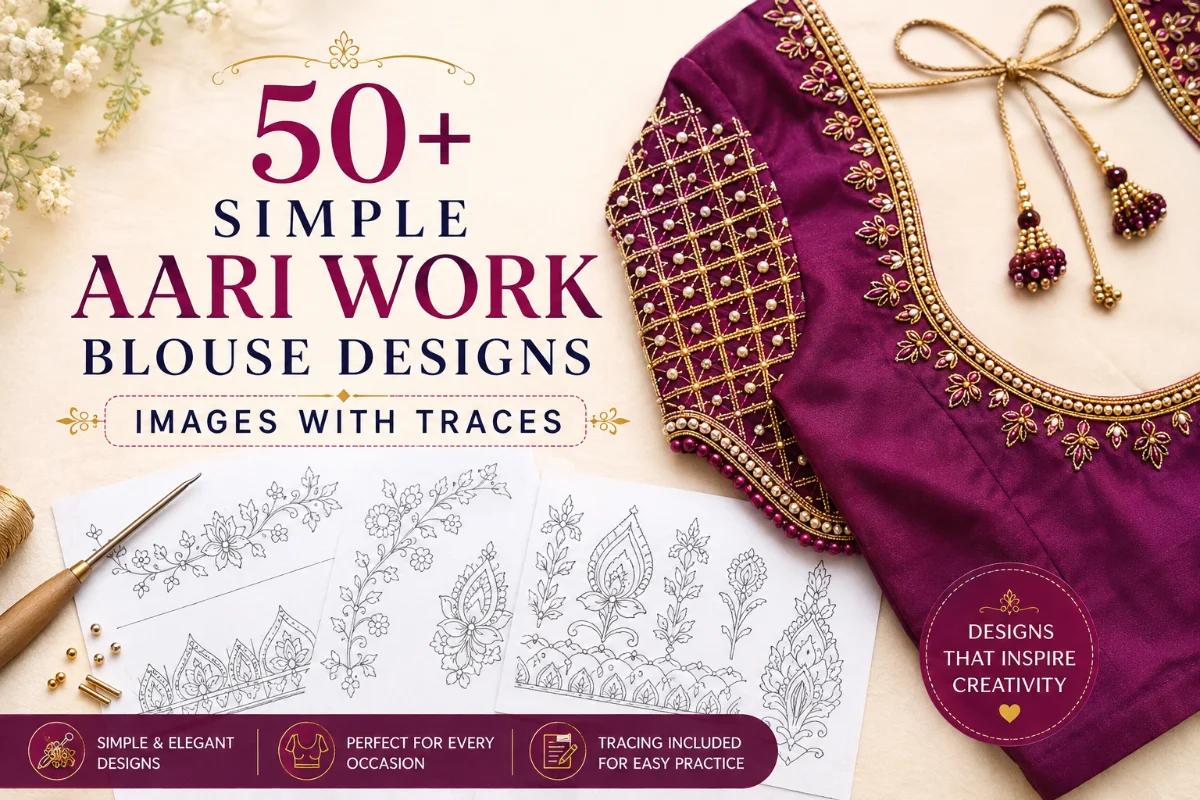
Understanding the Anatomy of Premium Aari Work
Honestly, honestly, when we look at high-end couture, the sleeve is where the story lives. These 25+ aari work blouse hand designs are curated to show how structure impacts visual weight. You'll notice that every single piece in this collection relies on a specific rhythm: a heavy. Ornate border paired with a balanced. Scattered pattern above. When you start your next piece, don't just rush into the needlework. Spend time laying out your main lattice or floral lines with a fine tracing pencil or a digital projection method. Your accuracy here determines the final grade of the work.
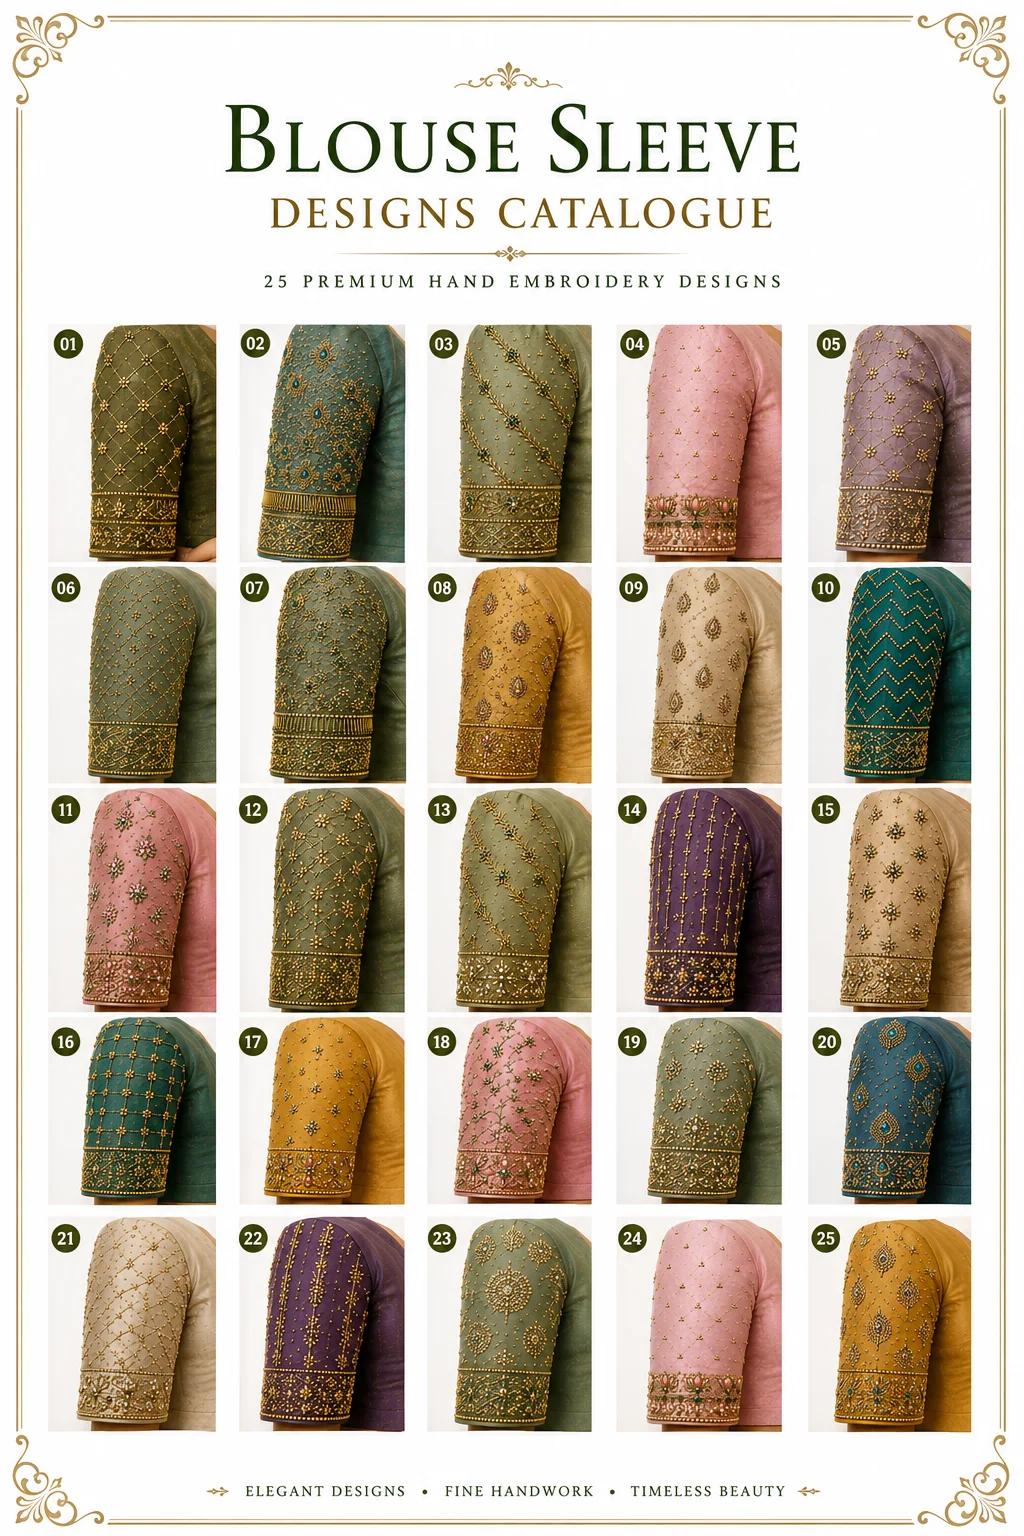
A complete catalogue showcasing 25 premium hand embroidery patterns for various sleeve lengths and styles.
Look — look — material choice dictates the lifespan of your work. You're dealing with delicate silk and heavy metallic wires. If you use cheap, coated threads, the shine will vanish within a month of wear. We favor high-grade Zardosi and stone-inlaid Kundan pieces. Notice how the designs shift from simple lattices to complex Jharokha patterns. Every choice you make with your needle must serve the overall shape of the sleeve. The way these patterns fill the space between the shoulder and the elbow is a masterclass in proportion and grace.
Deep Dive: The Diamond Floral and Peacock Teardrop
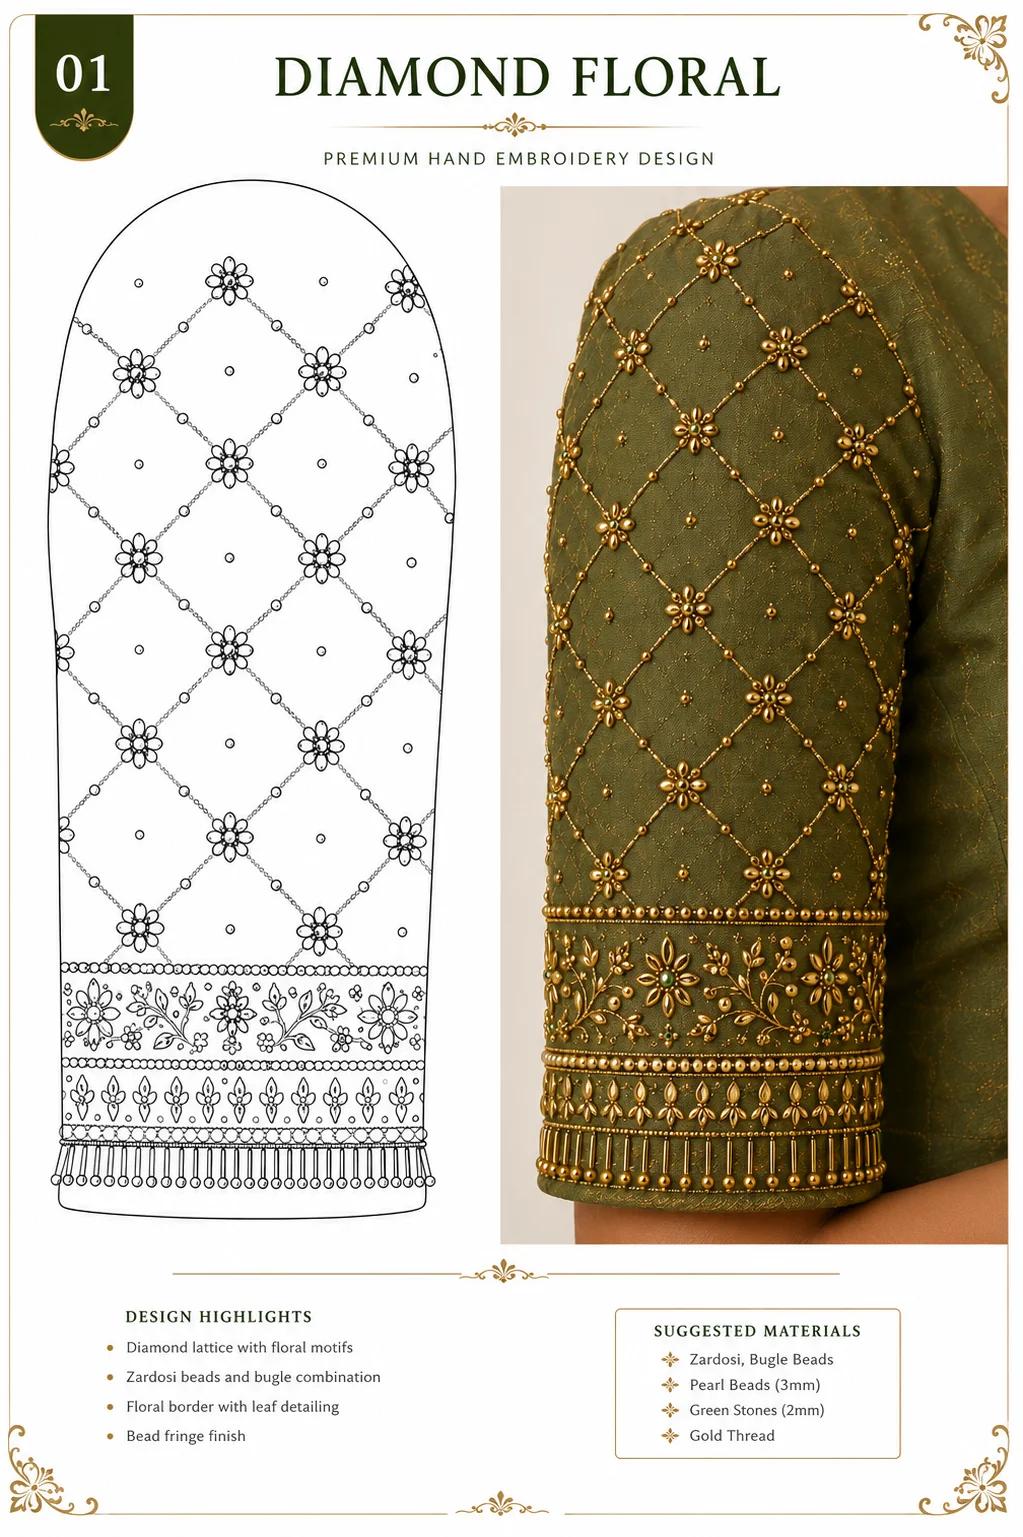
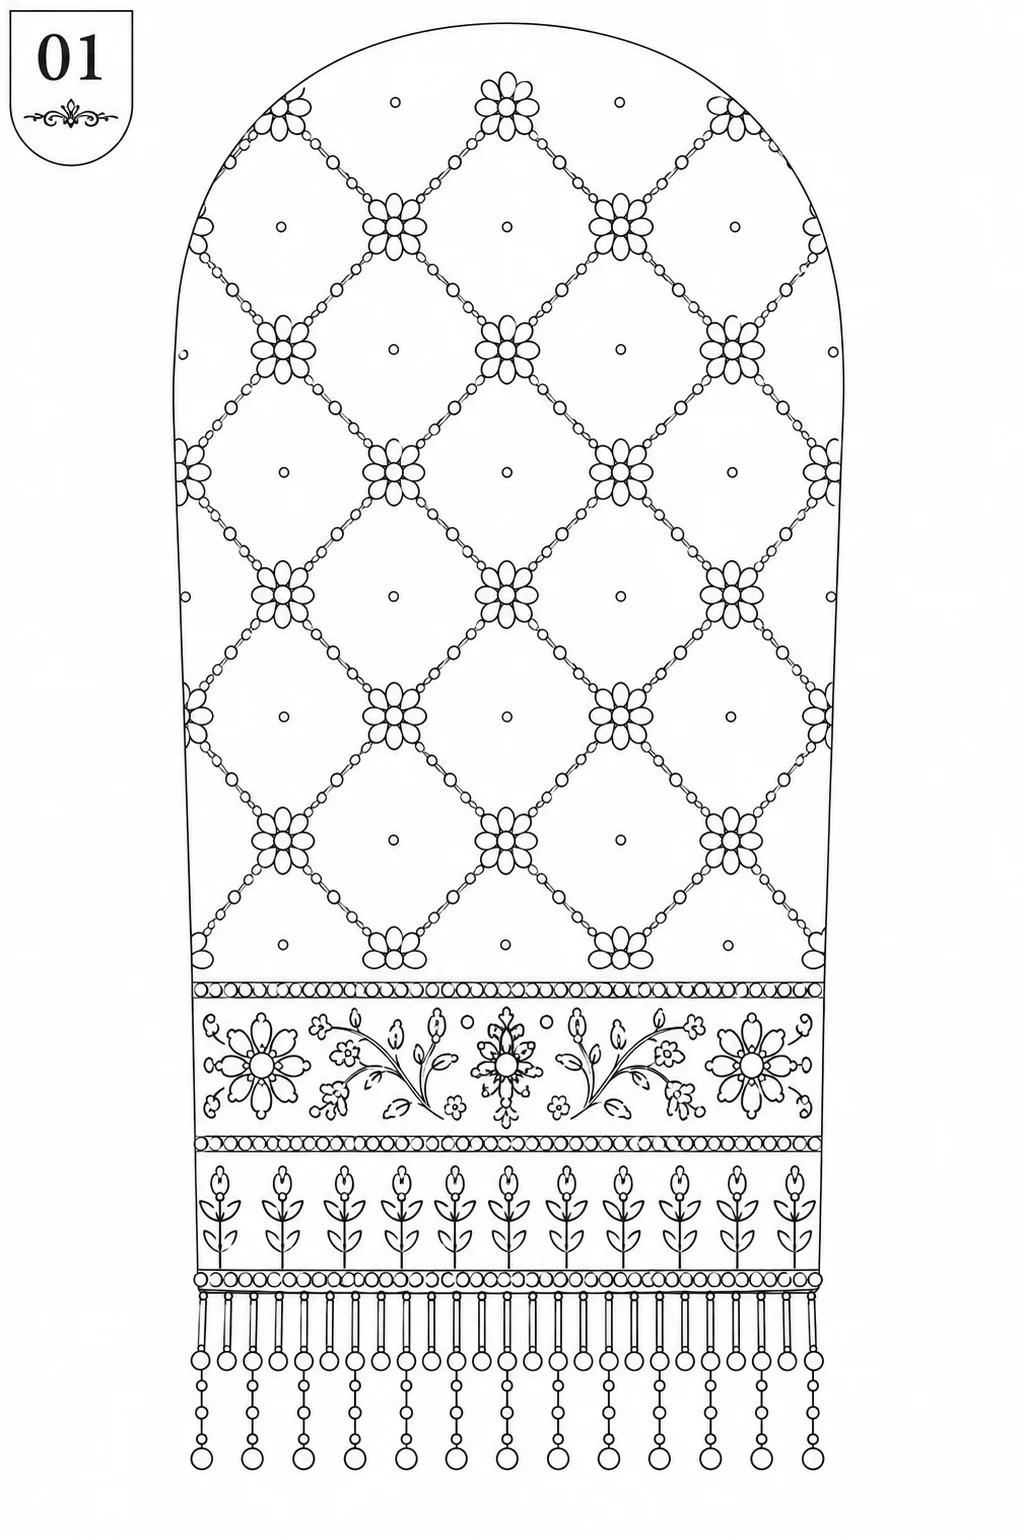
Design 01: An intricate diamond lattice pattern featuring delicate floral intersections and a heavy beaded border.
Look closely at the Diamond Floral. It's all about the intersection points. You need to anchor every flower exactly where the lines cross. If your diamond gaps are uneven, the whole sleeve looks skewed. I recommend placing your center flower first. Then working outward. For the Peacock Teardrop. The focus shifts to the stone placement. Each teardrop center acts as a weight, holding the embroidery steady against the fabric. Using 3mm pearls creates a nice buffer around the sharper stones, softening the harsh edges of the bugle beads.
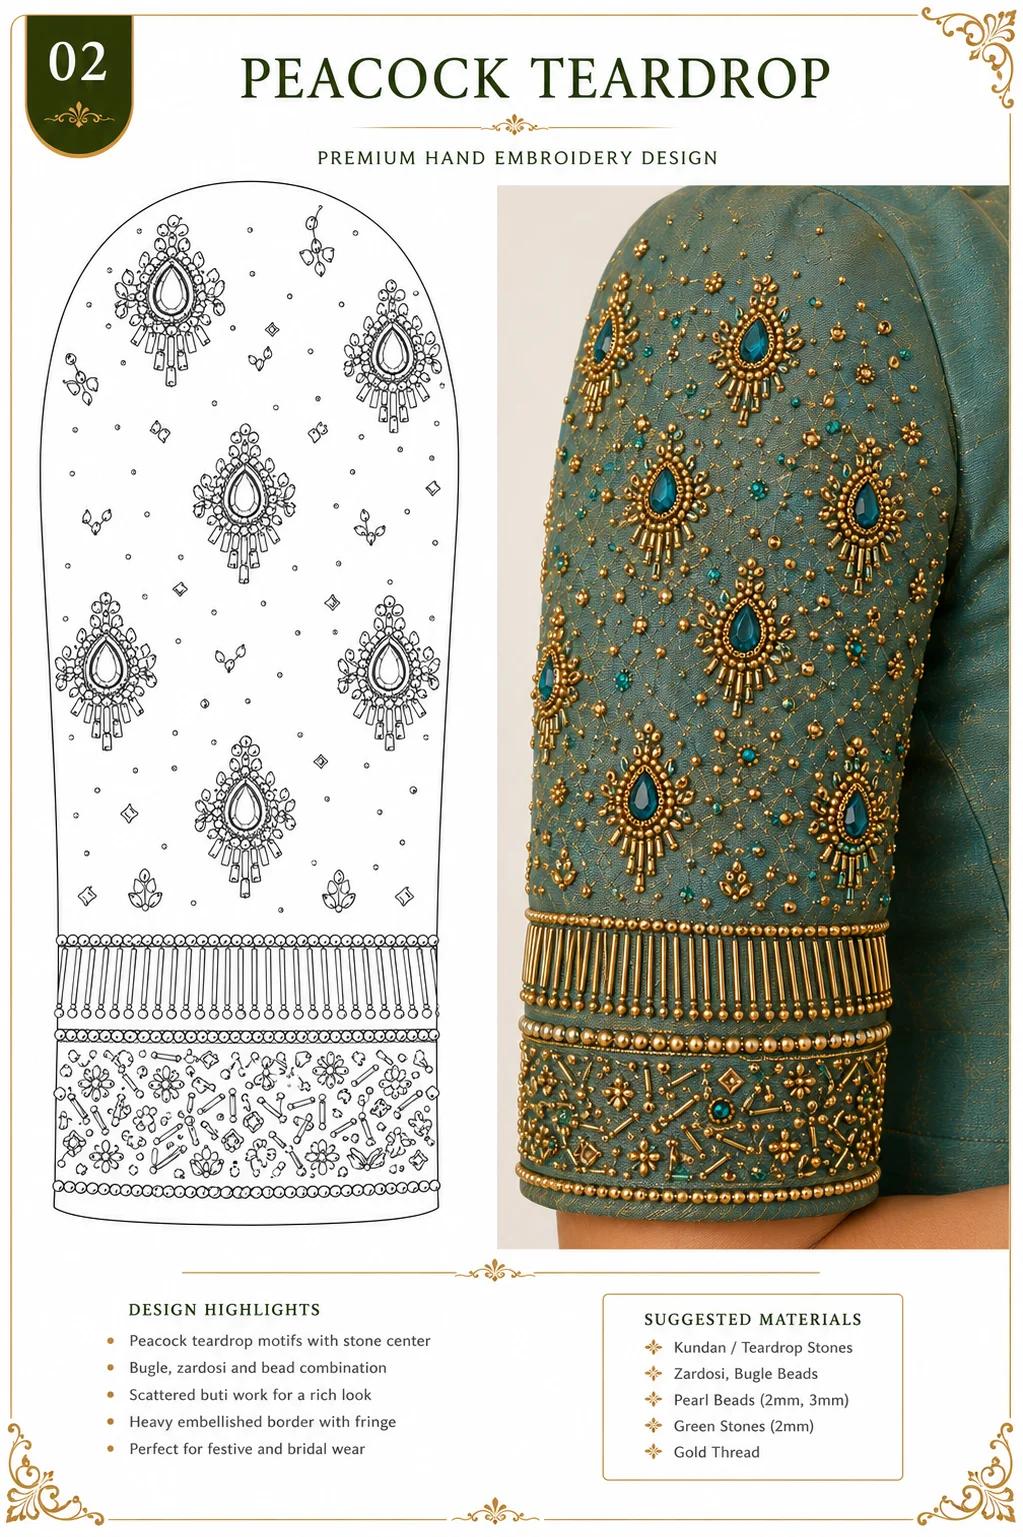
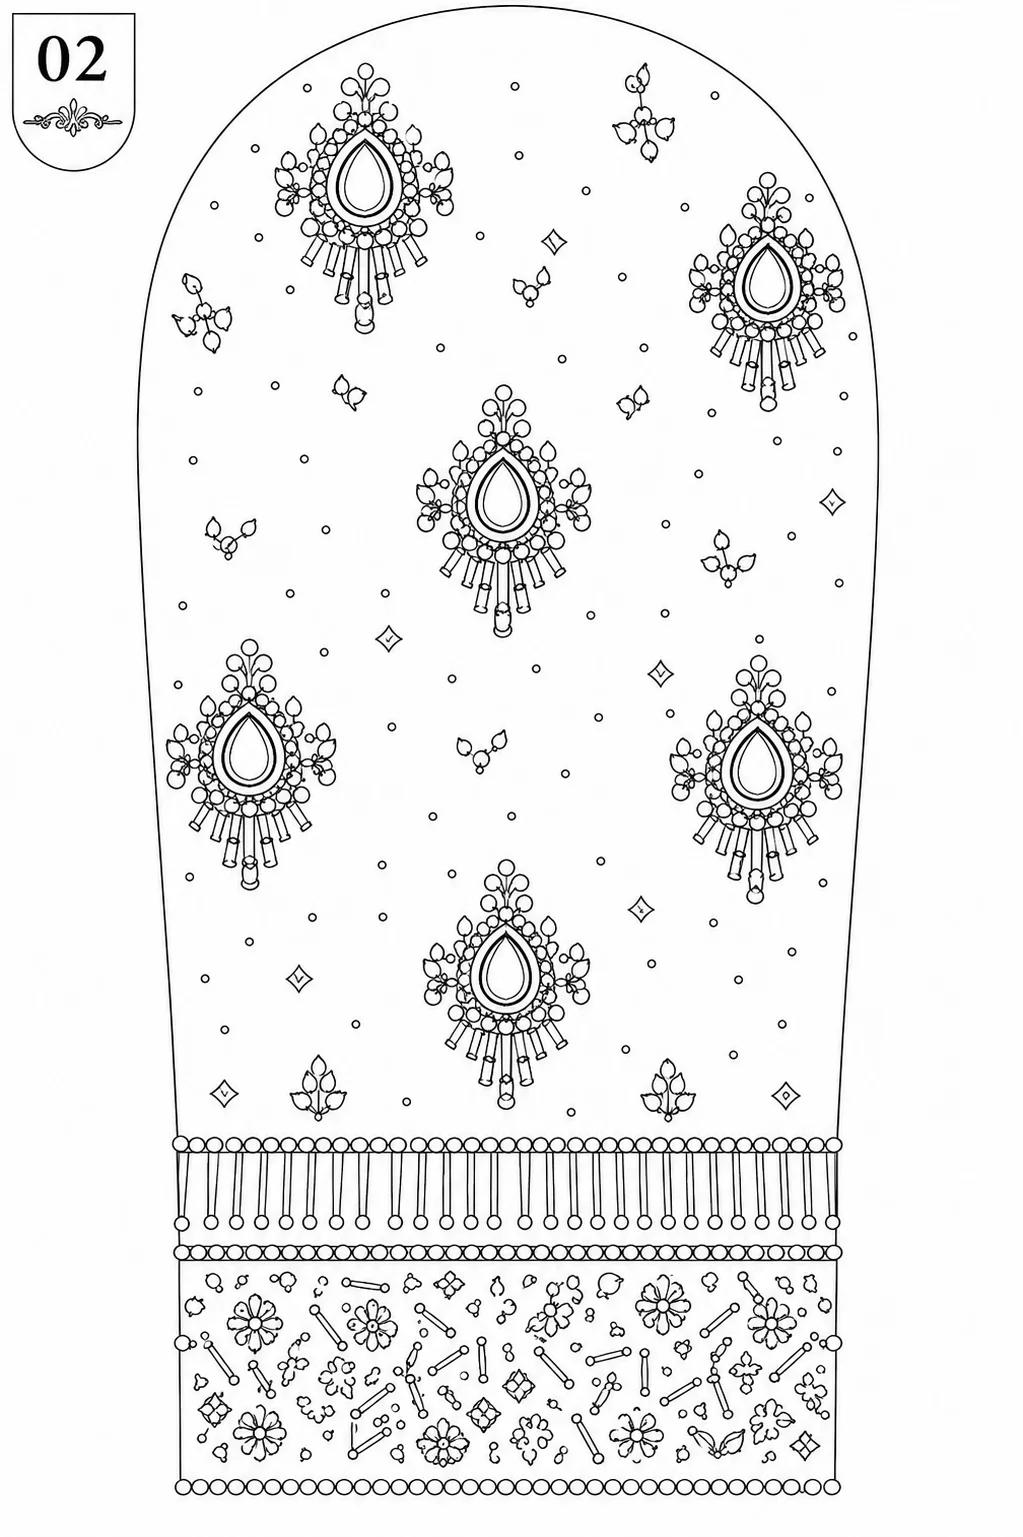
Design 02: A sophisticated peacock teardrop motif design with scattered buti work and heavy fringe details.
Your execution of the scattered buti work determines the negative space. Don't cluster them too tightly. These designs provide value by showing you exactly where the open spaces should live. By mirroring the physical features of the reference patterns. You build a foundation that feels professional. The fringe is the final touch. Adding movement to the sleeve. Use a strong nylon thread for the fringe loops so they don't snap when the blouse is pulled on or off during a busy wedding day.
The Art of the Diagonal and Lotus Borders
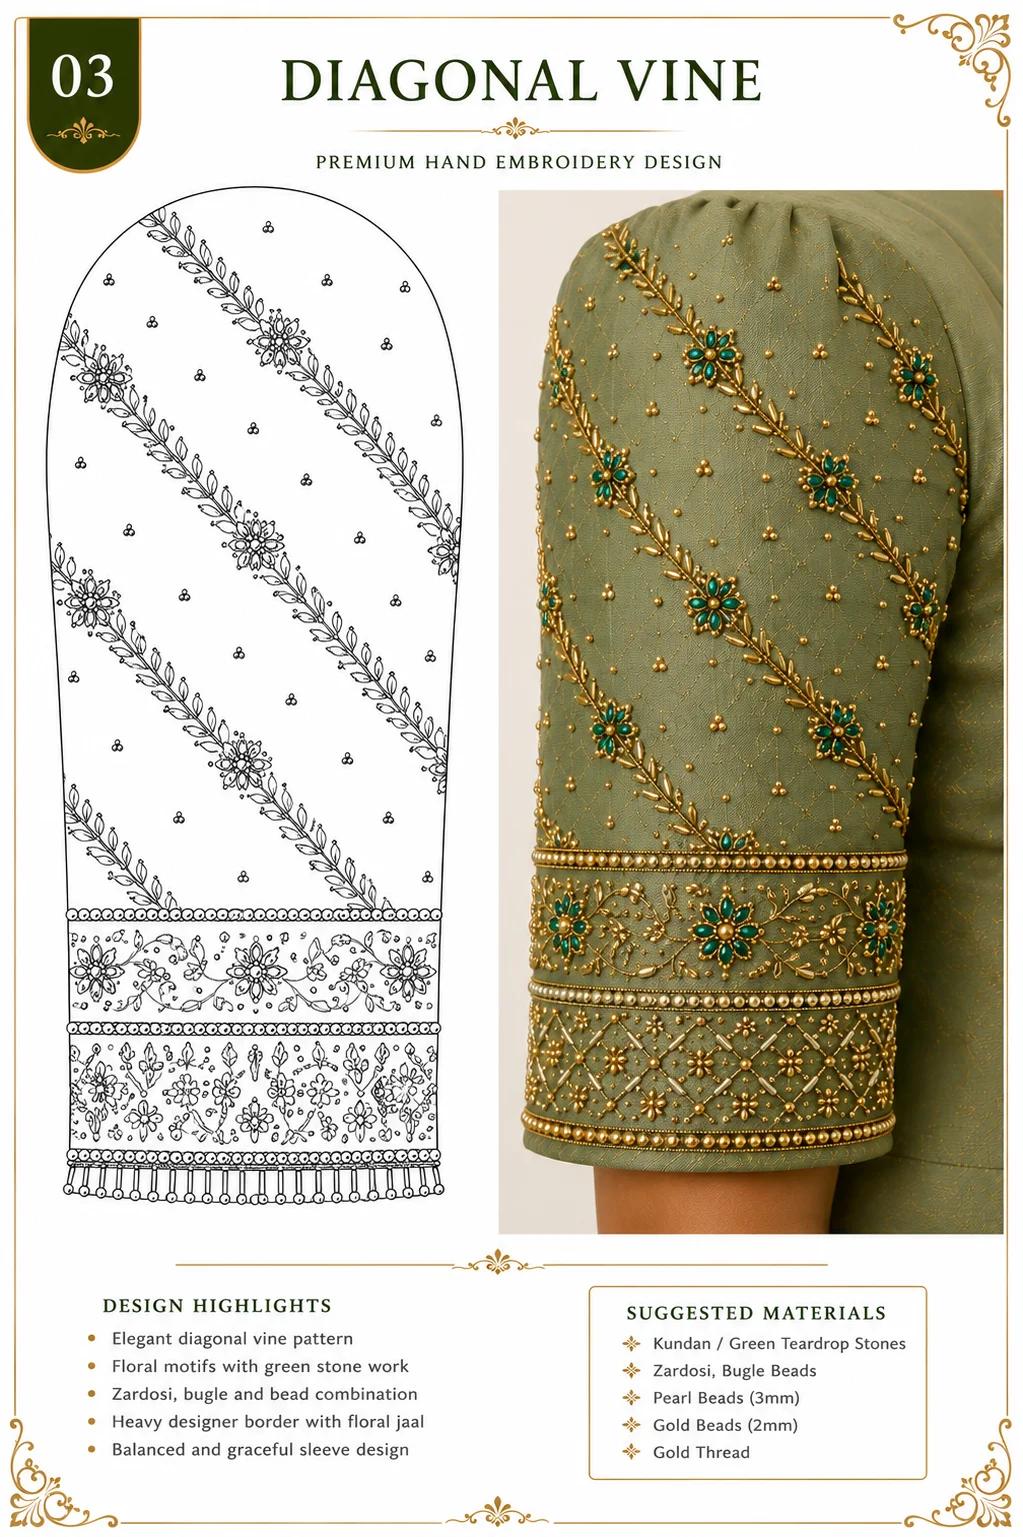
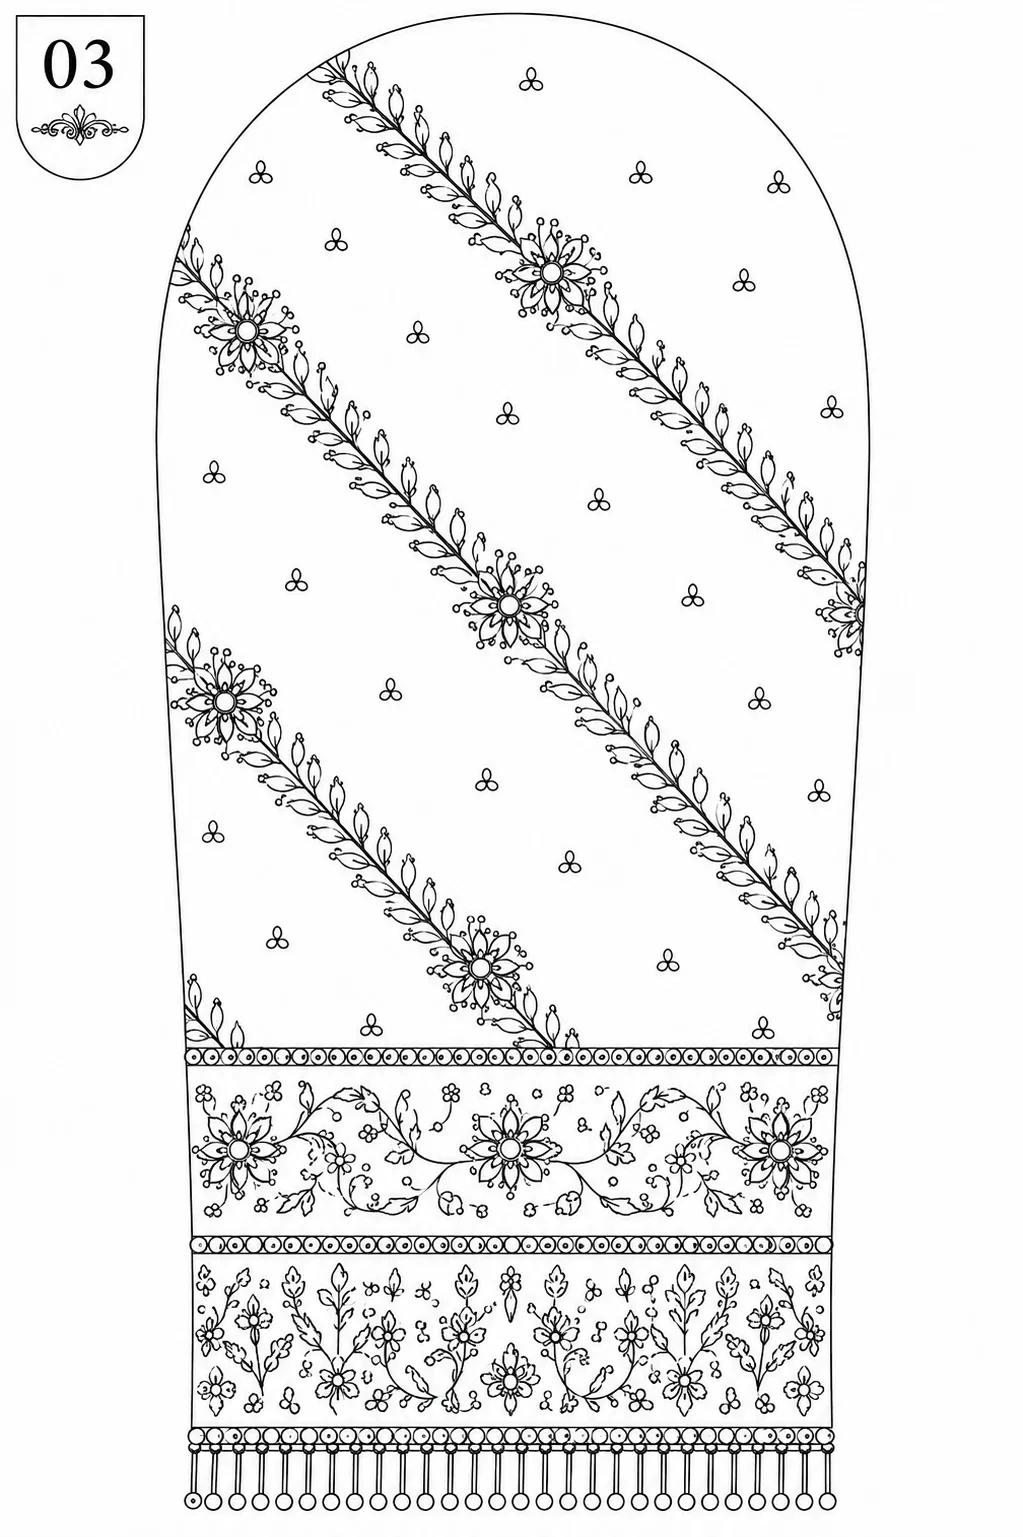
Design 03: An elegant diagonal vine pattern that creates a sense of fluid movement along the arm.
Diagonal lines offer a unique advantage: they make the arm look elongated. The vine pattern in design 03 is a personal favorite because it bridges the gap between traditional floral work and modern geometric layouts. When you trace this. Ensure your angle remains constant across the entire sleeve panel. Any deviation in the slope of the vine will be immediately visible. The lotus border below serves as a solid anchor. Grounding the fluid lines with a heavy, repetitive floral motif that catches the light perfectly.
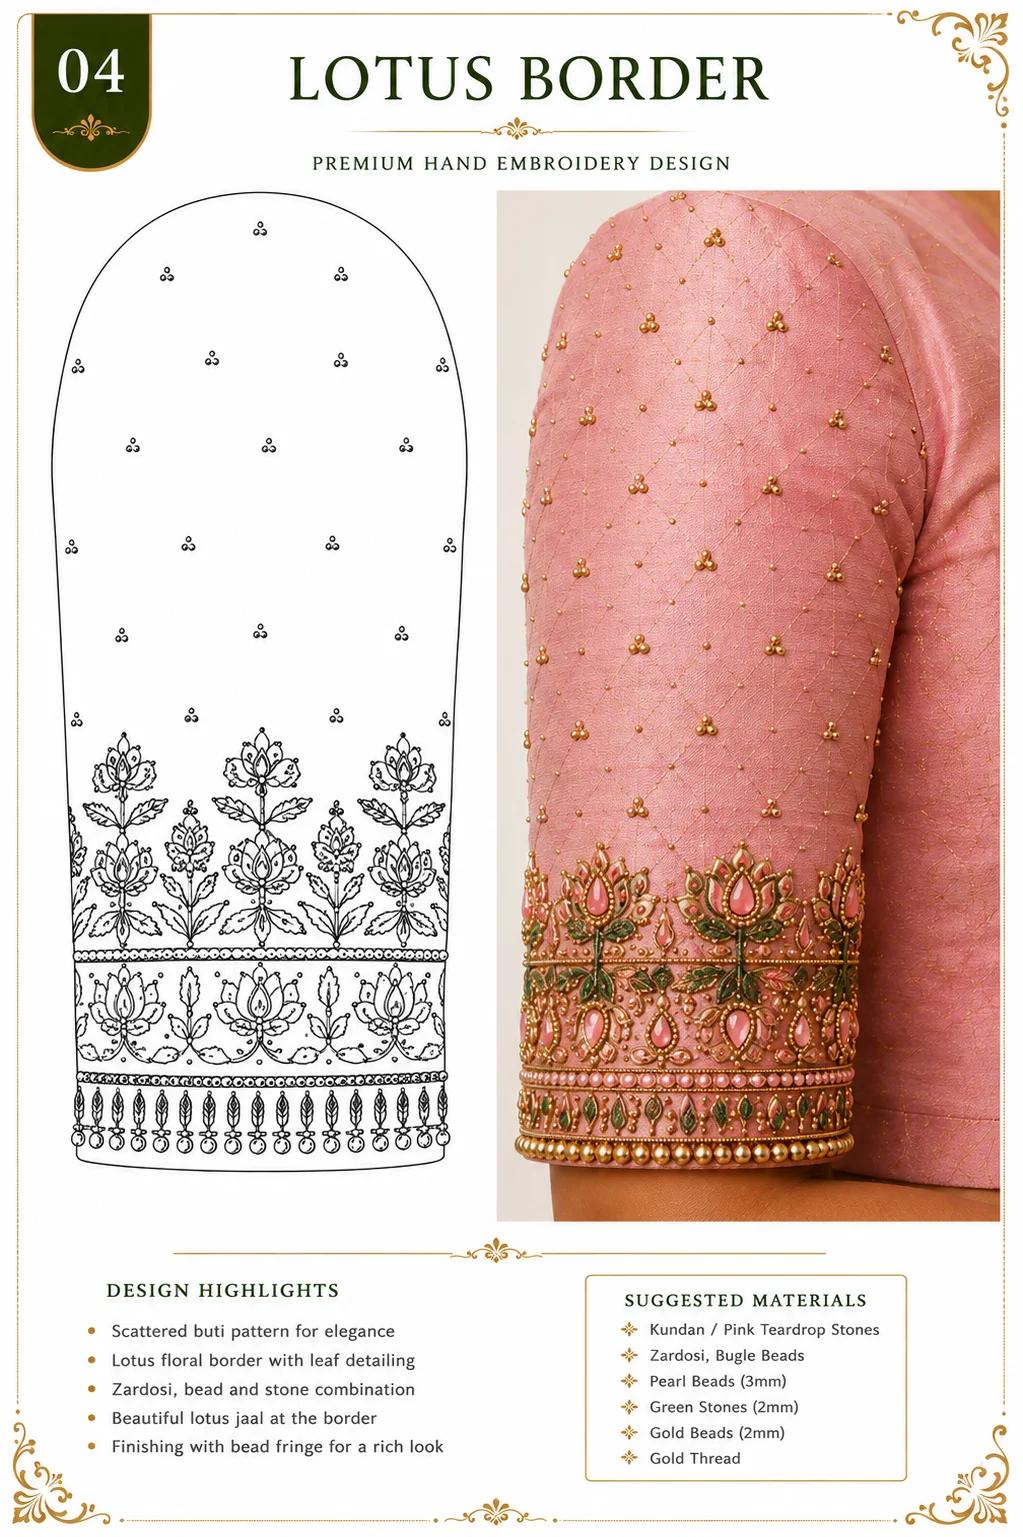
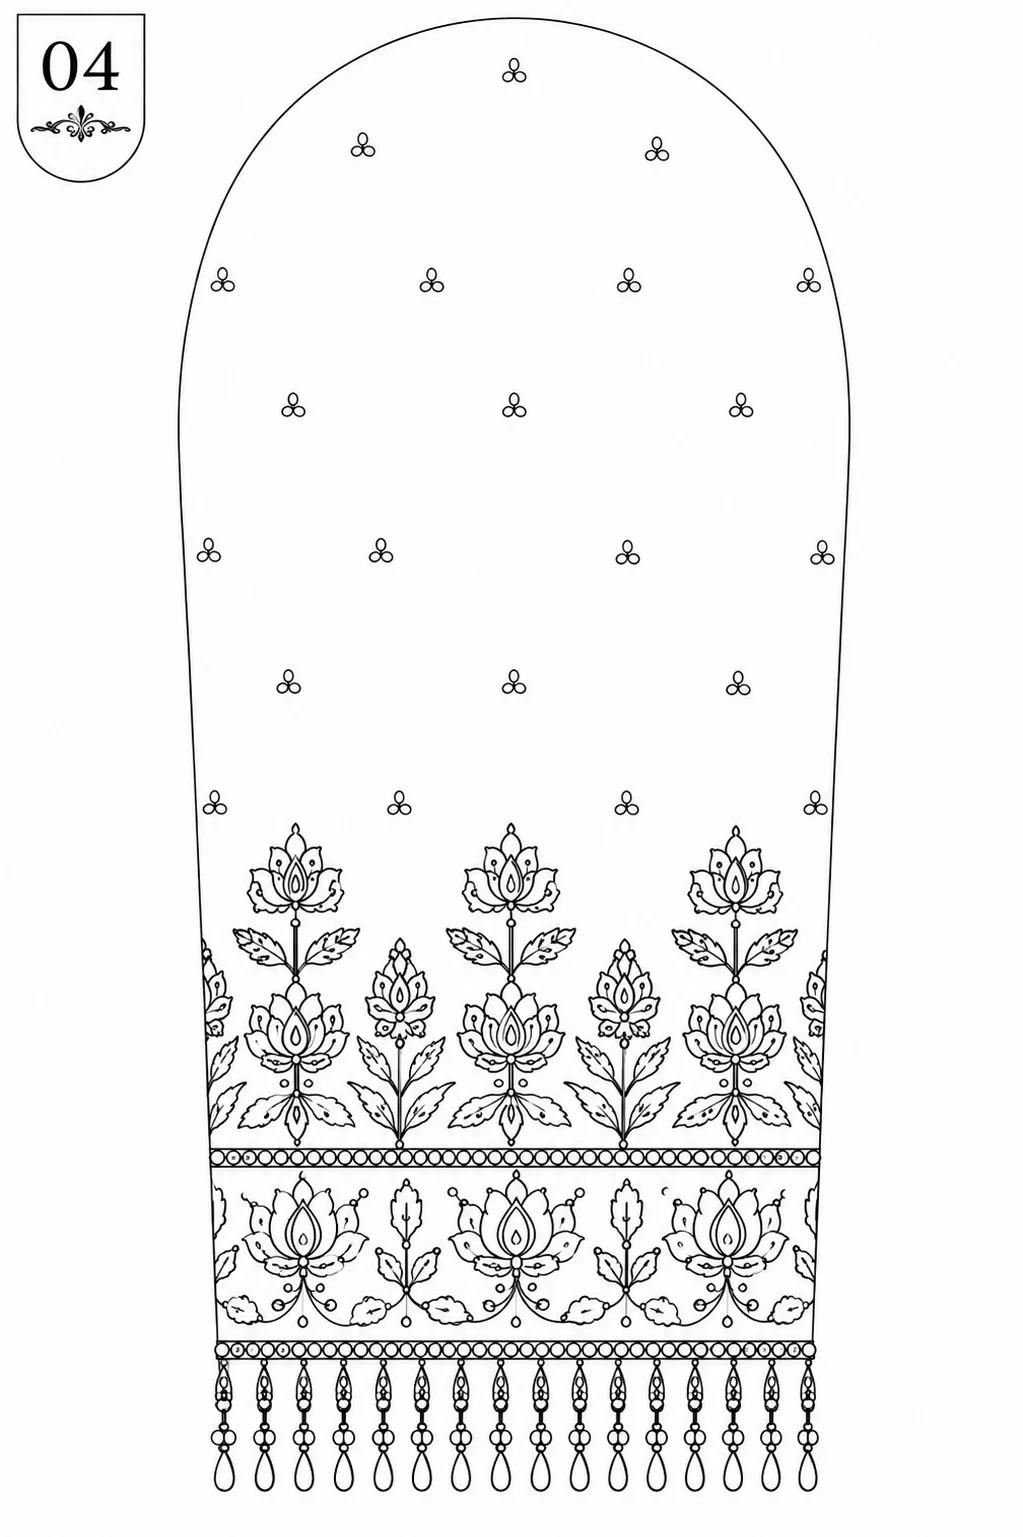
Design 04: A classic lotus border design paired with scattered floral buti for a balanced aesthetic.
Lotus patterns demand perfect curves. If your tracing is jagged, your chain stitch will betray you. I always tell my students to practice the arc on a waste piece of cotton before touching the expensive silk. With the lotus border. Use a mix of matte and shiny threads to create depth. The contrast between a dull gold thread and a bright. Reflective bead is what makes these simple aari work blouse hand designs look truly expensive. It creates a subtle texture that photographs beautifully.
Moroccan Trellis and Scallop Pearl Techniques
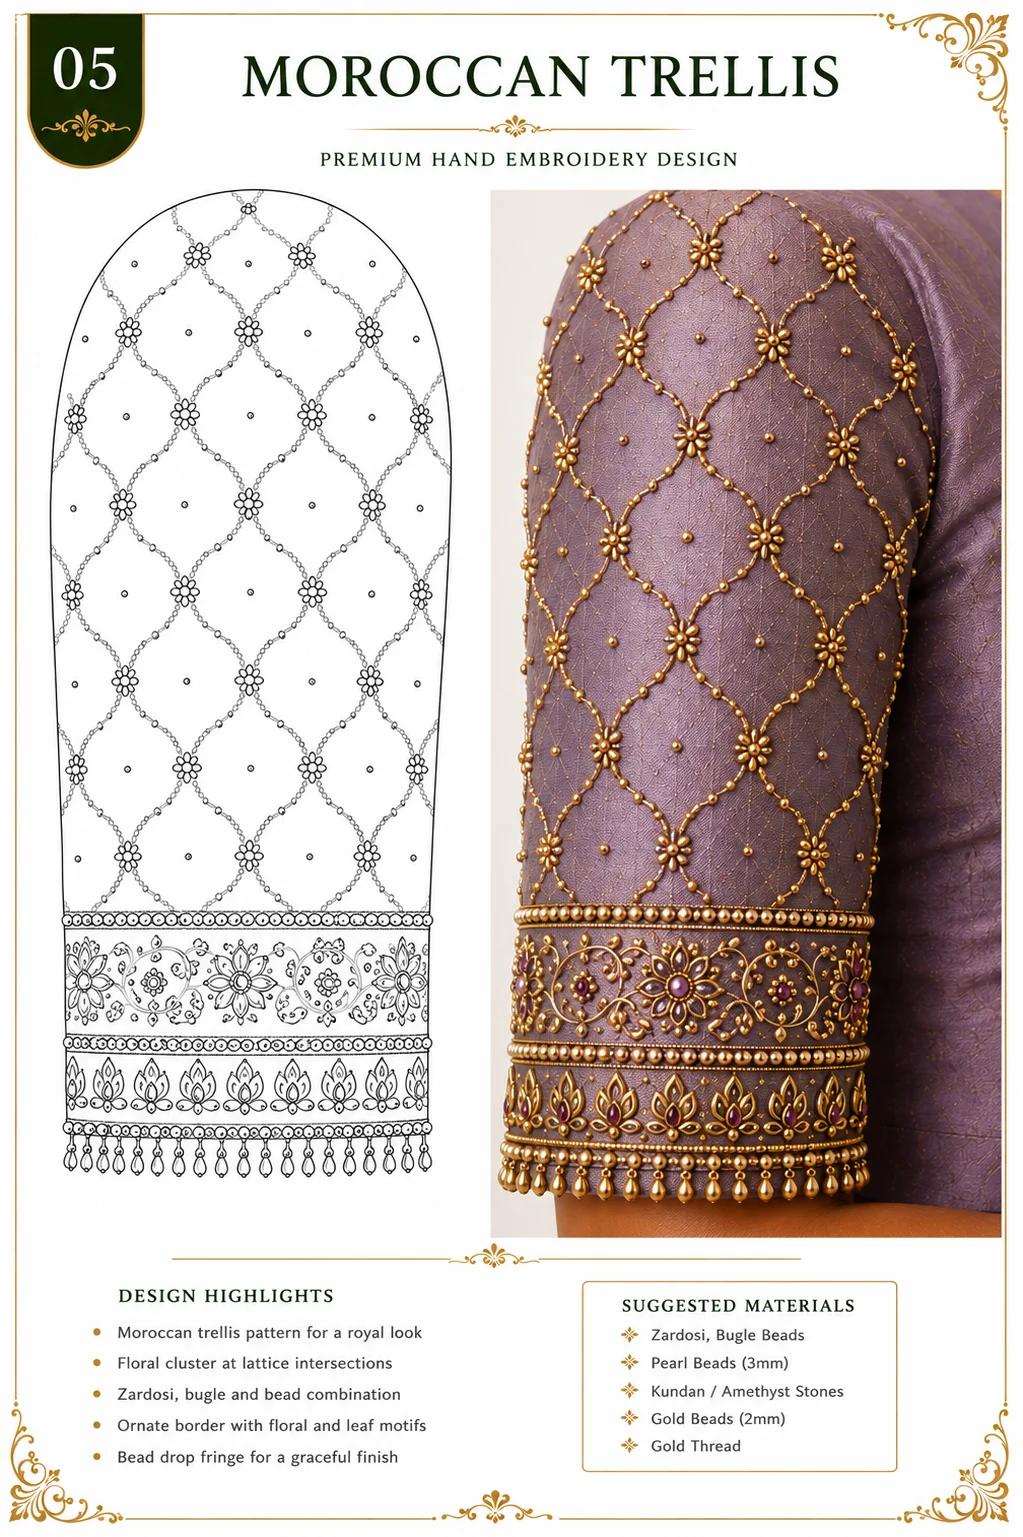
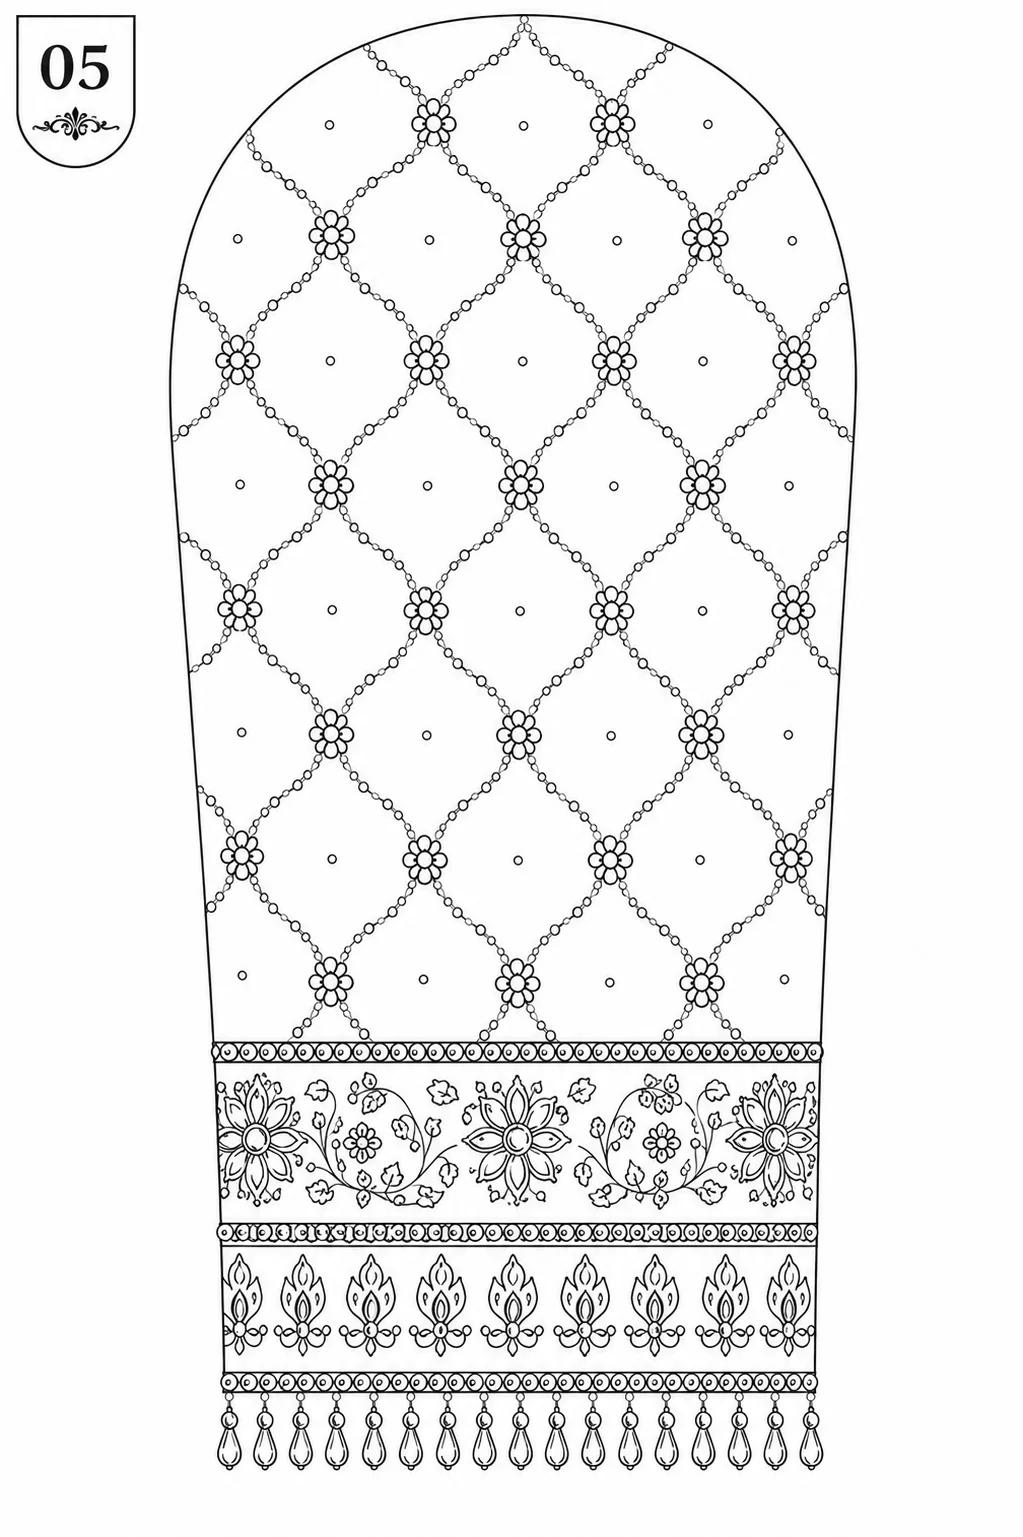
Design 05: A royal Moroccan-inspired trellis pattern with intricate floral clusters at every intersection.
Moroccan trellis designs rely on the precision of the grid. You're effectively building a cage of thread that needs to hold its shape. The intersections should be reinforced with a tiny stitch to prevent the lattice from sagging. When you add the floral clusters. Work them in one continuous motion if possible to keep the thread tension uniform. This specific layout is perfect for deep-colored fabrics like wine or royal blue. It adds enough sparkle to be festive without overpowering the base fabric of the blouse.
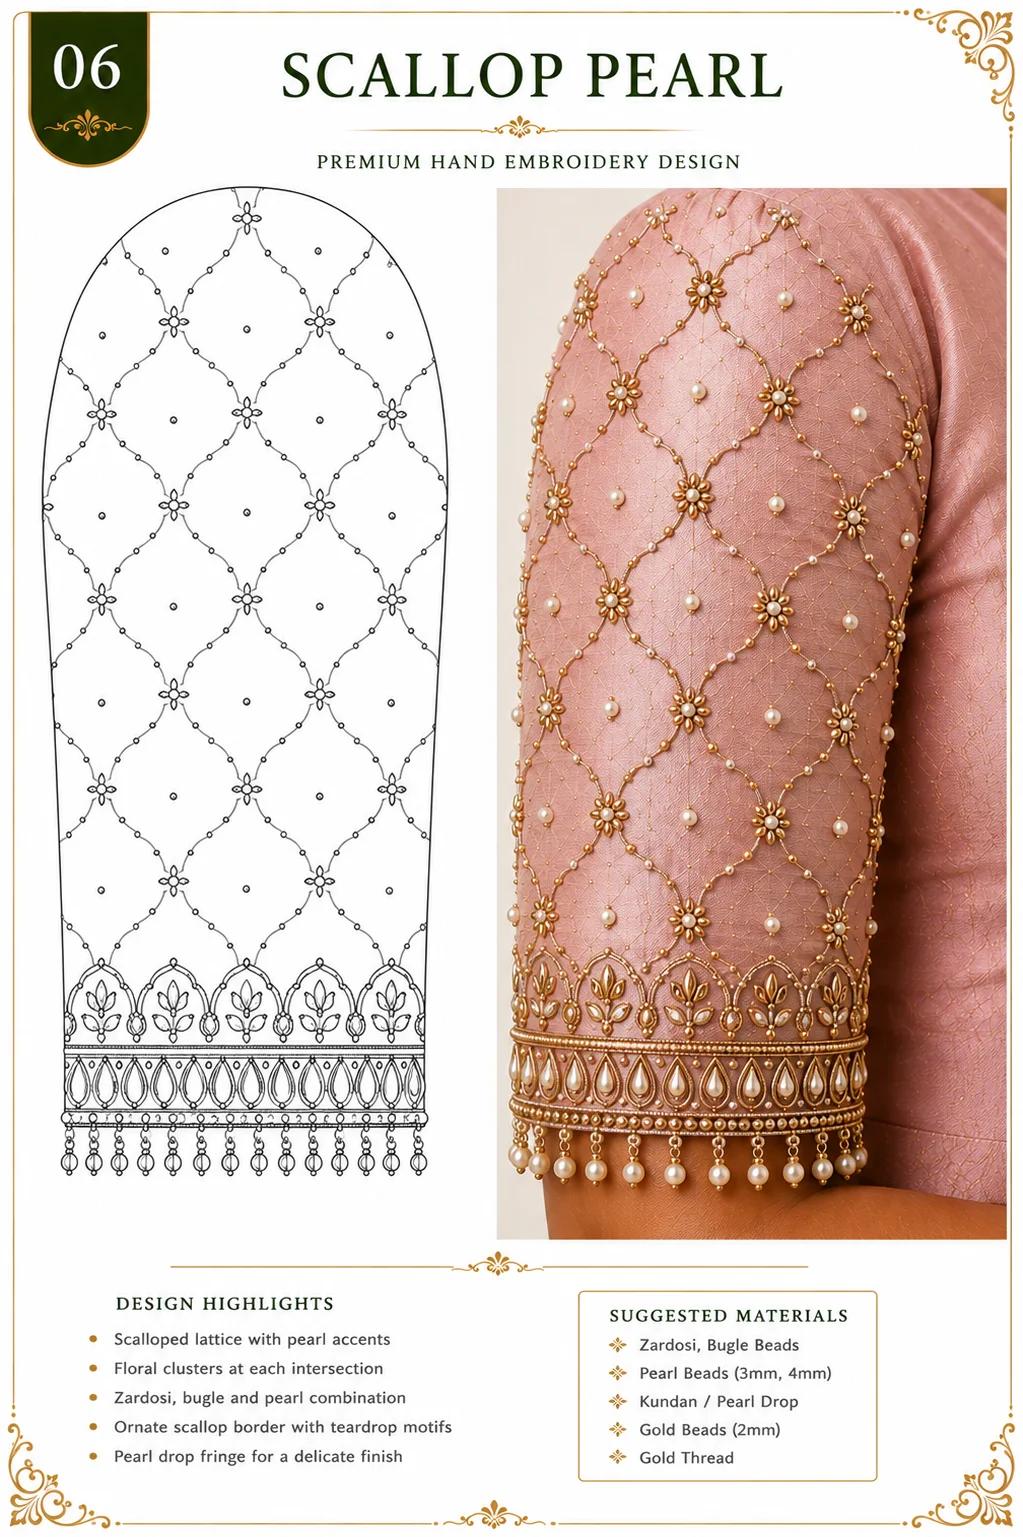
Design 06: A delicate scallop border design accentuated with pearl drops for a soft, feminine finish.
Scallops are notoriously difficult because they've to look identical. Use a stencil for your arcs to ensure absolute consistency. The pearl accents aren't just decorative; they define the edge. If your pearls are spaced inconsistently. The eye will be drawn to the error immediately. I like to use a small seed bead between each pearl to give the design more breathing room. This prevents the pearls from crowding each other and keeps the scalloped line sharp and clean on the sleeve hem.
Architecture in Embroidery: Royal Jharokha and Peacock Feathers
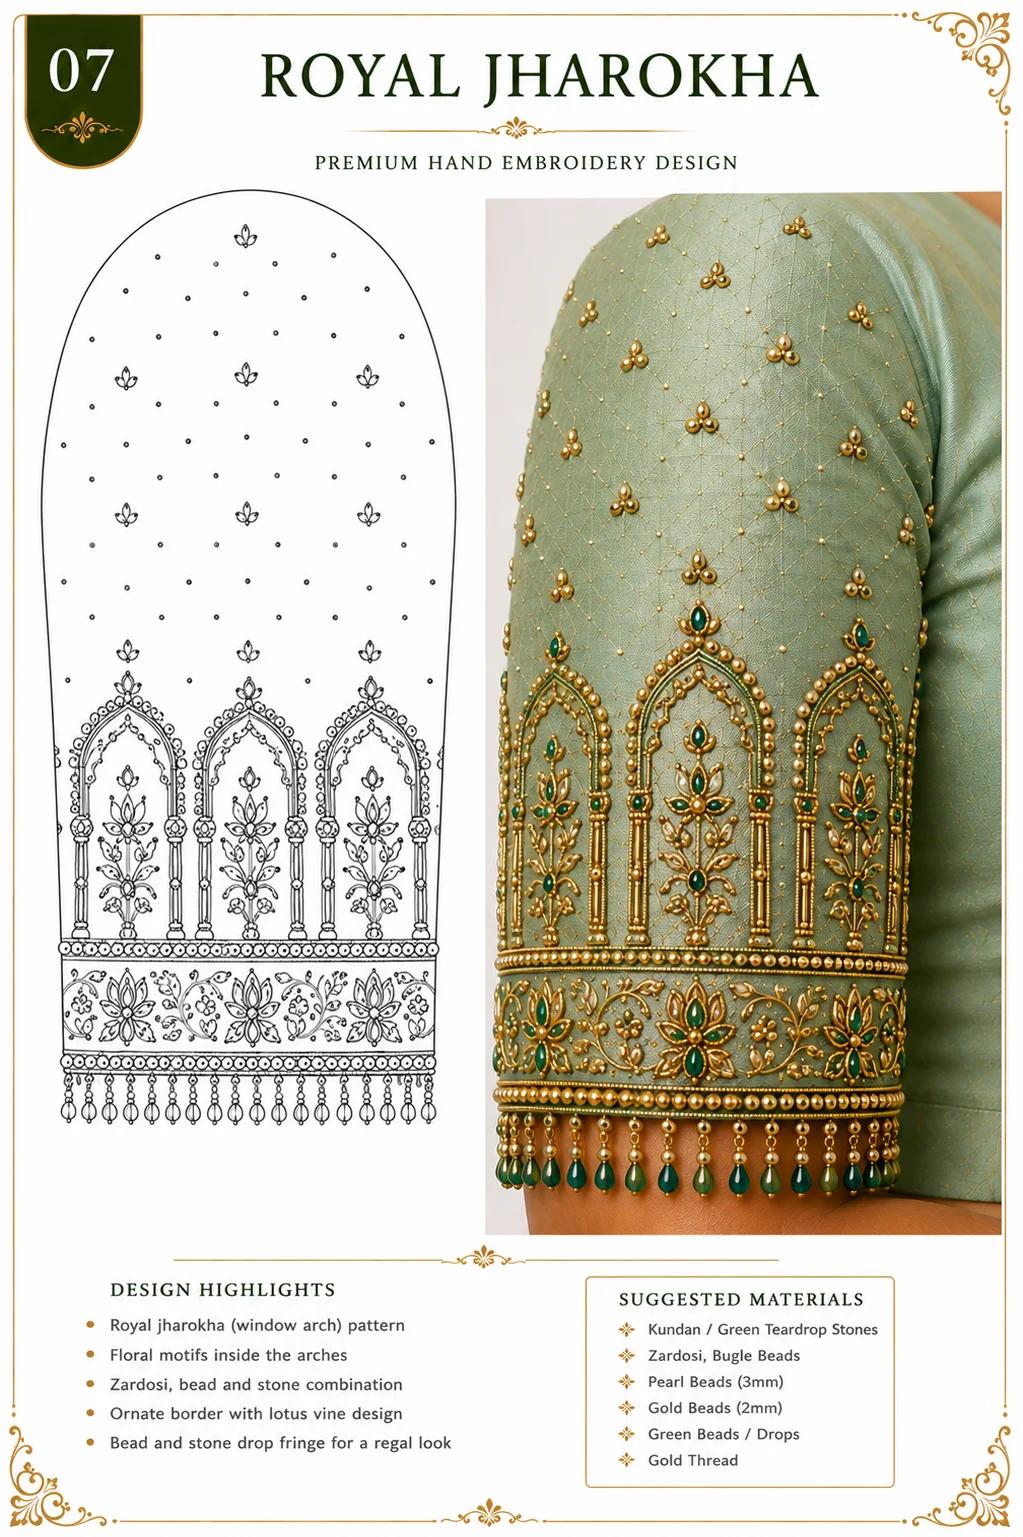
Design 07: A regal Jharokha or window arch design that incorporates traditional floral motifs within each frame.
Architecture-inspired designs like the Jharokha provide a distinct frame for your creativity. Think of each arch as a small canvas within the larger sleeve. You can vary the color of the stones inside each arch to match a multi-colored saree. This keeps the look cohesive while allowing for a burst of personality. The border work here is dense. So make sure your frame is tight. If the fabric ripples while you work inside these arches. The entire sleeve will look puckered once removed from the frame.
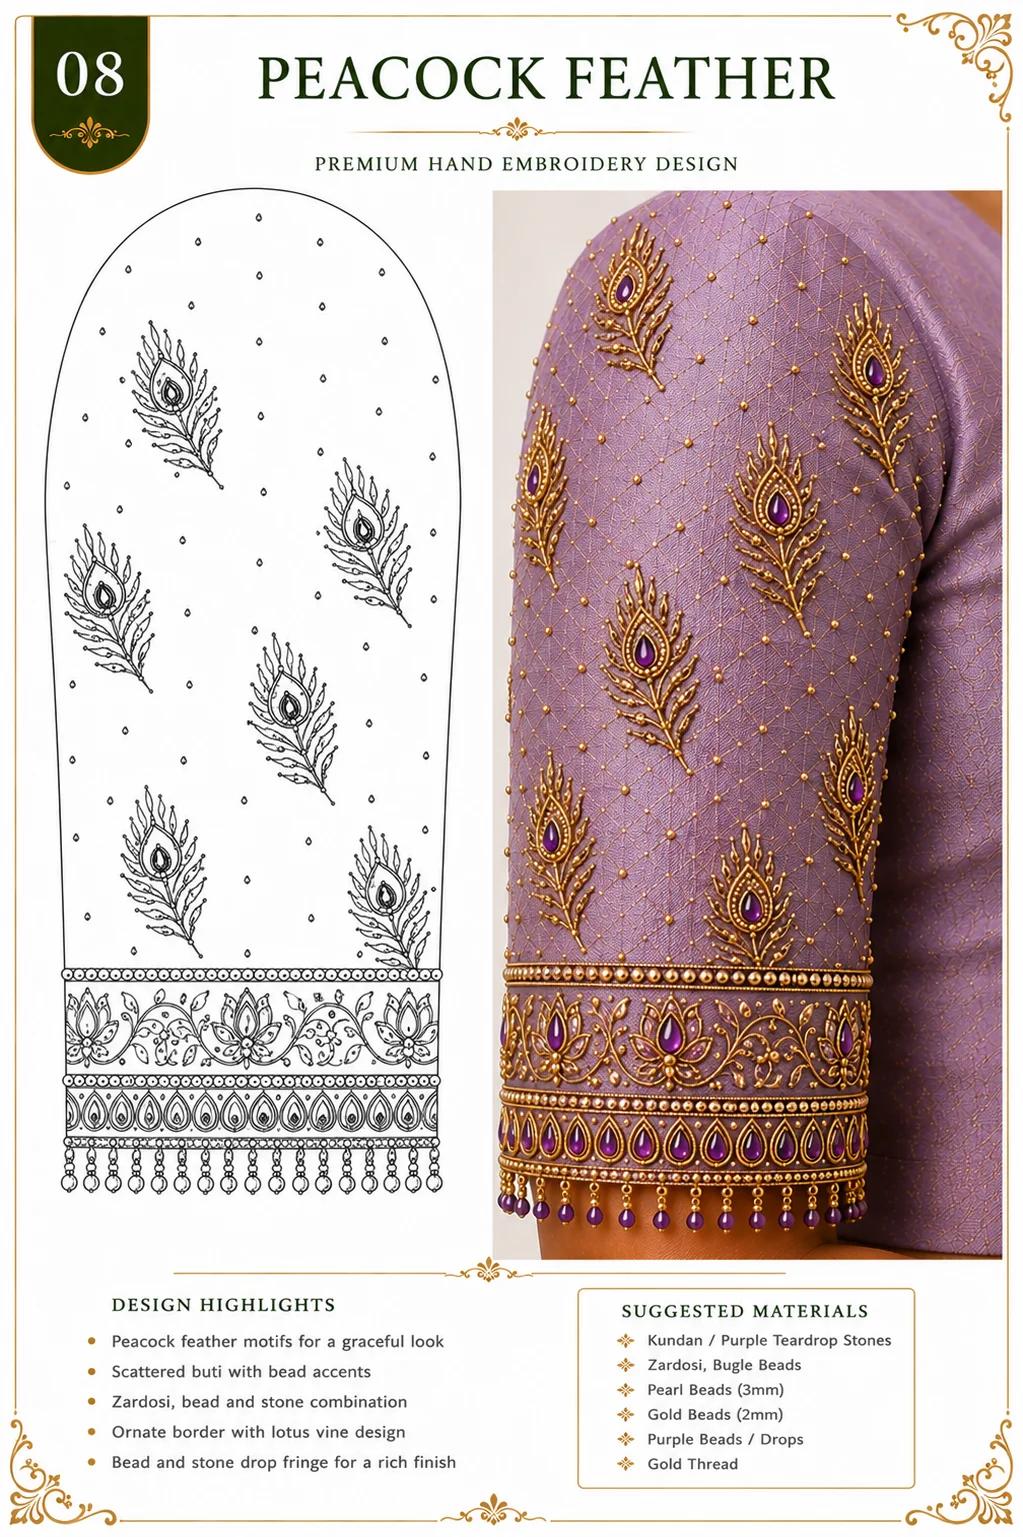
Design 08: A graceful peacock feather motif pattern designed for a rich, textured look on sleeves.
Peacock feathers are the gold standard for traditional Indian embroidery. The trick is in the gradient. Start with a darker stone at the center and radiate out with lighter beads. This creates the illusion of a glowing eye. Keep the surrounding buti work light so you don't compete with the feather itself. Many people make the mistake of over-decorating the background. Which washes out the main motif. Let the feather breathe. Use long. Sweeping stitches for the quill to give it a natural, flowing appearance.
The Mughal Garden and Lotus Jaal
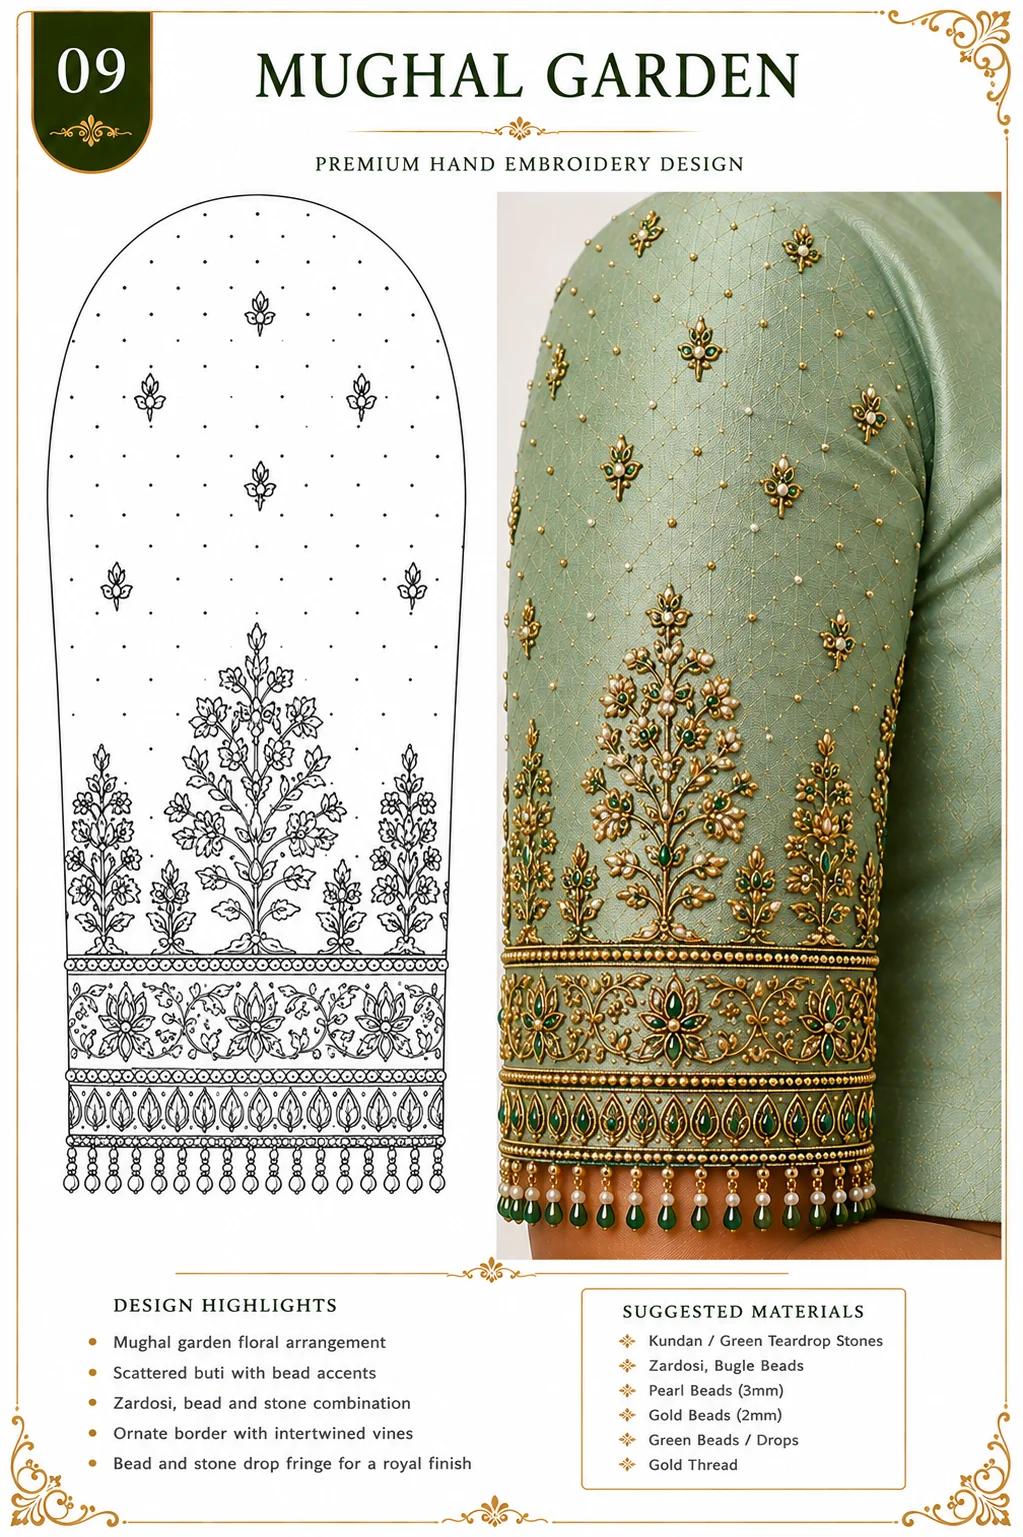
Design 09: An elaborate Mughal garden-inspired floral arrangement that brings heritage charm to the sleeve.
Here's the thing: here's the thing: garden motifs require a delicate touch. You're mimicking nature, so the vines should feel organic, not robotic. Vary the height of your floral stems slightly so the design doesn't look like a stiff grid. The Mughal aesthetic is all about richness. So feel free to use multiple shades of green for the leaves. This adds a depth that a single color can't achieve. As you fill in the stems. Use a tight chain stitch to give them enough strength to support the weight of the beads.
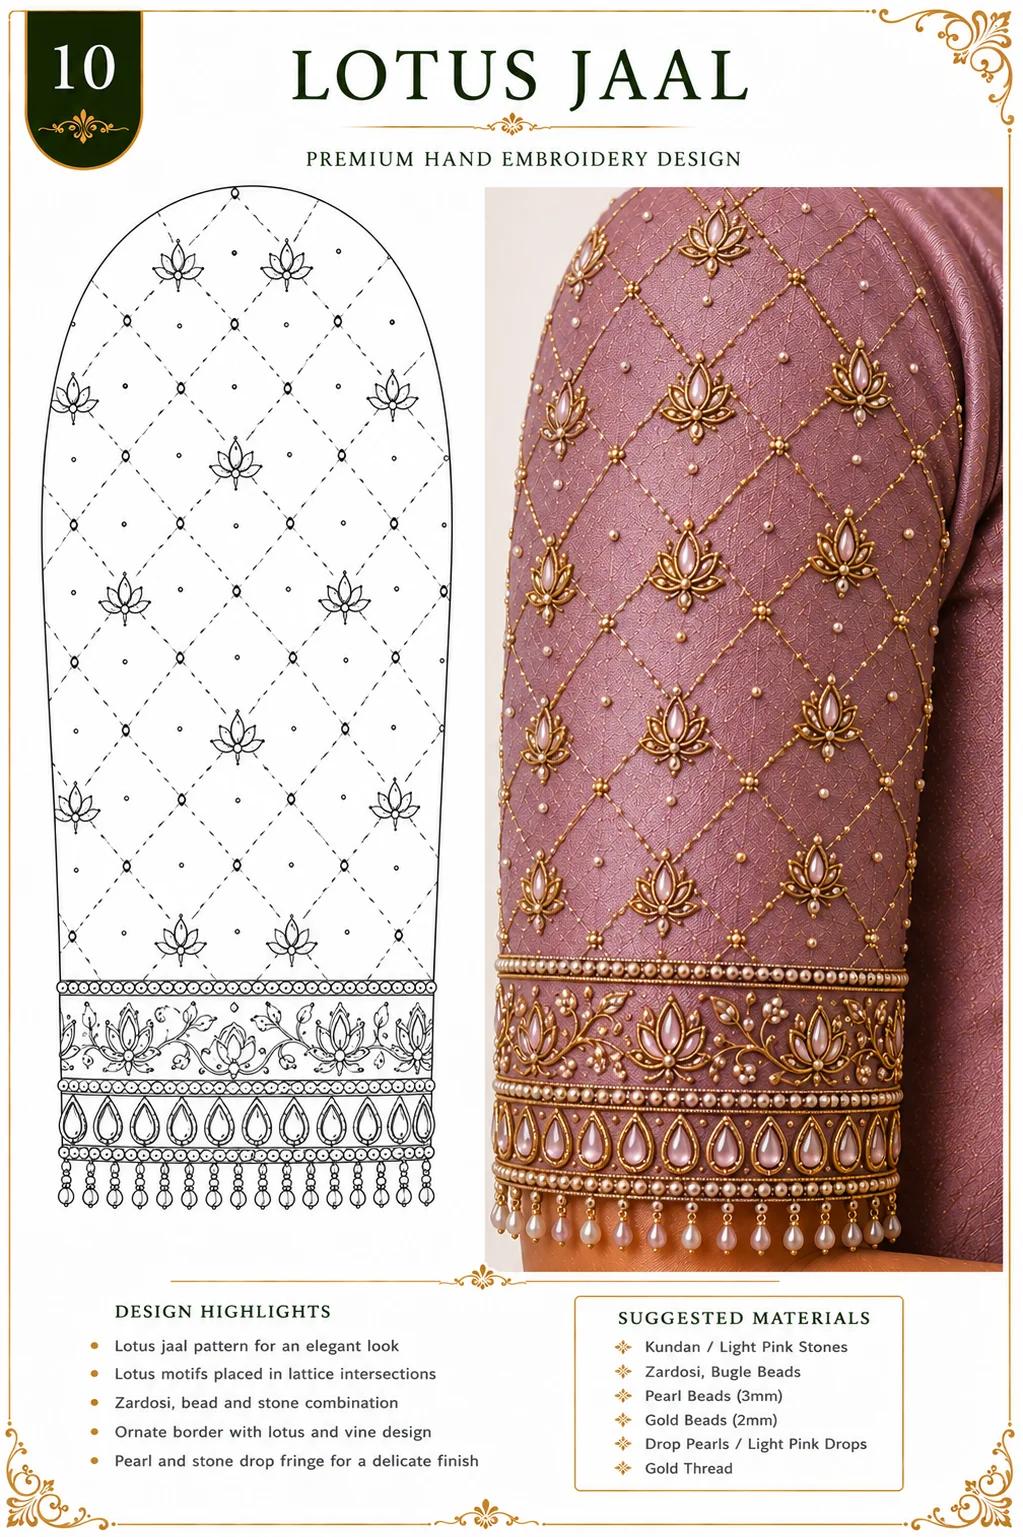
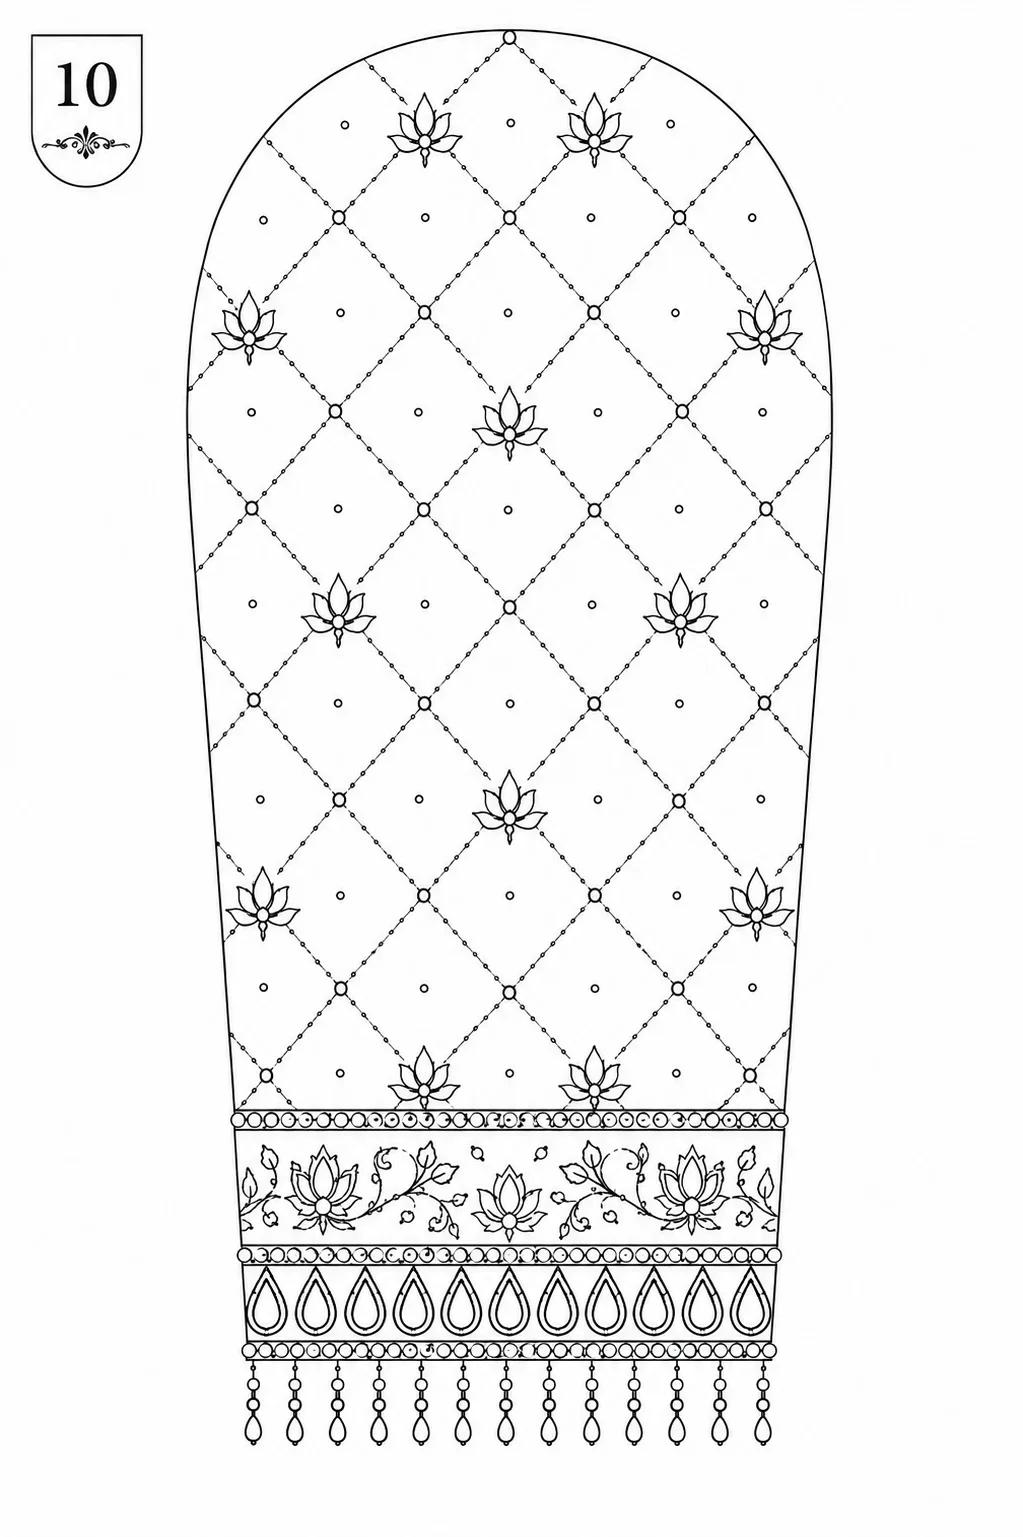
Design 10: A mesmerizing lotus jaal pattern where motifs sit within a perfect grid for a classic look.
And here's what's interesting: and here's what's interesting: grid-based designs like the Lotus Jaal are deceptive. They look simple, but the alignment is everything. If one lotus is tilted, the whole row looks wrong. Take your time with the initial marking. Use a fine-point white marking pen. When you start stitching. Work from the top down. This ensures that any slight fabric shift doesn't ruin the bottom border. The fringe on the bottom should be sparse and intentional. Too many beads will make the sleeve heavy and uncomfortable to wear for long periods.
Defining Elegance: Mehroon and Sheesh Mahal
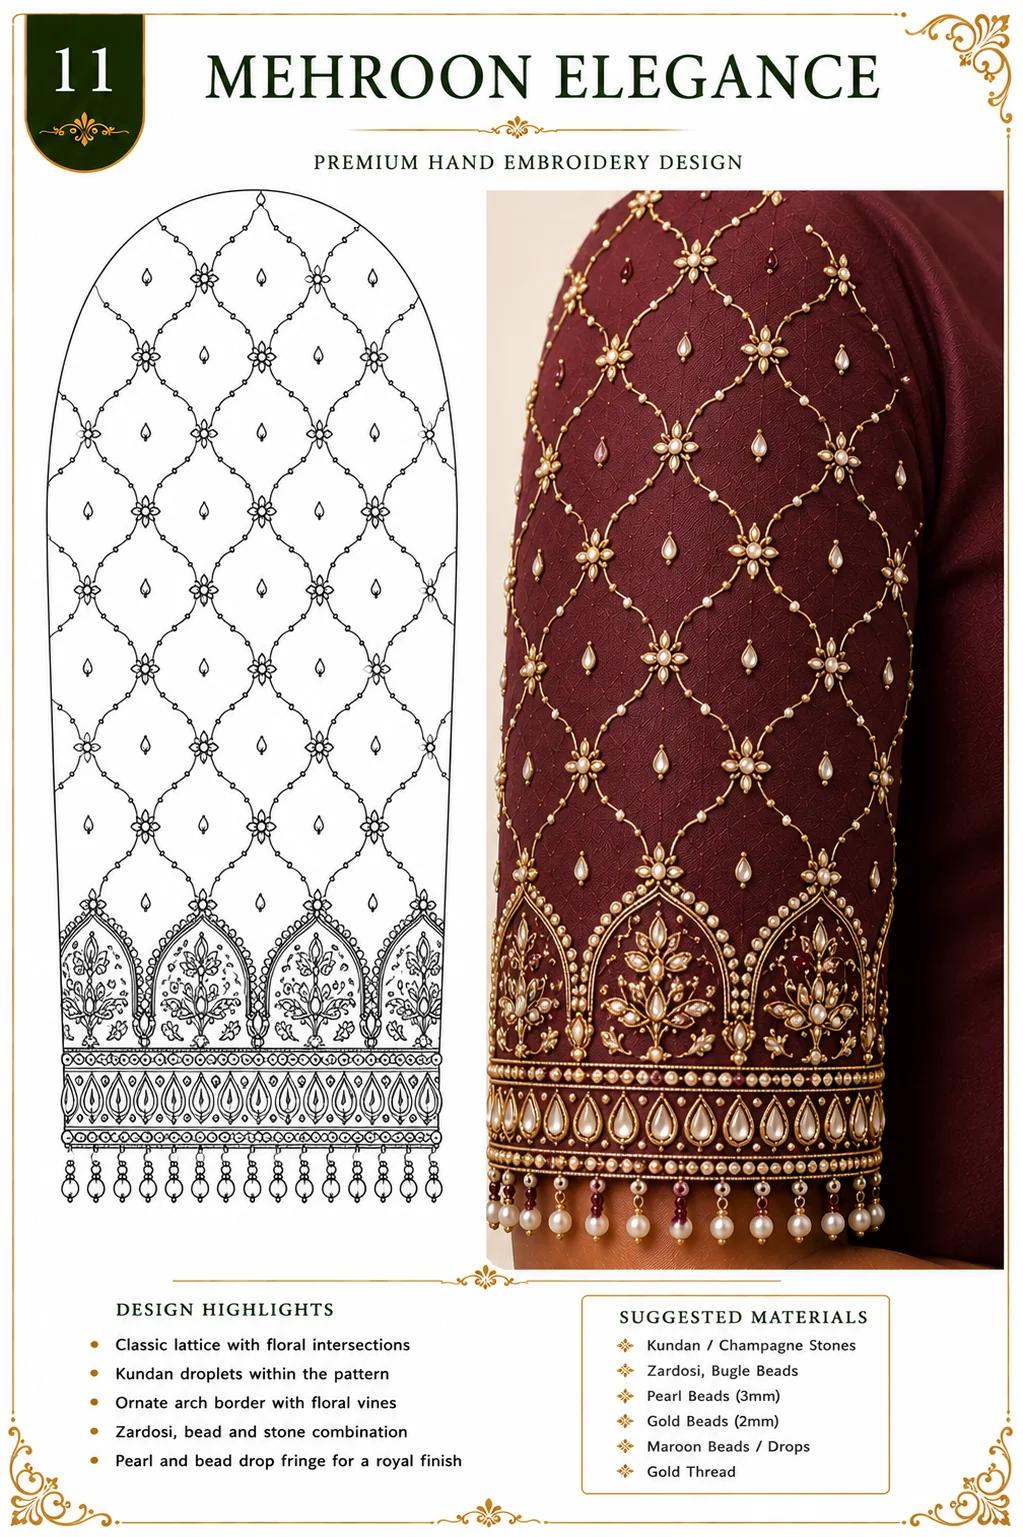
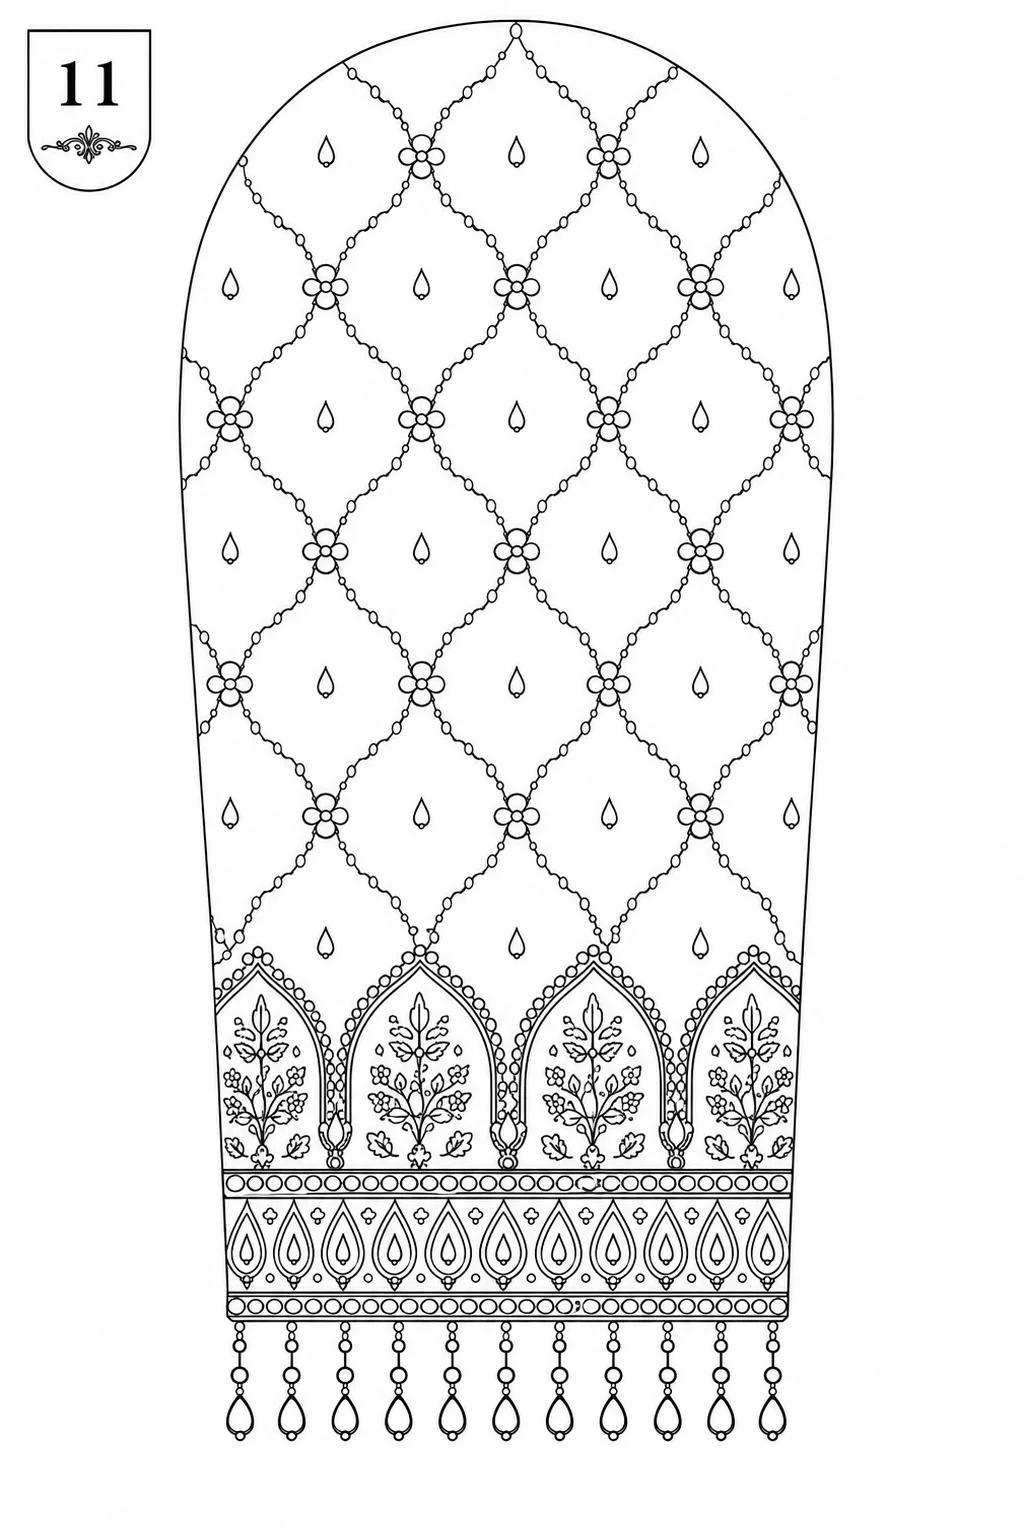
Design 11: A sophisticated deep red-toned design featuring classic lattice work and elegant floral intersections.
Deep colors need metallic highlights to pop. In the Mehroon design, the gold thread does the heavy lifting. Ensure your gold zari is of high quality so it doesn't tarnish against the dark fabric. The small stone droplets are perfect for adding tiny flickers of light without requiring a full stone cluster. This is an excellent choice for a bridesmaid or an engagement look where you want sparkle that's elegant rather than loud. Always use a back-stitch for securing your stones to ensure they stay put.
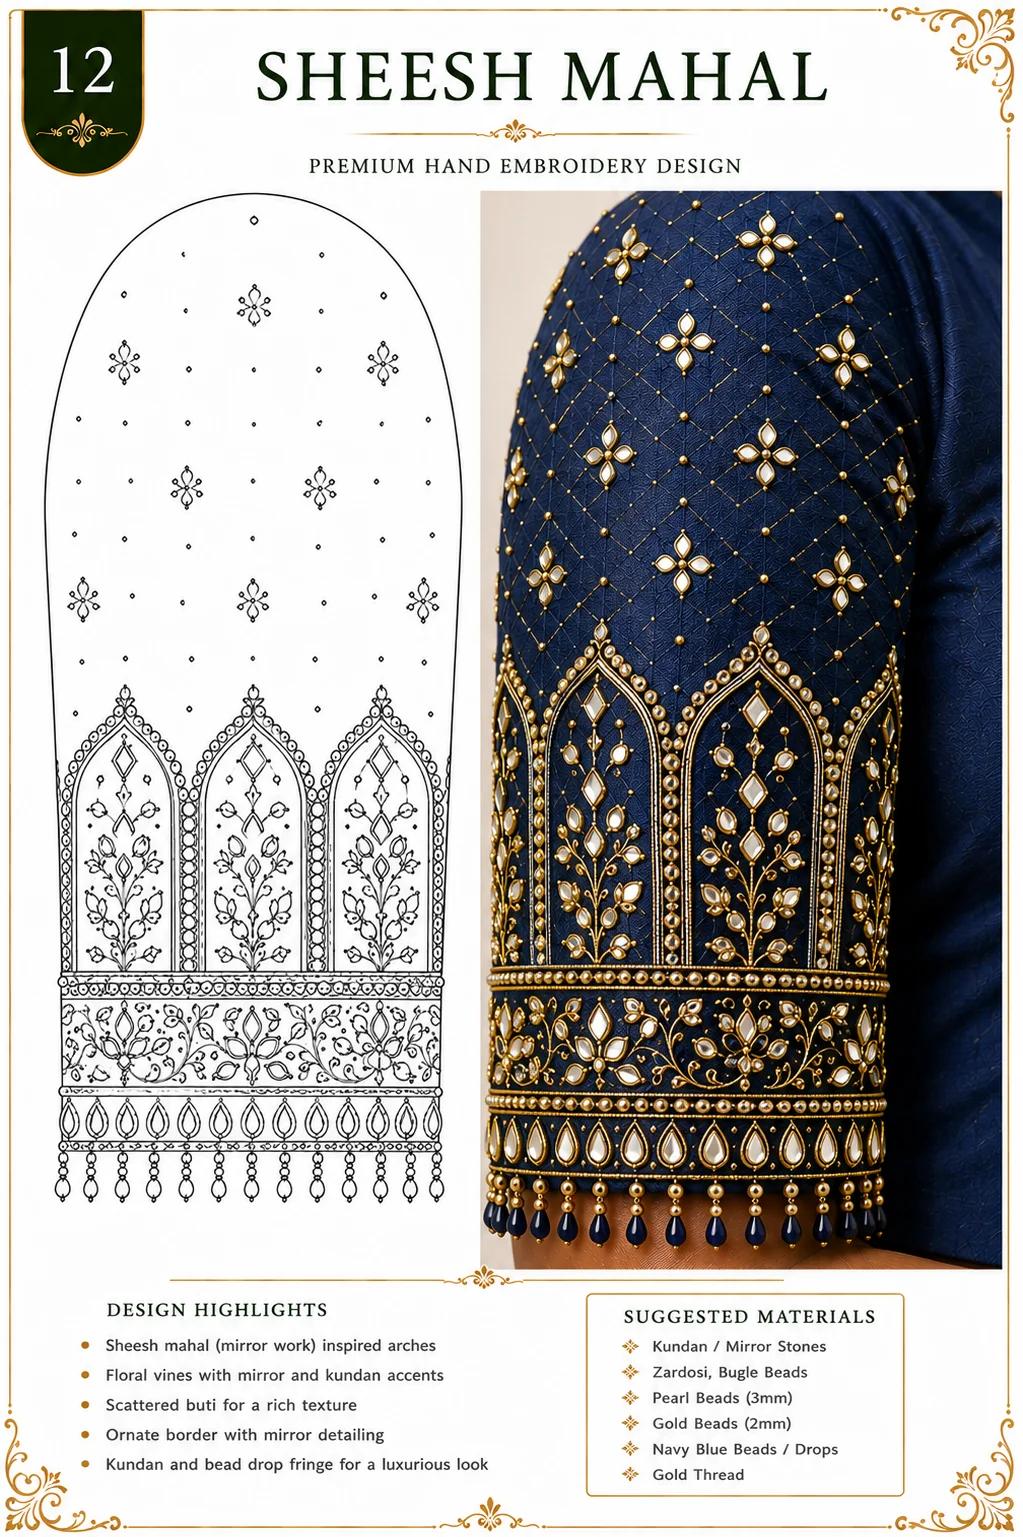
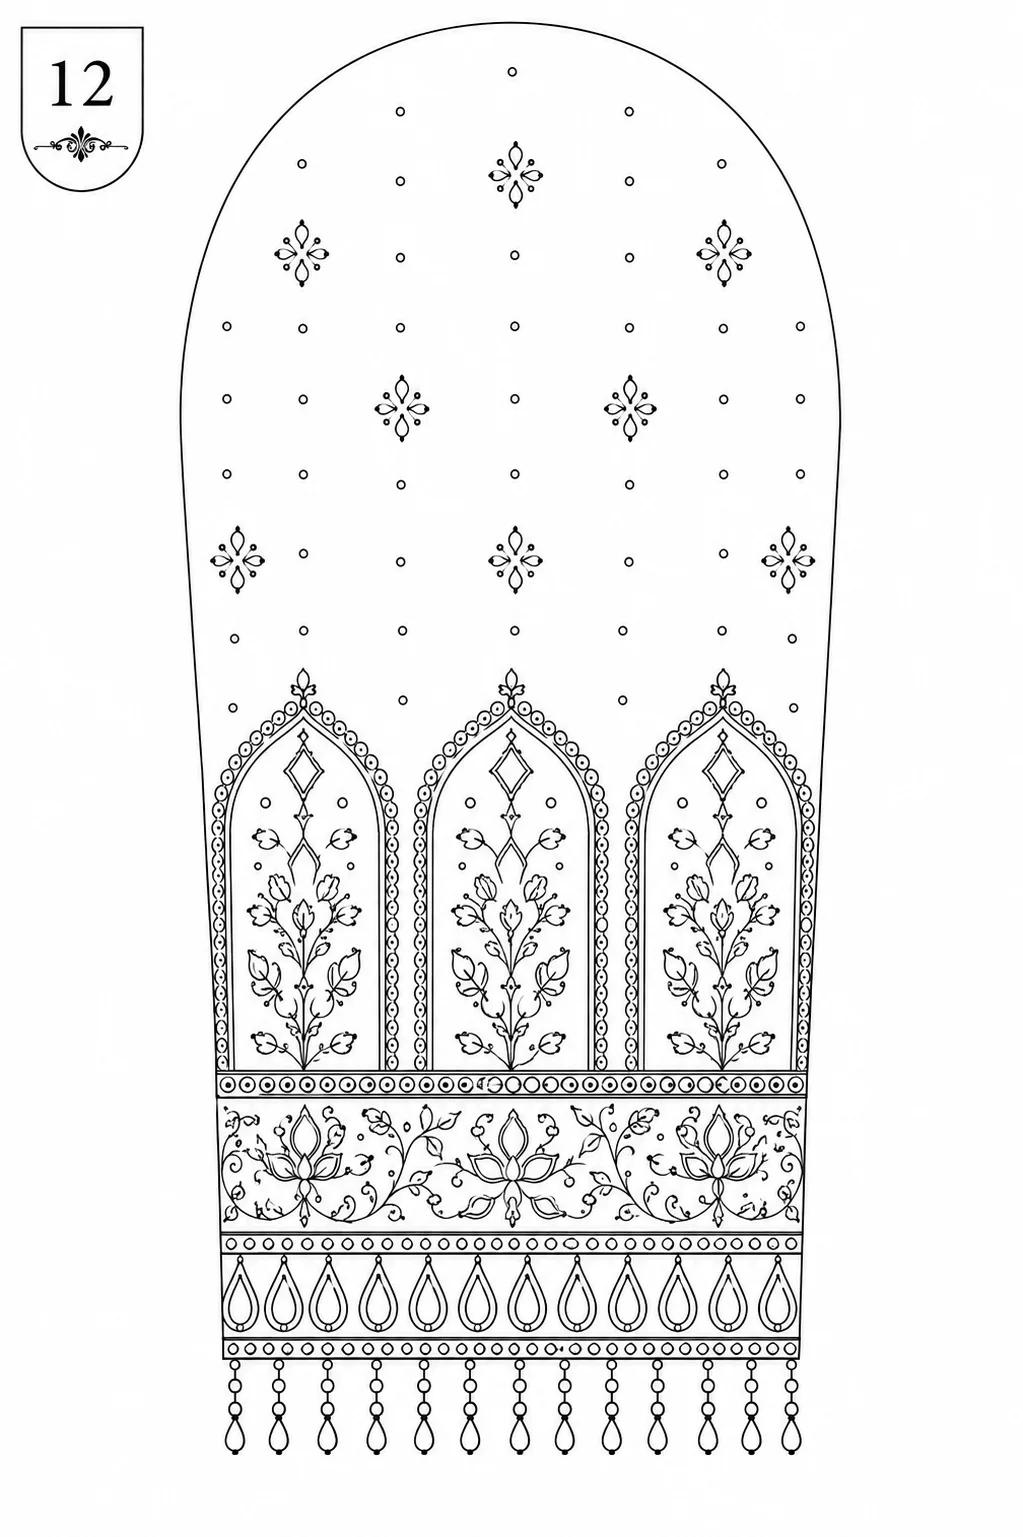
Design 12: A mirror-work inspired design that mimics traditional palace architecture with intricate vine details.
Mirror work catches light like nothing else. In the Sheesh Mahal design, the mirrors are your focal points. If you're using real mirrors, secure them with a strong buttonhole stitch. If you're using plastic or acrylic. A simple cross stitch will suffice. The vines should be kept thin to contrast with the broad shape of the mirrors. This balance is key to making the design look like a cohesive piece of jewelry rather than a collection of random parts scattered on the fabric.
Heritage and Morni Sophistication
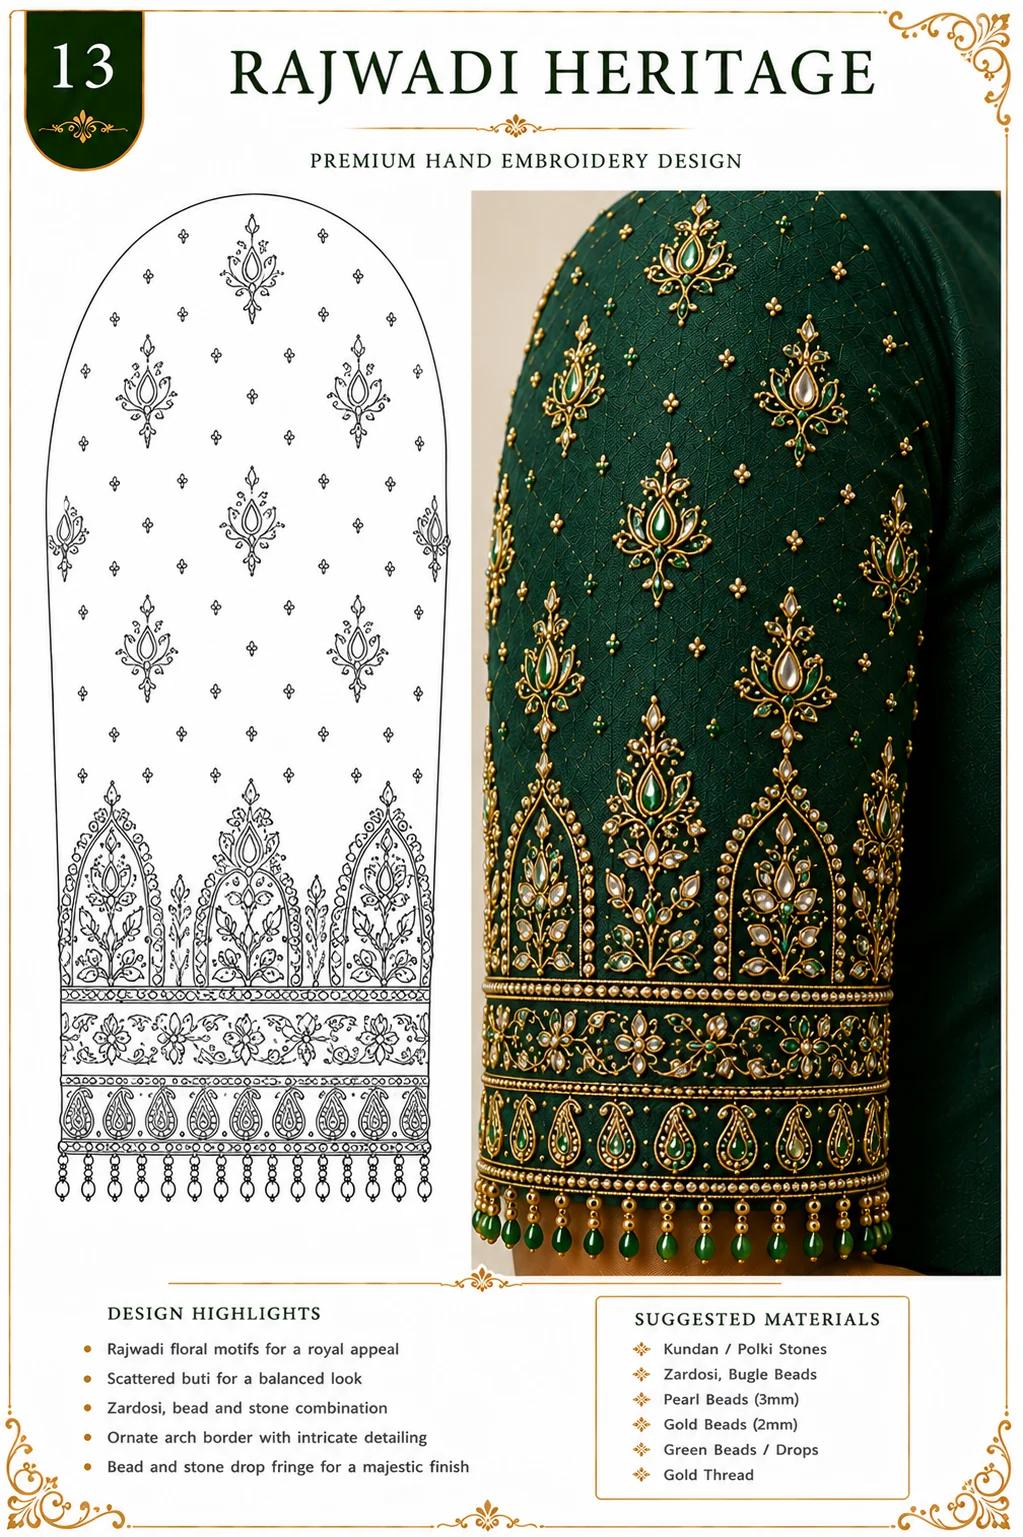
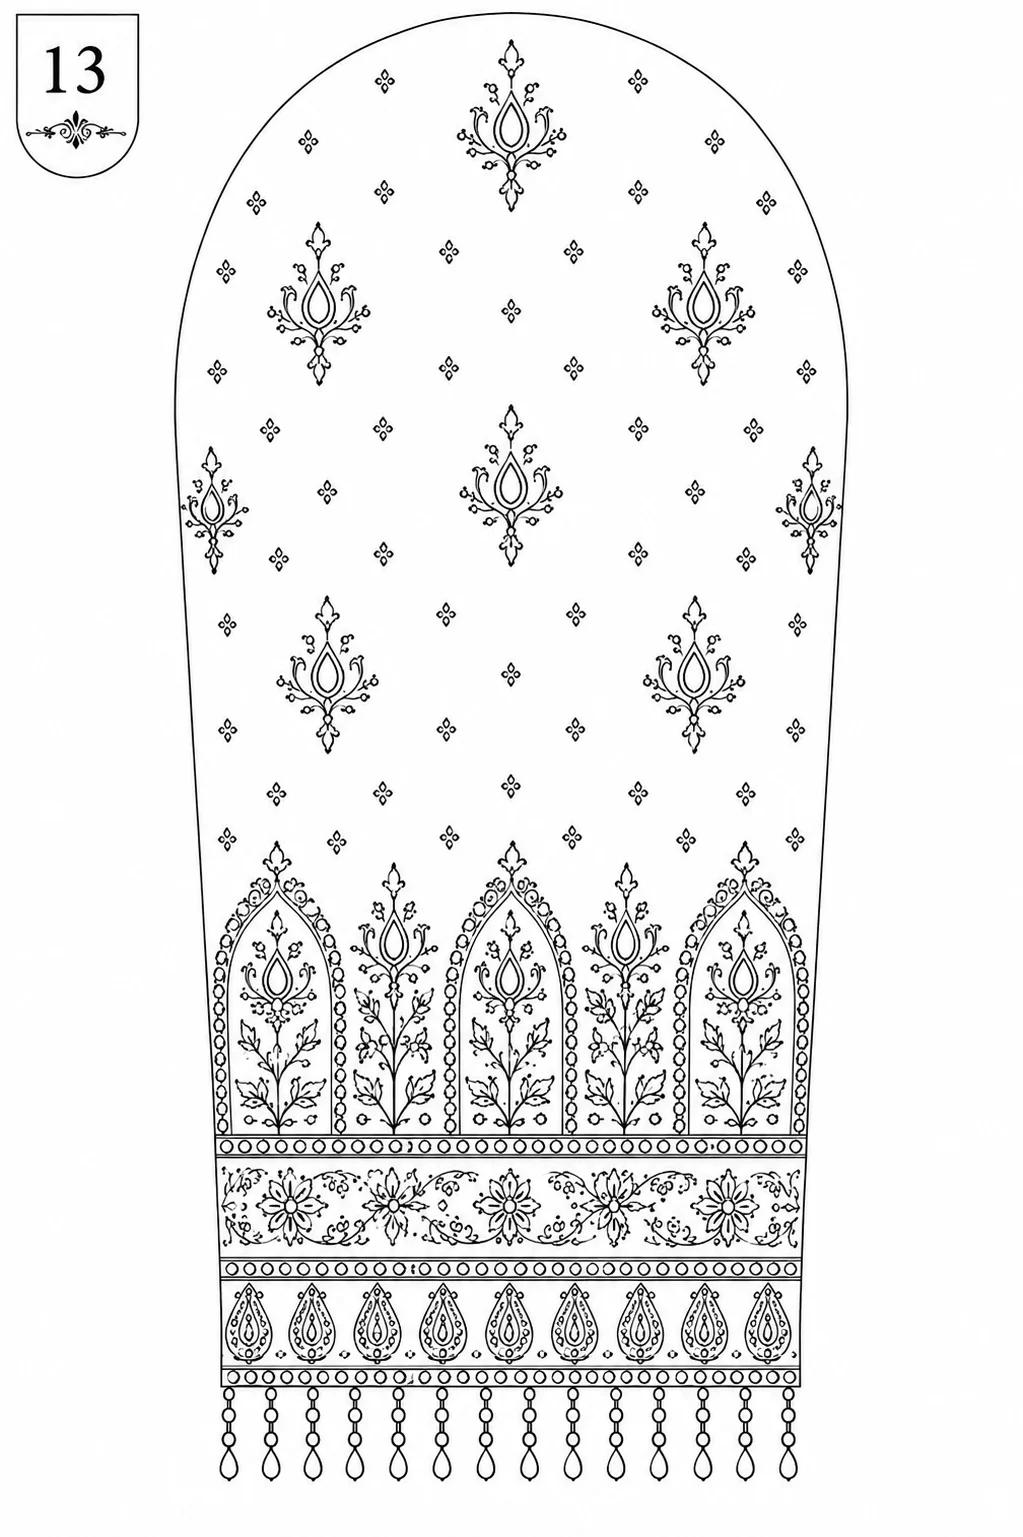
Design 13: A heritage-inspired design with complex arch motifs that celebrate traditional craftsmanship.
Rajwadi patterns are heavy and regal. They're best suited for bridal sleeves. You'll notice that the bottom border is particularly wide, which serves to balance the weight of the hand. When you work with this many stones, plan your work around the weight. If your fabric is light georgette. You must use a strong interfacing to prevent sagging. Never skip the backing material. It's the secret to getting a clean. Flat finish that doesn't buckle under the pressure of the needles and the weight of the heavy stones.
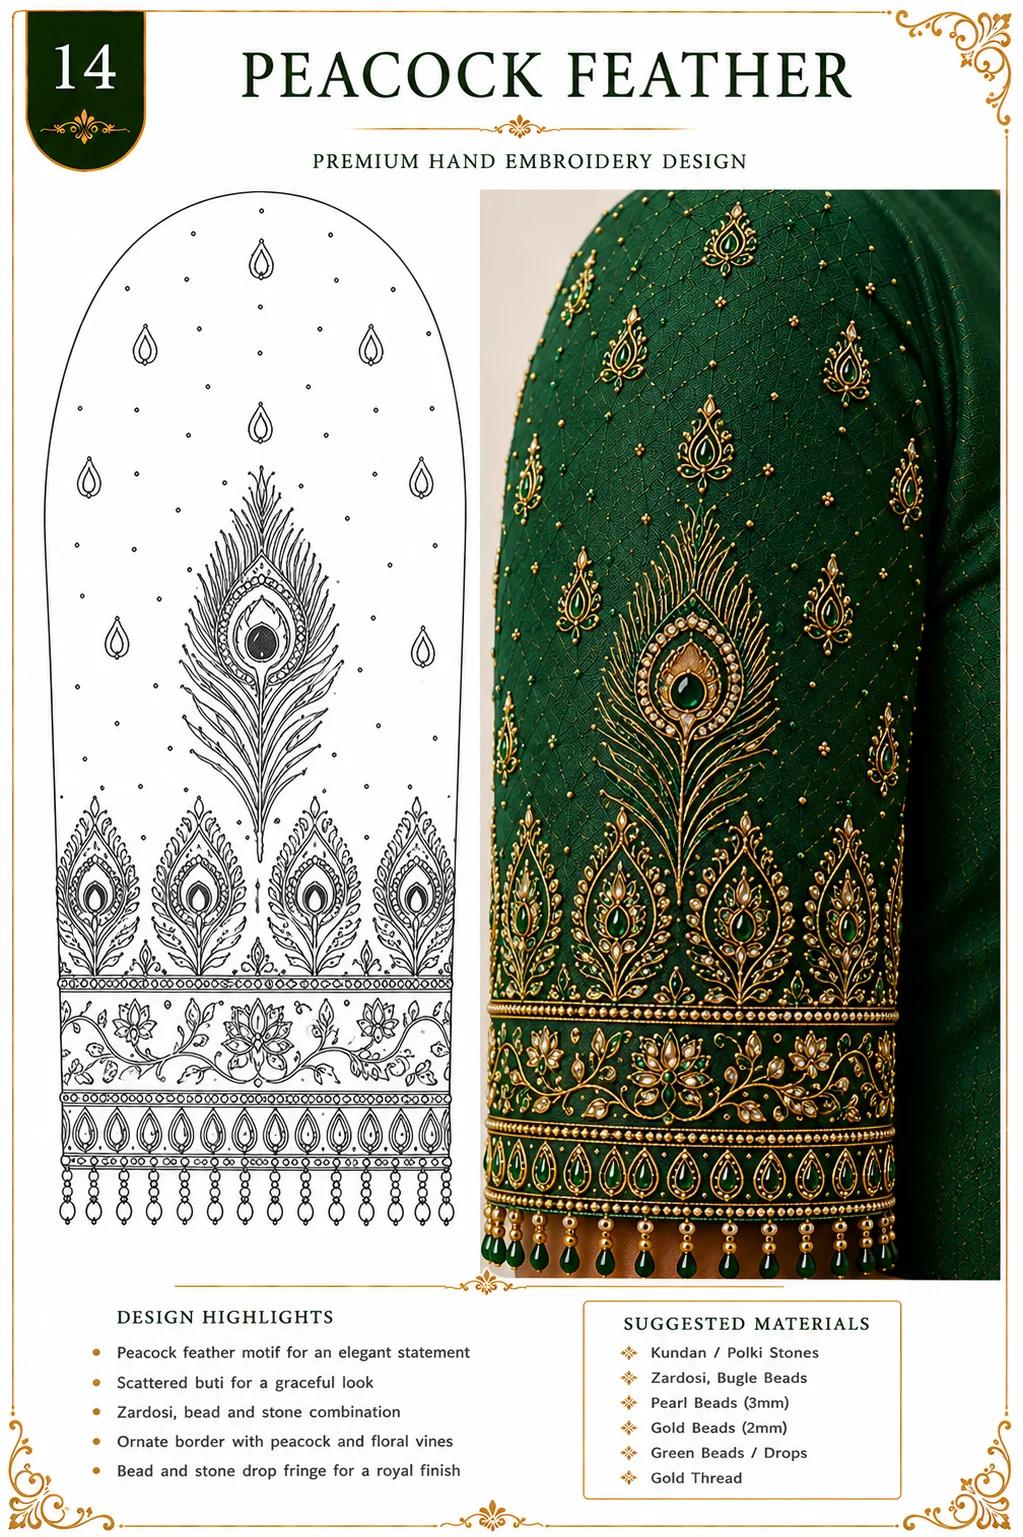
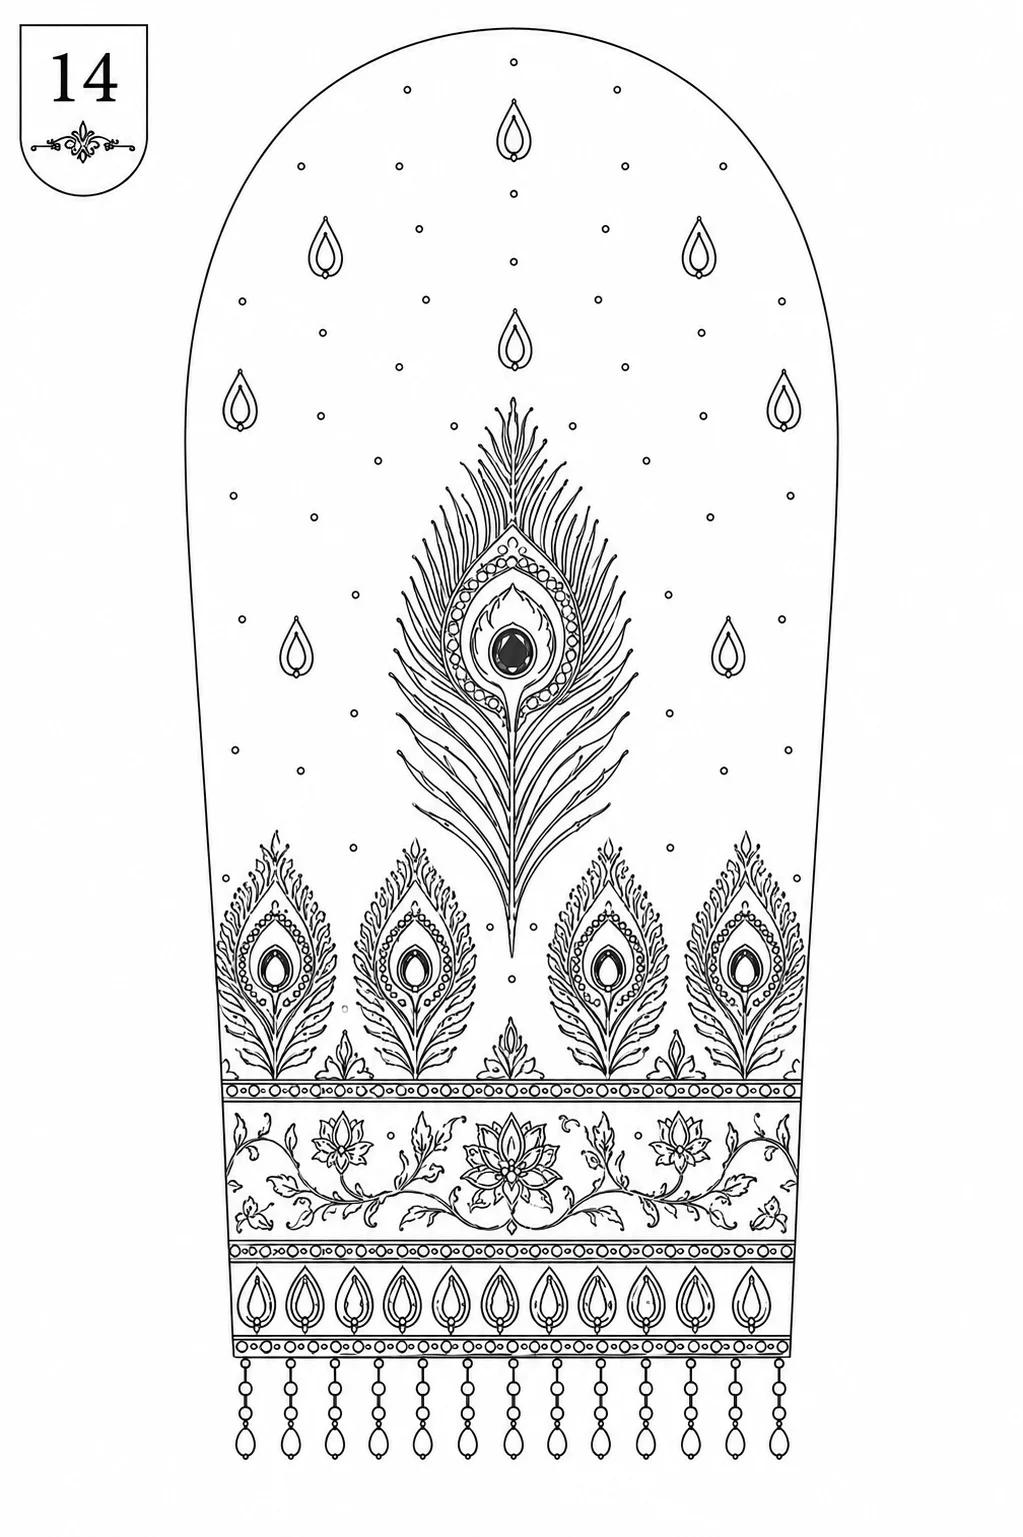
Design 14: A striking peacock-inspired design that centers a large bird motif with delicate floral support.
The Morni or peacock motif is the centerpiece of this design. Because it's large, spend extra time on the outline. If the bird's head is off-center, the whole design feels awkward. I prefer to outline the bird in a single continuous thread before adding any color or fill. This gives me a clear boundary. Once the outline is perfect. The filling process becomes much more relaxing. The border below should be kept simple so it doesn't fight the peacock for attention.
Modernizing Tradition: Zaar Blossom and Heritage Jaal
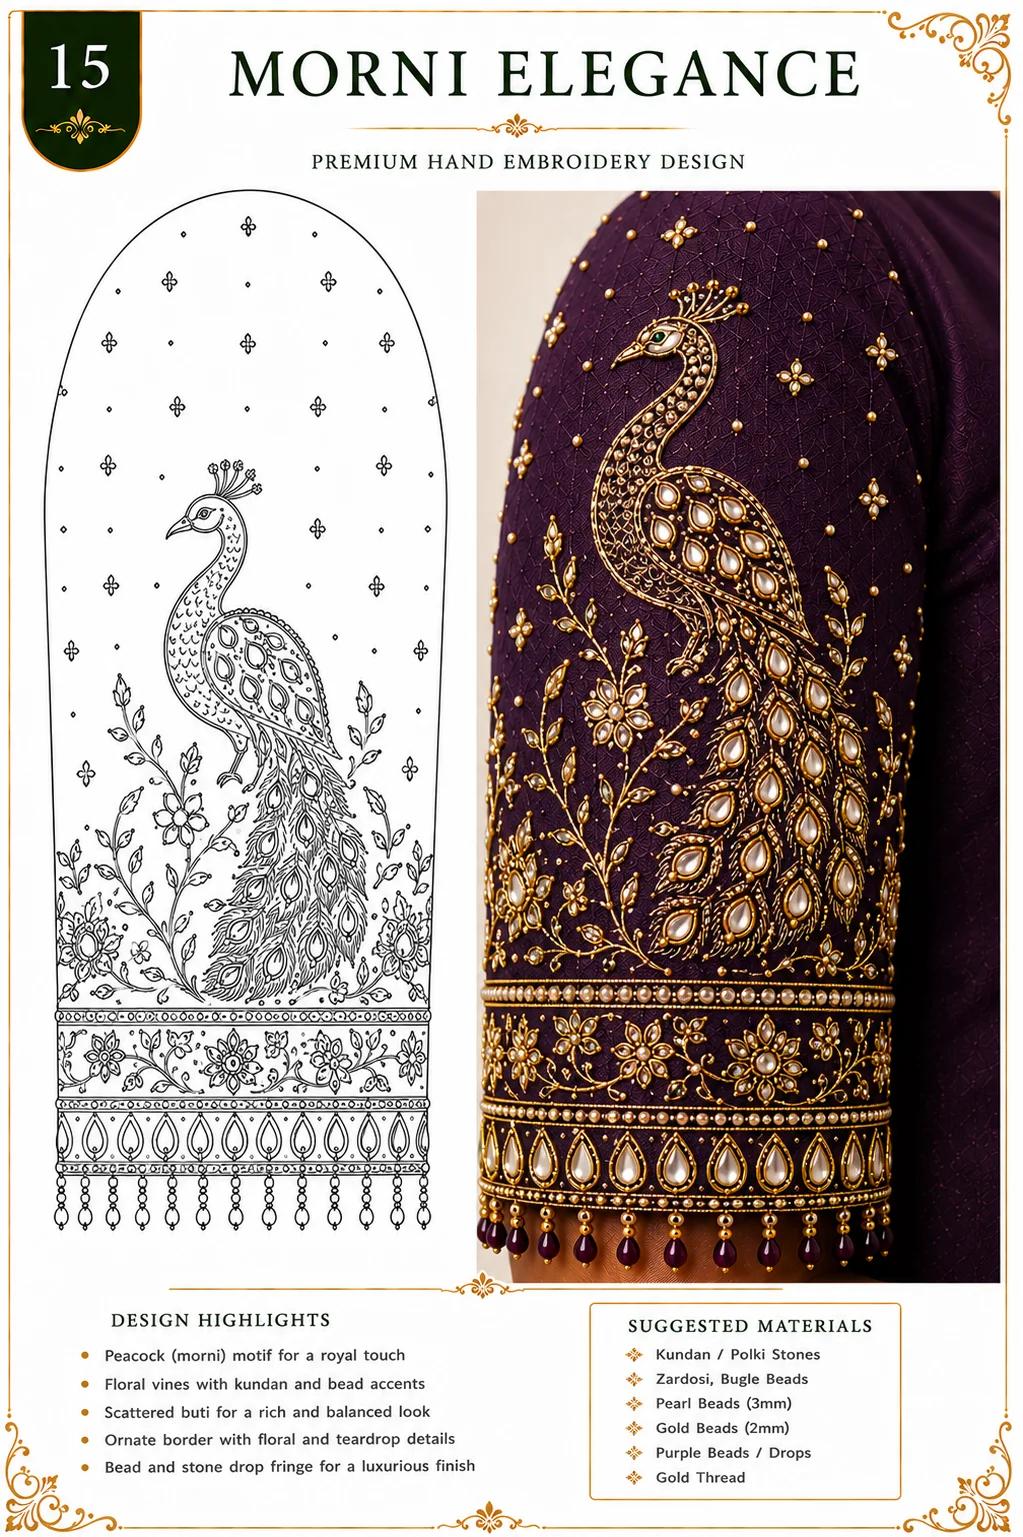
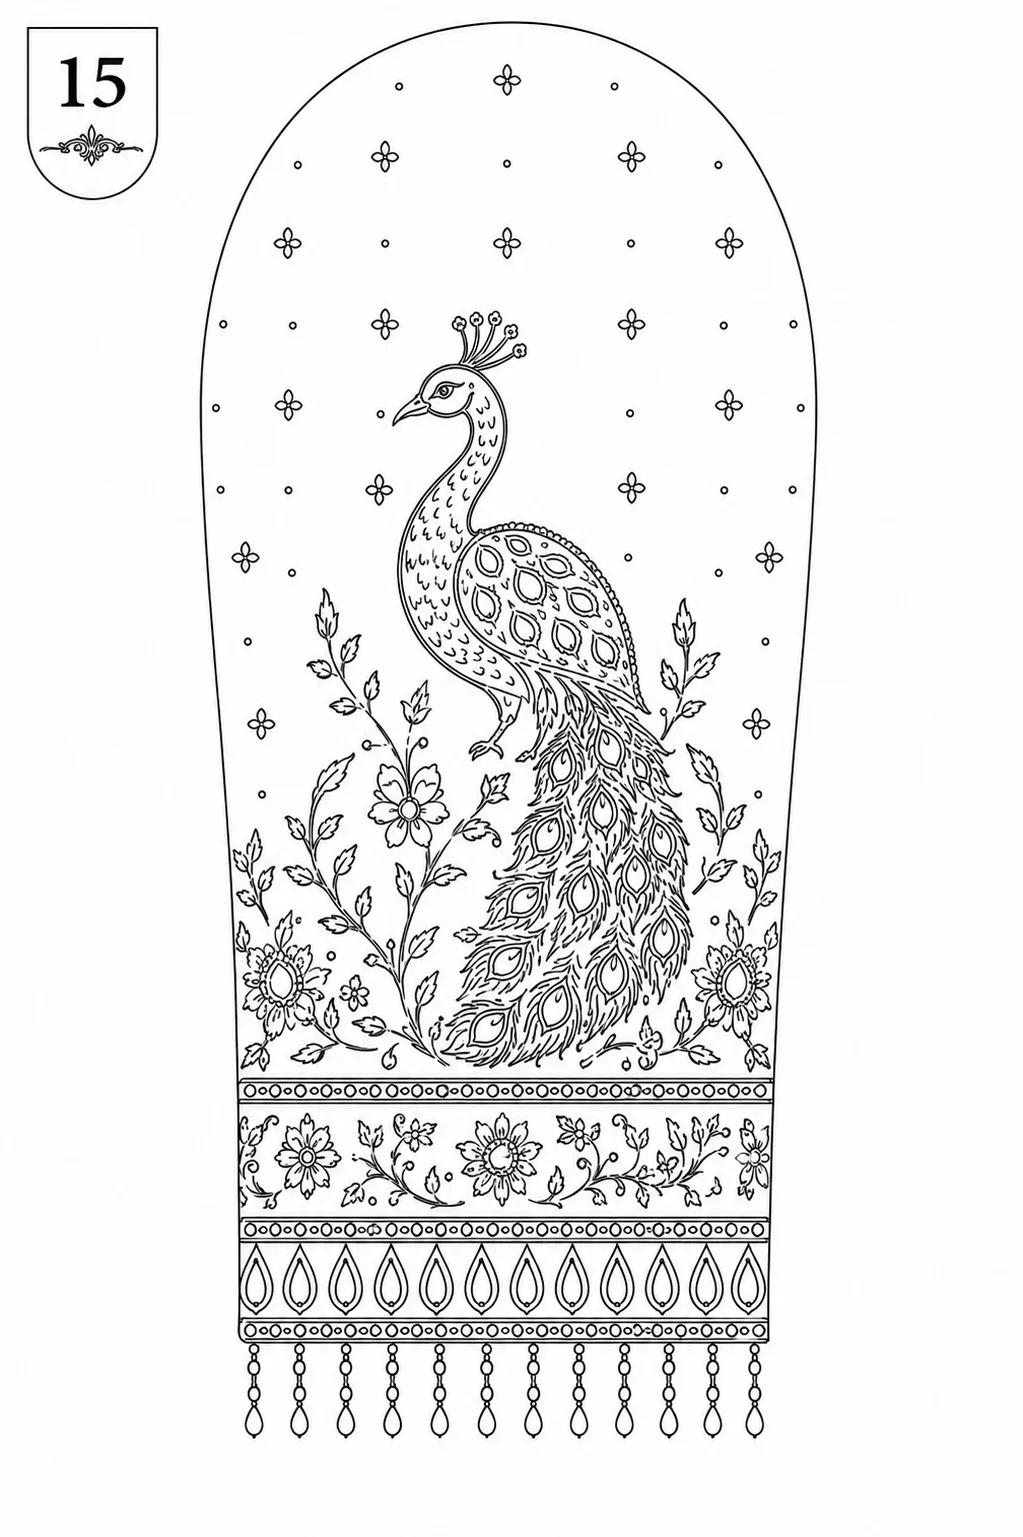
Design 15: A modern floral blossom design that incorporates scattered motifs for a light and airy feel.
Sometimes, less is more. The Zaar Blossom design is all about negative space. It feels airy and light, making it a great option for day-time weddings or summer functions. The blossoms act as anchors, while the scattered leaves fill the space between. Don't feel pressured to cram every inch of fabric with thread. The beauty of this design lies in how the base fabric shows through. Choose a high-quality silk or satin to make this design stand out even more against the skin.
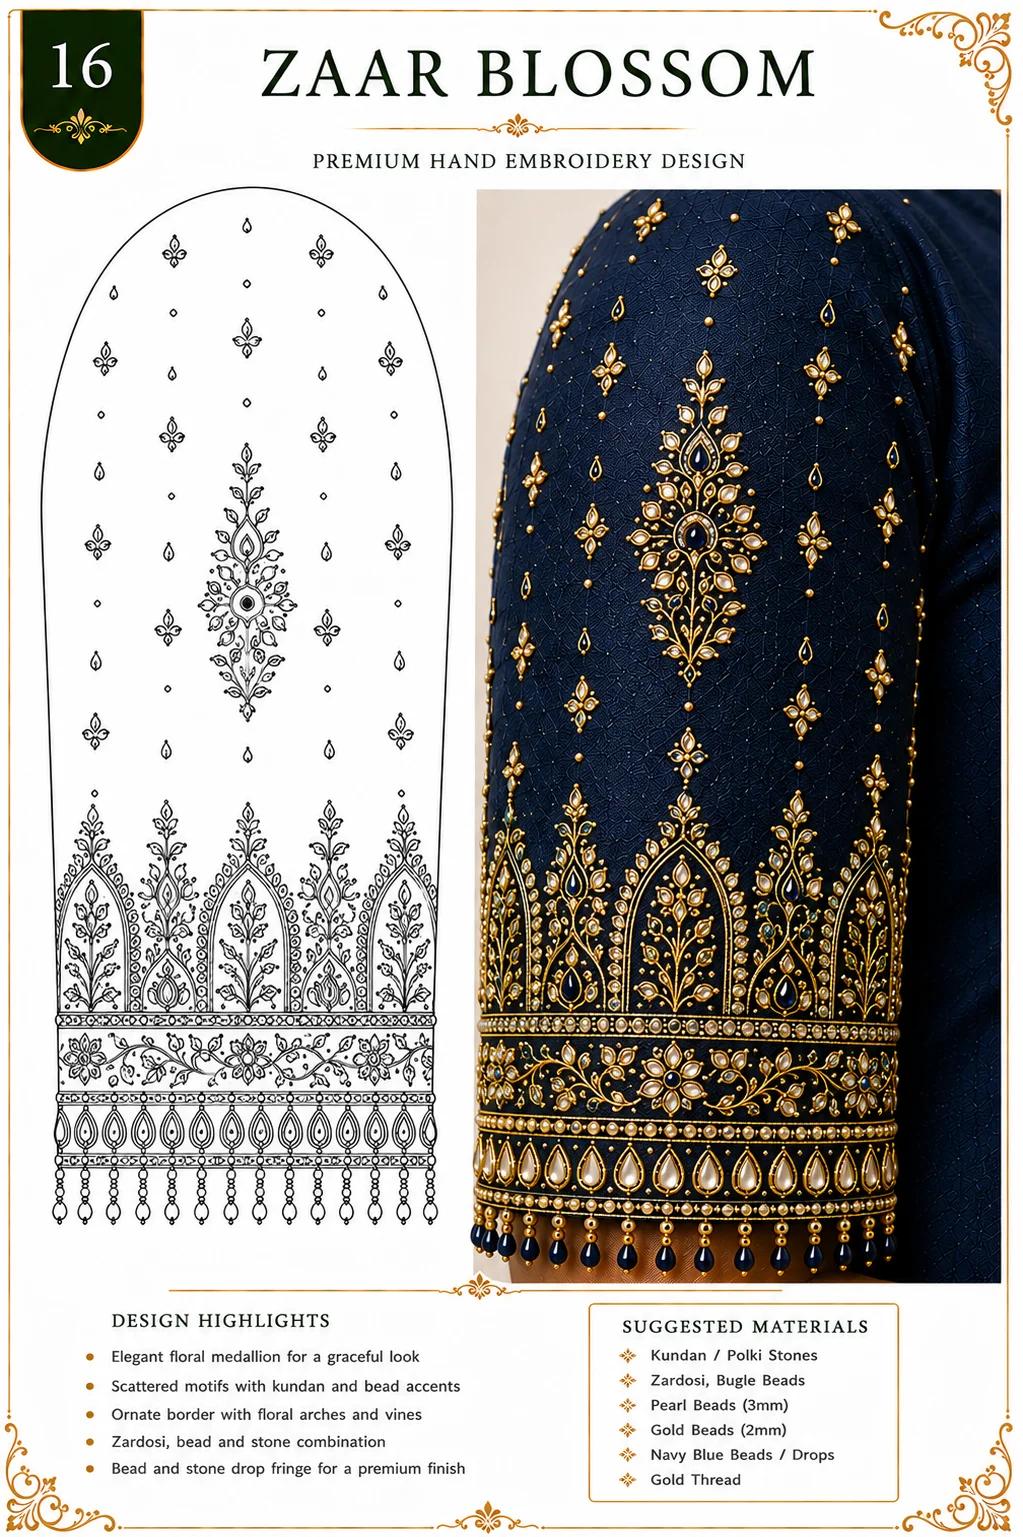
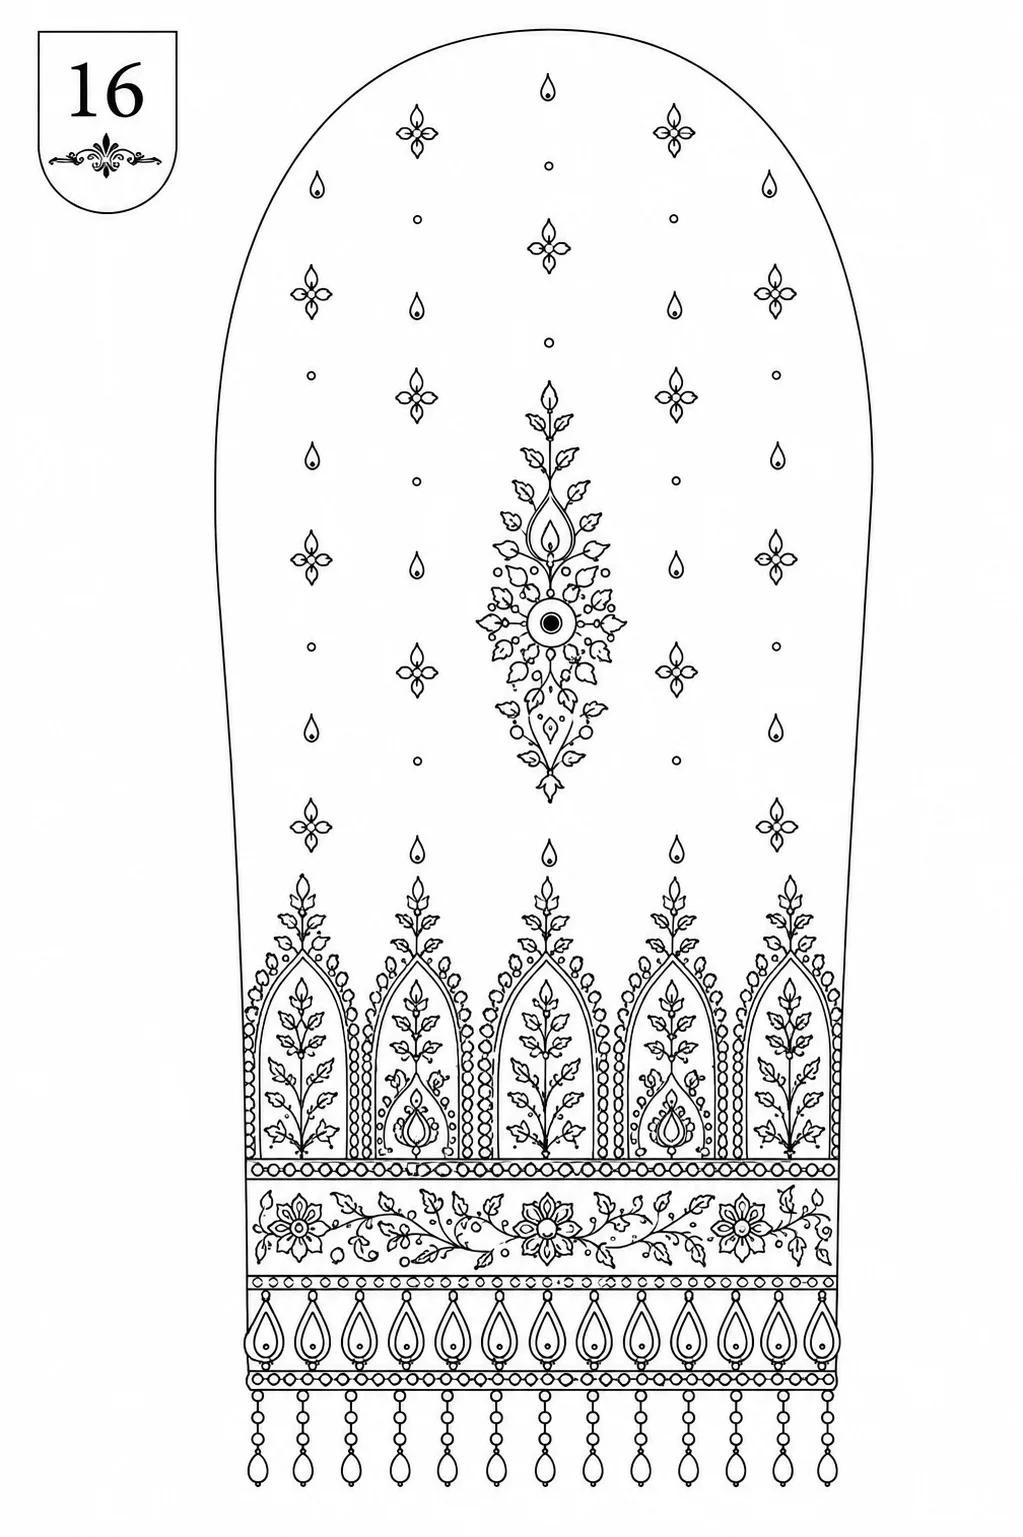
Design 16: A traditional jaal pattern that utilizes mirror work and floral motifs to create a regal aesthetic.
This is a classic take on the jaal. The mirrors are placed centrally within the floral frames. It's a very structured design, which makes it great for those who find free-hand work intimidating. You have a clear path to follow. The border at the bottom is highly geometric. So take your time with the corners. If you're using a frame. Make sure the fabric is stretched taut before you begin. Even a little bit of slack can lead to uneven stitch lengths that spoil the symmetry of the jaal.
Botanical Flourish: Royal Vine and Lotus Grace
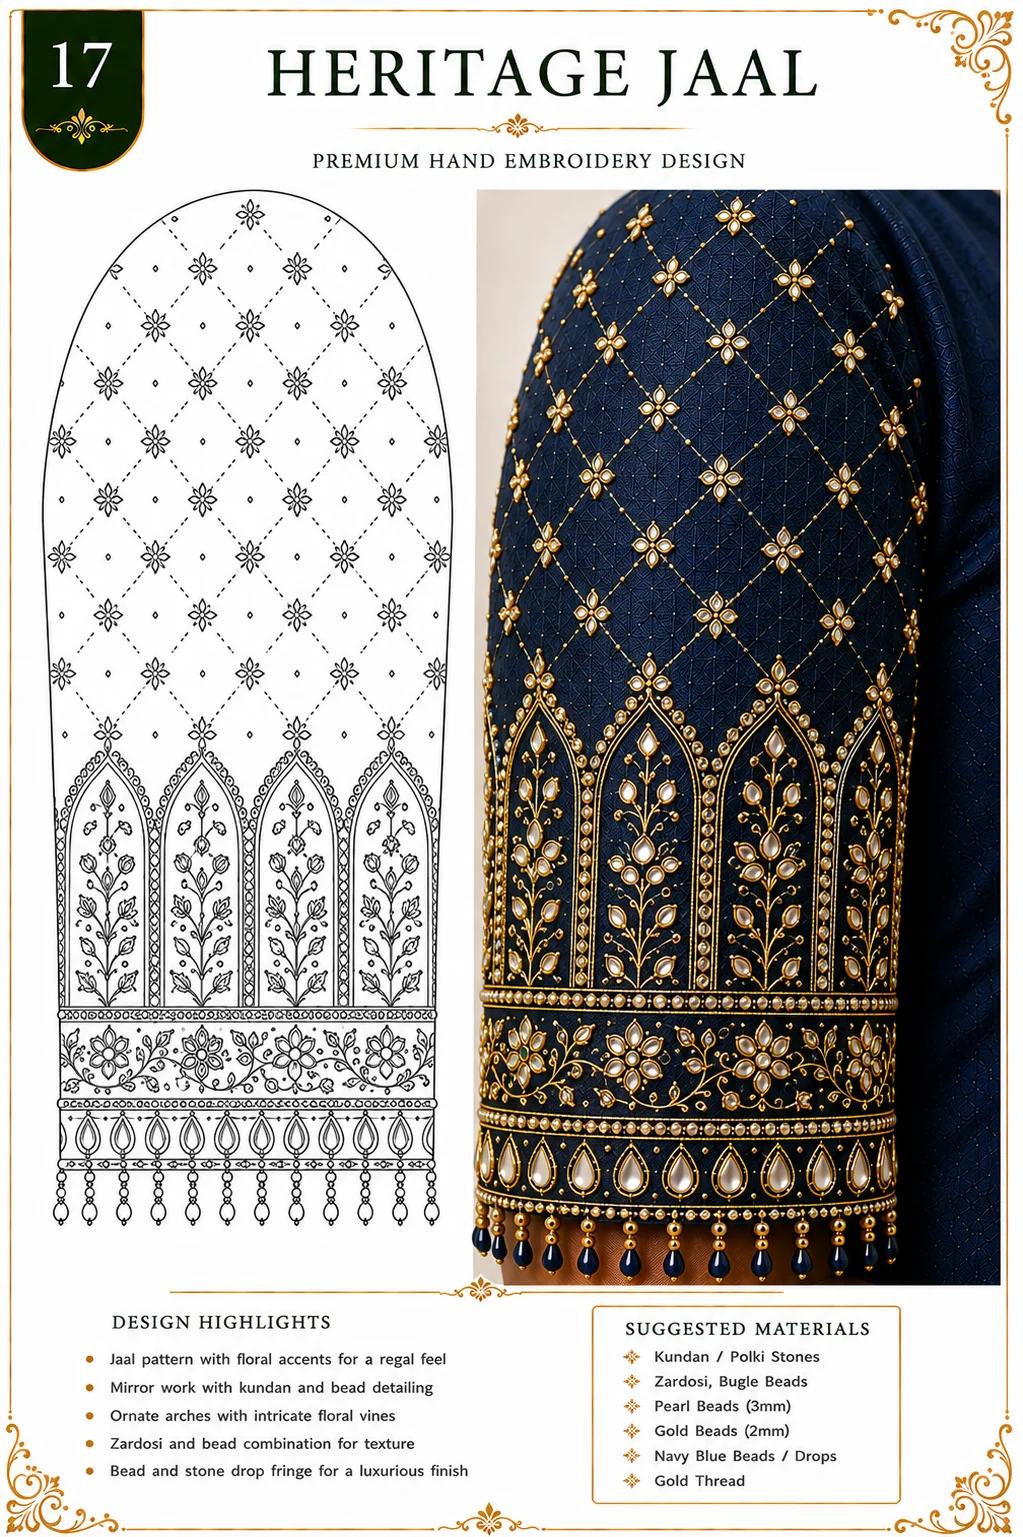
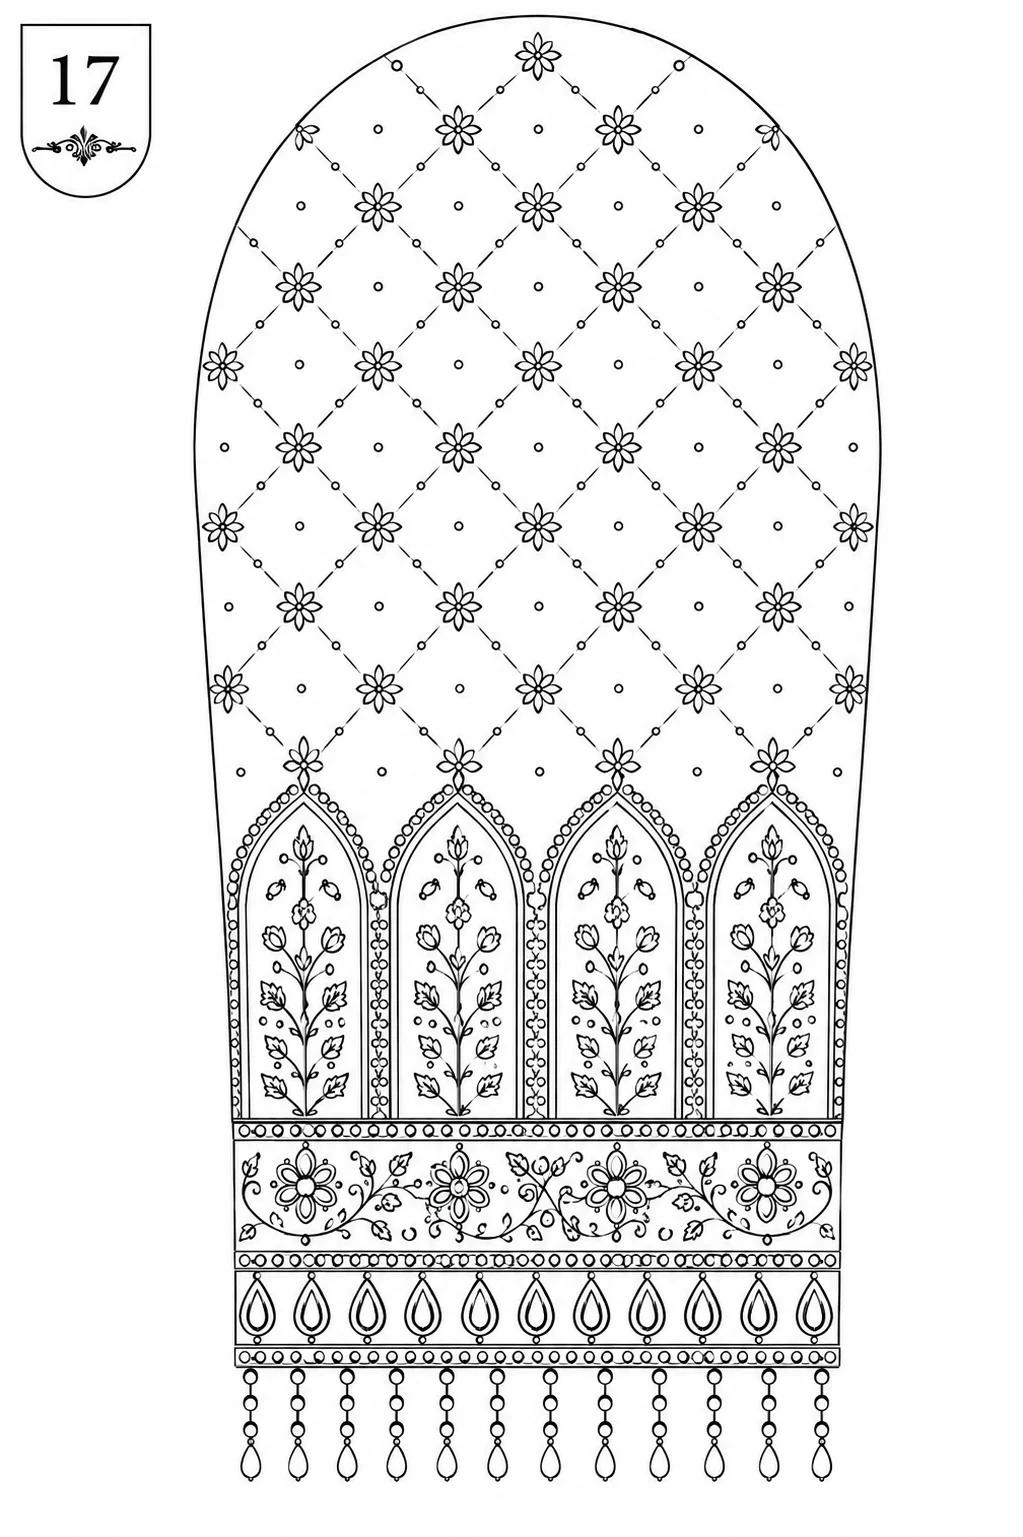
Design 17: A vertical vine design that draws the eye upward, creating a flattering and elongated silhouette.

Premium Zardosi / French Wire for Embroidery
Est. ₹299Check Price on Amazon.in*We may earn a commission if you purchase through this link.The Royal Vine is a masterclass in upward movement. By directing the eye from the cuff up toward the shoulder, you create a sense of height and grace. The floral motifs at the base are dense, while the top of the vine is sparse. This gradient of detail is a pro-level technique that makes your work look more intentional. When tracing this. Make sure the central stem has a gentle. Flowing curve. A rigid, straight line will make the embroidery look like a drawing rather than a natural vine.
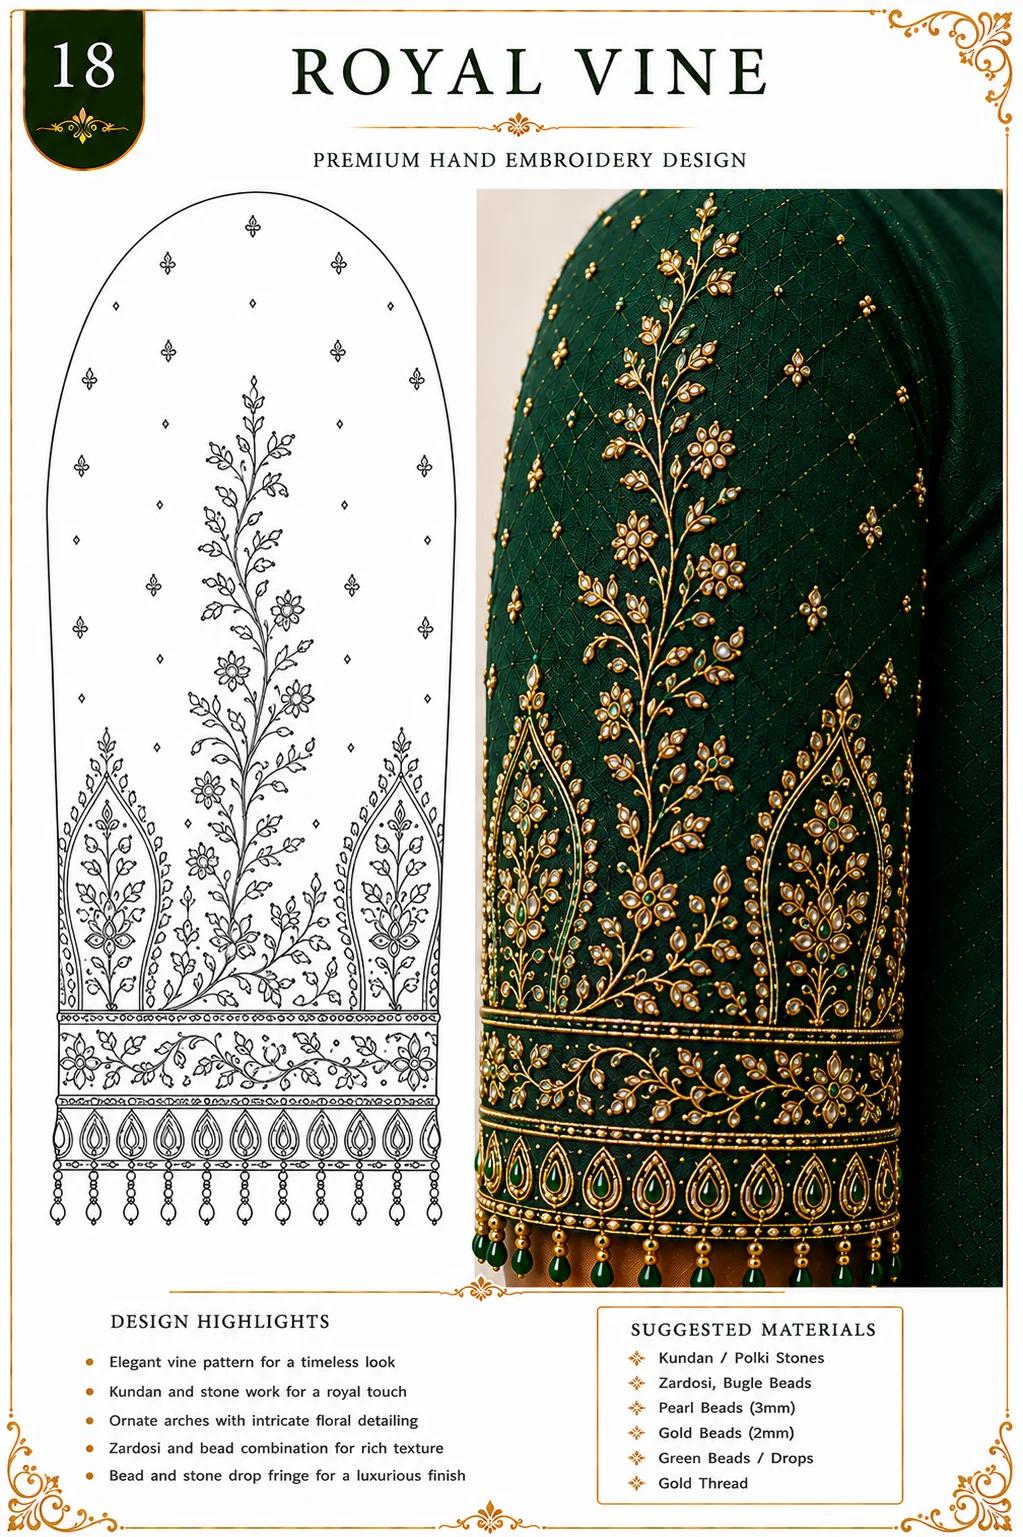
Design 18: A serene lotus-inspired design that brings a touch of calm and elegance to any blouse sleeve.
Lotus Grace is about soft, rounded shapes. Notice that there are no sharp angles here. Everything is a curve. Use a soft, satin-finish thread for the lotus petals to give them a pearlescent sheen. The border echoes the lotus motif. Tying the whole look together. If you want to customize this. Try changing the stone colors in the center of the lotus. It's a versatile pattern that works equally well on dark, rich fabrics or light, pastel-colored silks depending on the color of your thread.
Majestical Flourishes: Mehroon Majesty and Diamond Elegance
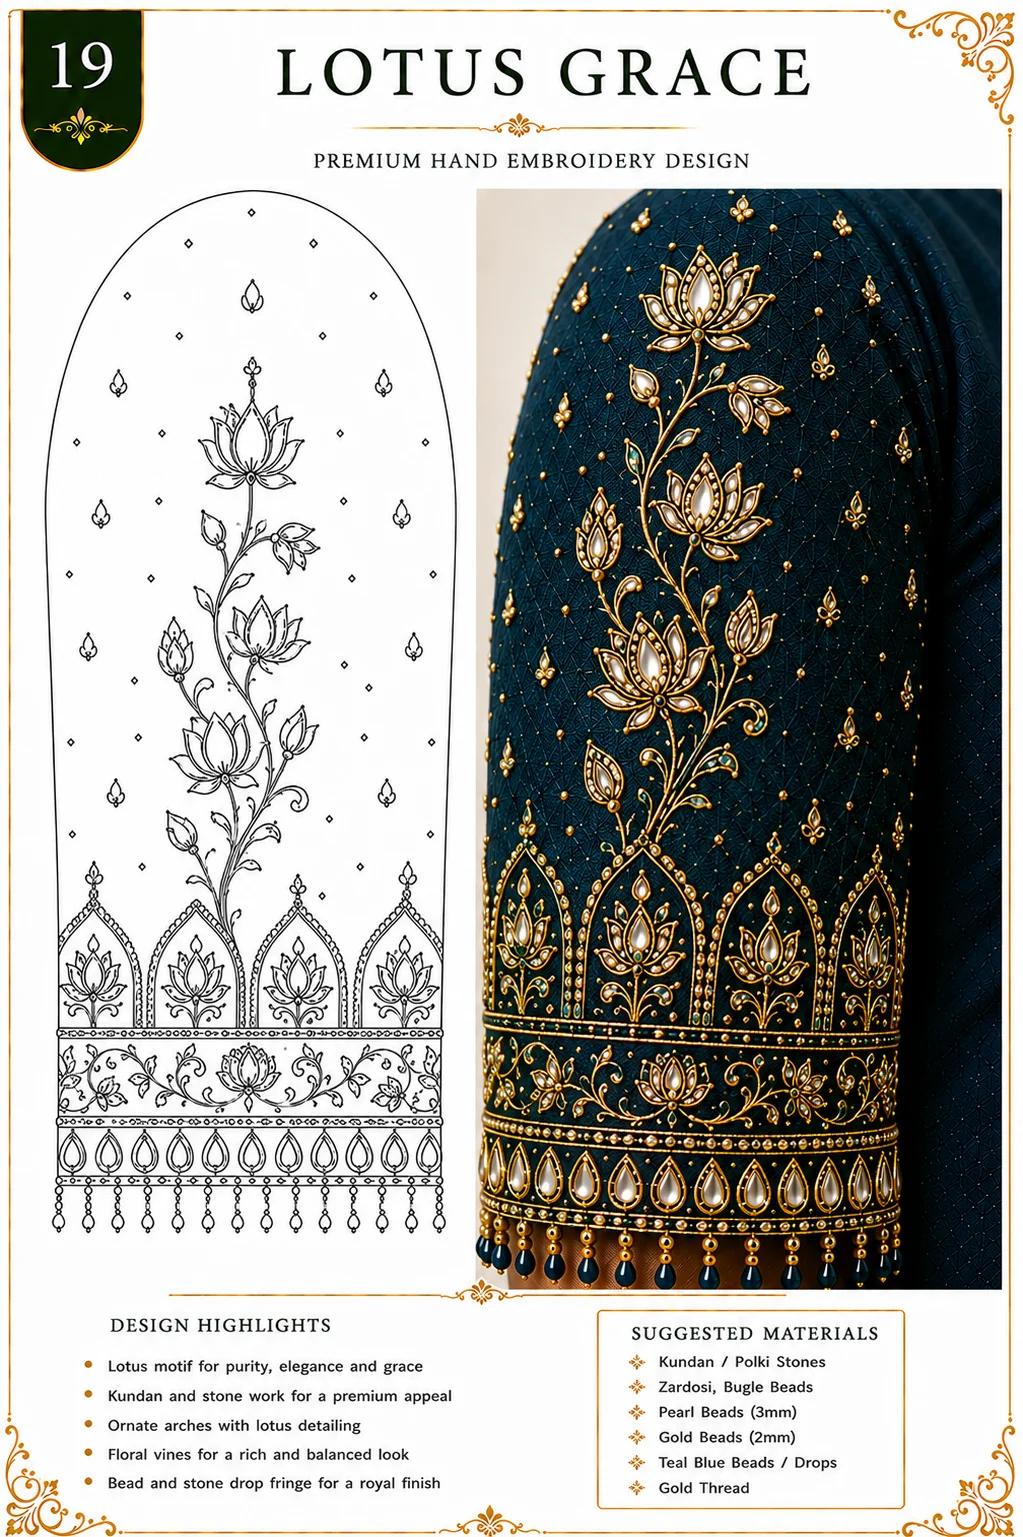
Design 19: A rich, bold floral design that uses deep colors to create a sense of majesty and depth.
So, so, this pattern is built for impact. It uses larger floral elements that cover more surface area. If you're working on a sleeve that's quite large, this design is perfect because it fills the space beautifully without feeling cluttered. The use of larger stones in the flower centers is a great way to add weight and interest. When stitching these large flowers. Work in concentric circles from the center out. This helps maintain the tension and keeps the petals looking crisp and well-defined.
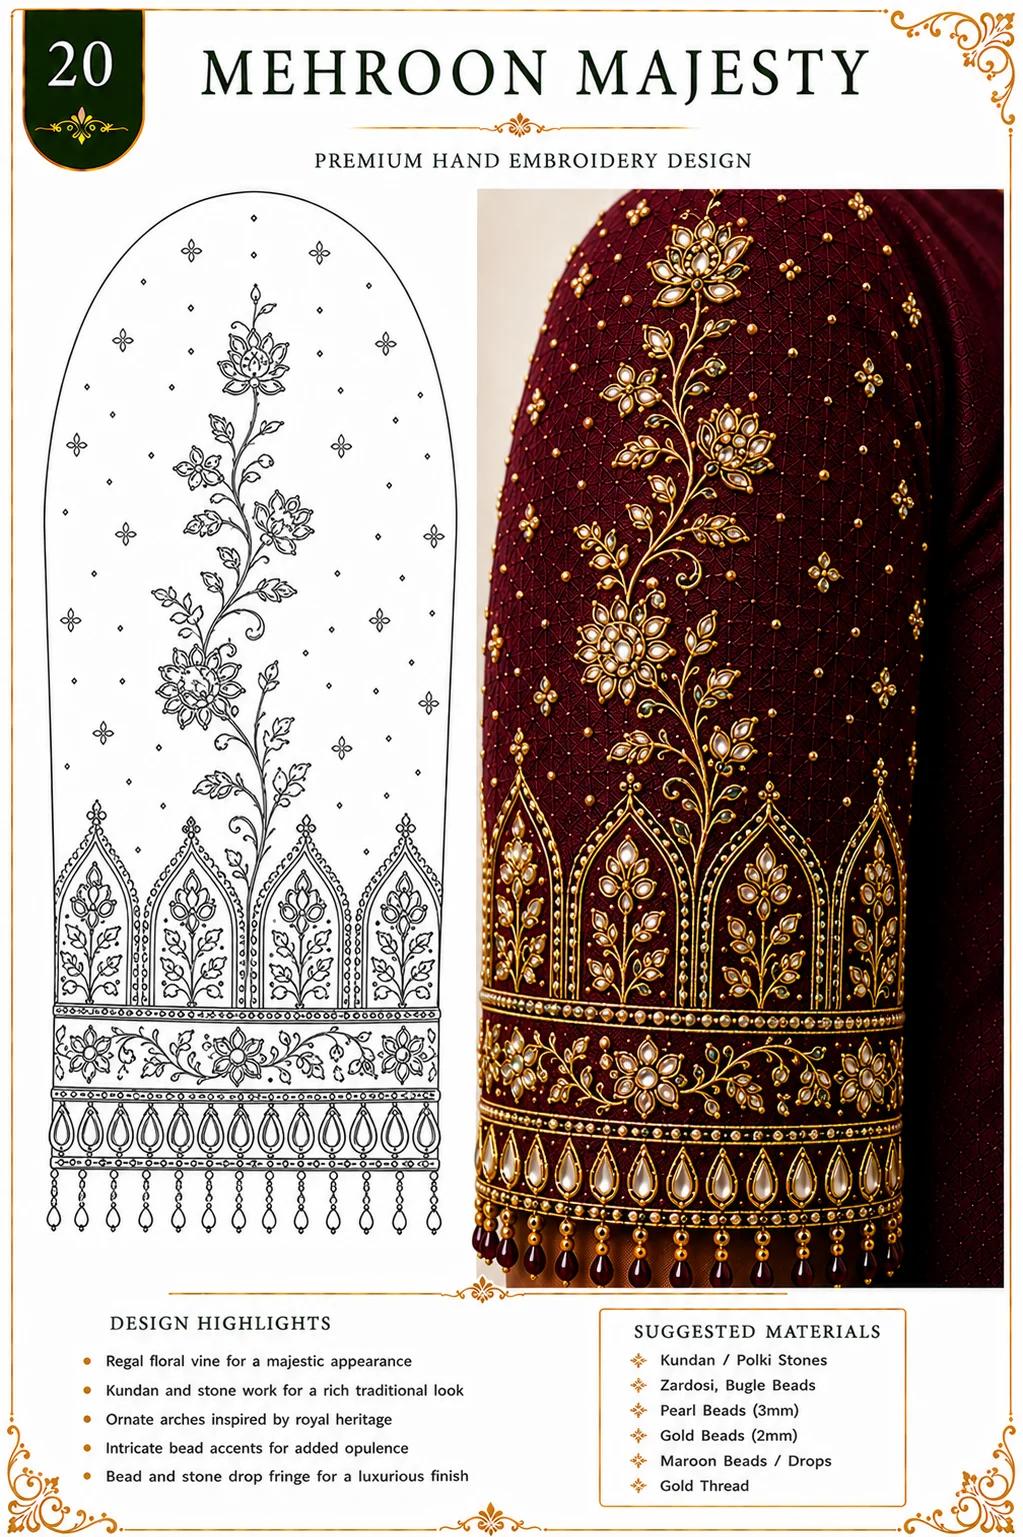
Design 20: An elegant diamond-based pattern that uses precision detailing for a high-end, luxury finish.
In practice, in practice, diamond Elegance is for the perfectionist. The grid is the hero here. It's a very formal pattern that looks beautiful when paired with a heavy saree. Because the pattern is so precise, any error will show. I suggest using a ruler to mark your grid lines before you start. It might take an extra twenty minutes. But it saves hours of frustration later. The border work is quite detailed. So plan your color palette carefully. A monochromatic gold and silver look works stunningly well here.
Celestial and Midnight Designs
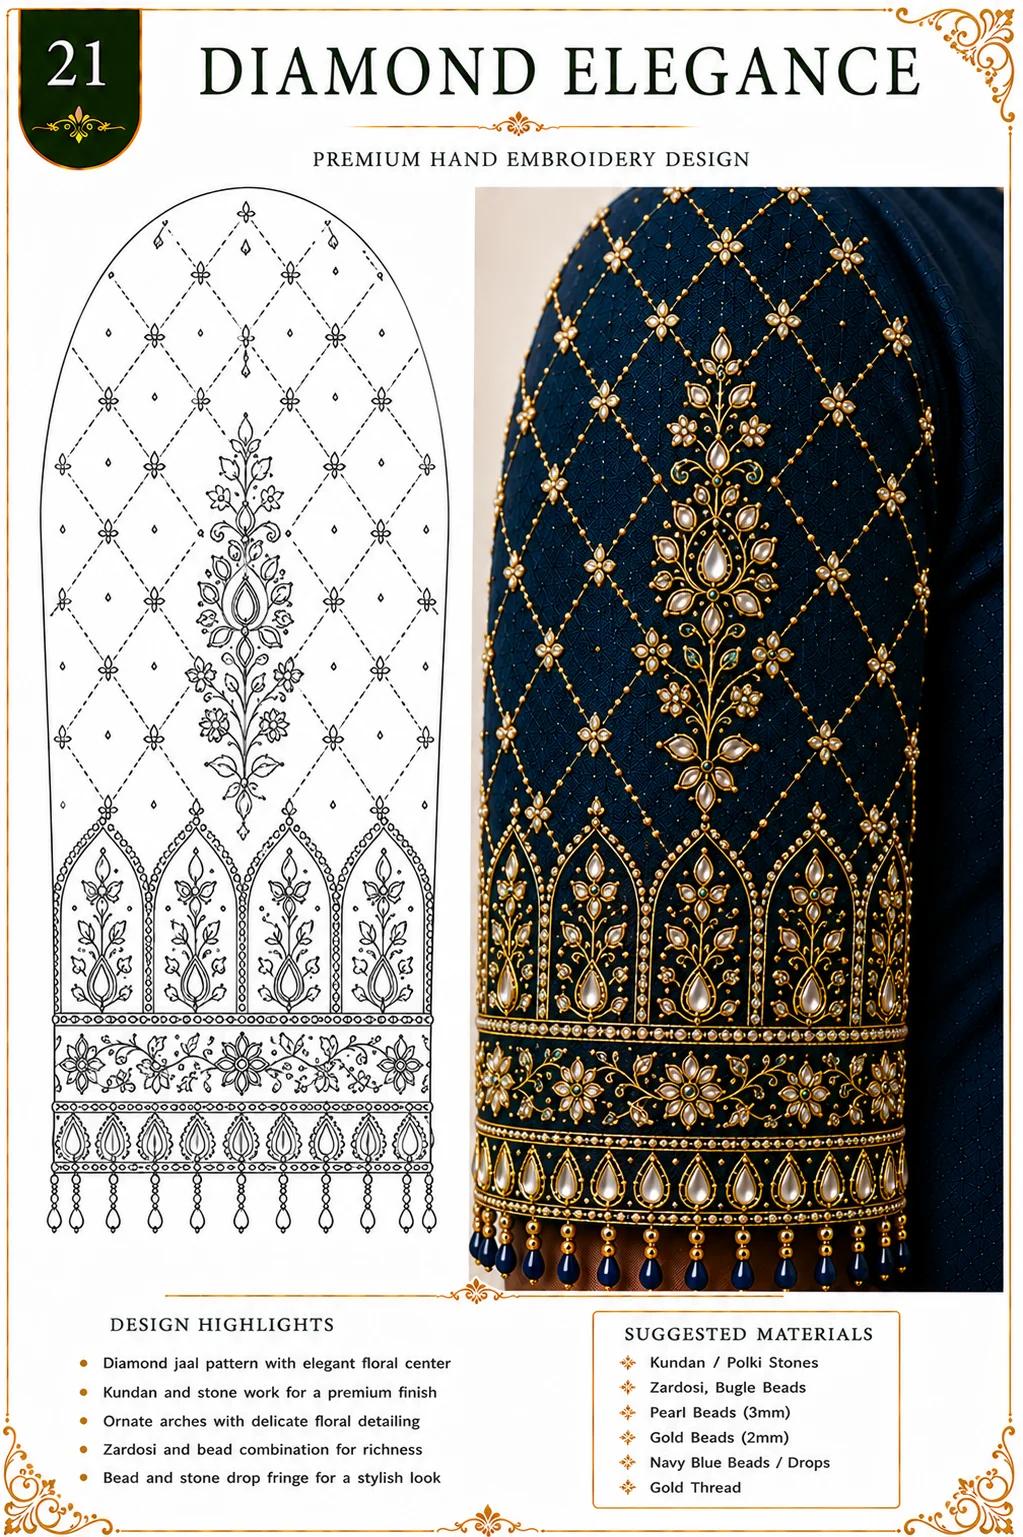
Design 21: A delicate, celestial-themed floral design that adds a magical and ethereal touch to your apparel.
The Celestial Bloom is all about the tiny details. The little star-like motifs between the flowers give it that magical feel. Use a fine metallic thread for these stars. They don't need to be big; just a simple cross-stitch or a French knot will do the trick. The larger flowers provide the base. And the stars add the sparkle. This is a very creative pattern that allows you to play with different types of metallic threads and beads to get the desired effect.
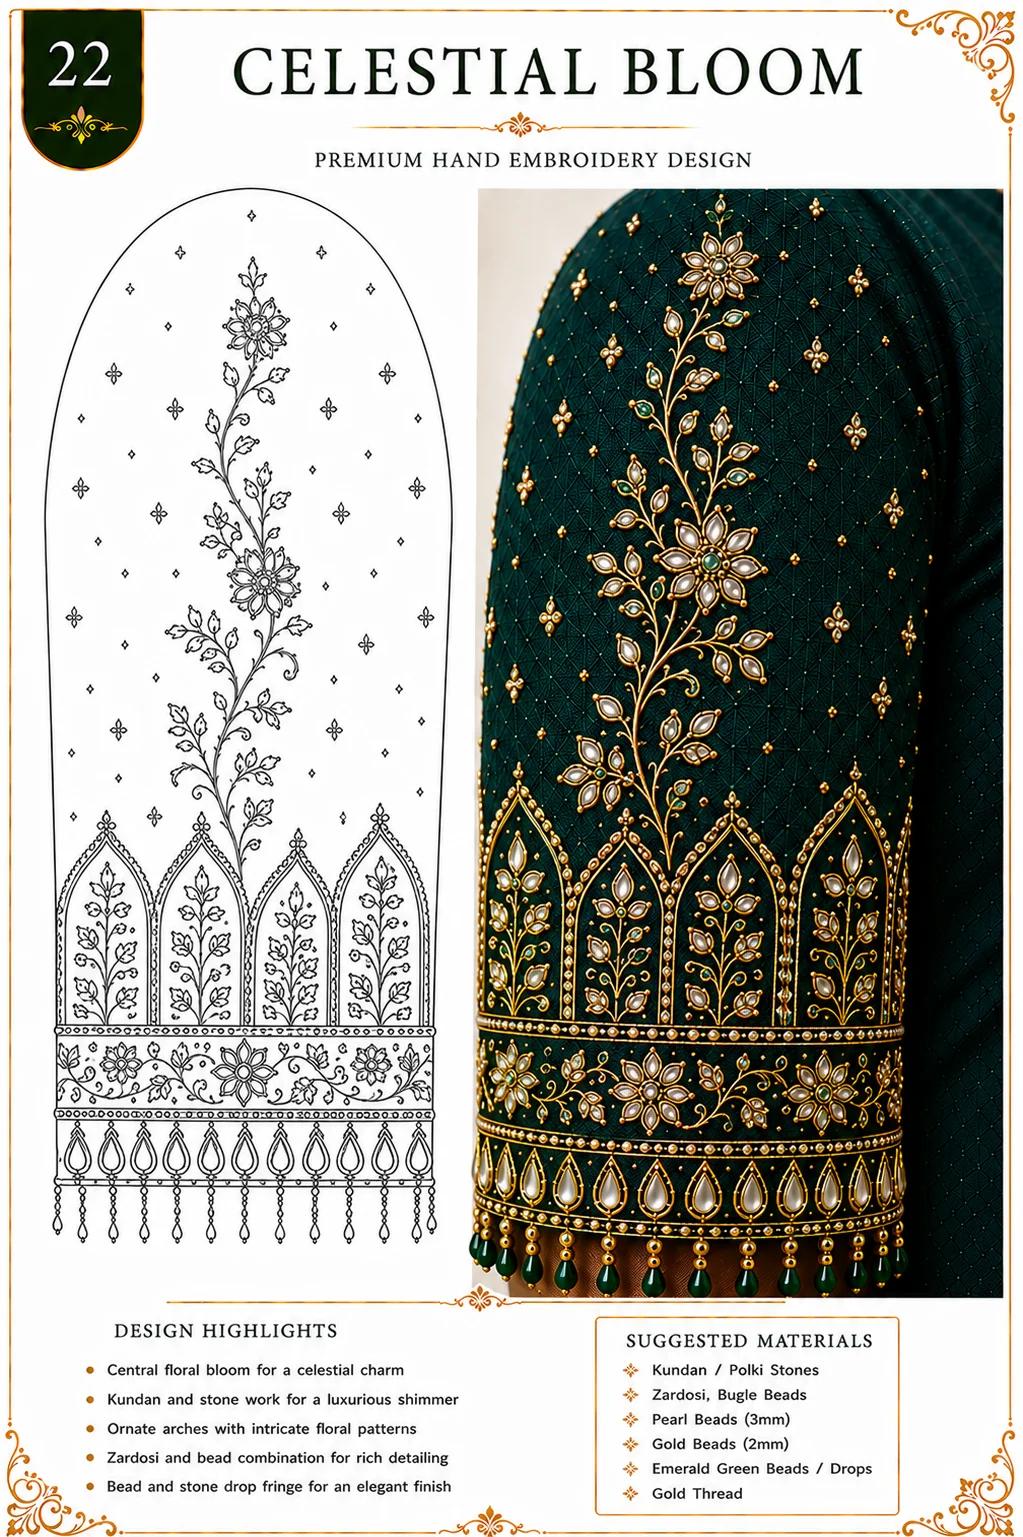
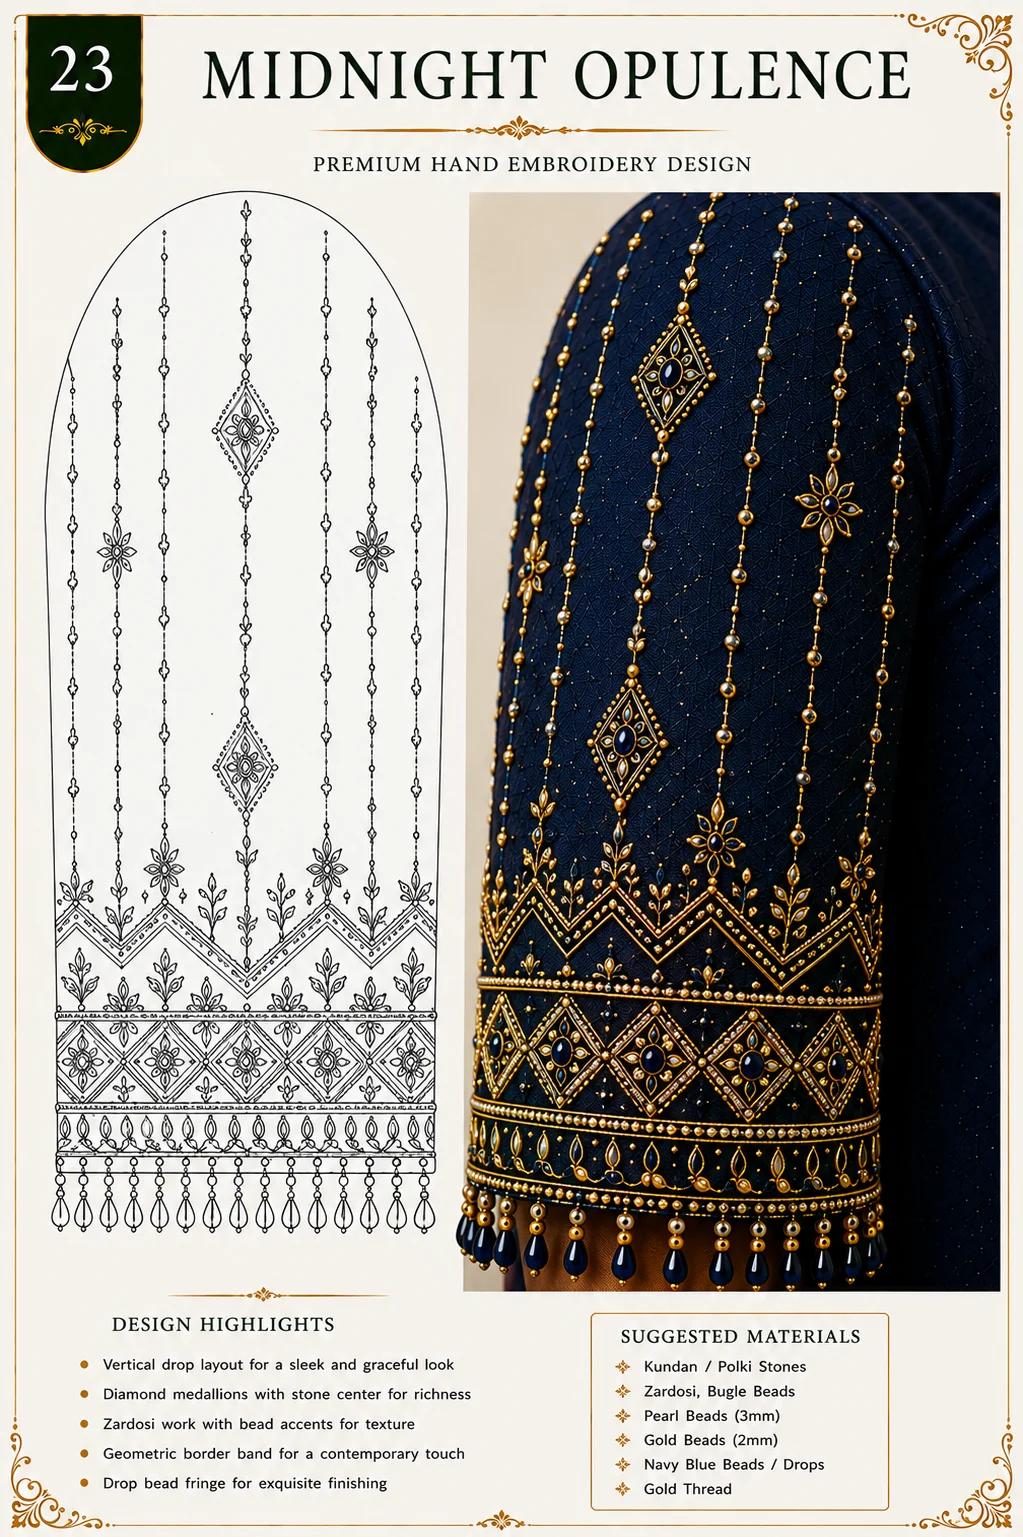
Design 22: An opulent design that works perfectly on dark navy or black fabric, ideal for evening events.
Midnight Opulence is designed for evening wear. Dark fabric provides the perfect background for gold, silver, and iridescent beads. Use beads that have a strong reflective quality. The vertical lines add structure, and the diamond medallions are perfect for hiding larger. More expensive stones. This design feels luxurious and expensive without being too busy. It's the perfect choice for a night event where you want your embroidery to catch the low light of a banquet hall or an evening wedding ceremony.
Closing the Look: Royal Fern and Sovereign Embrace
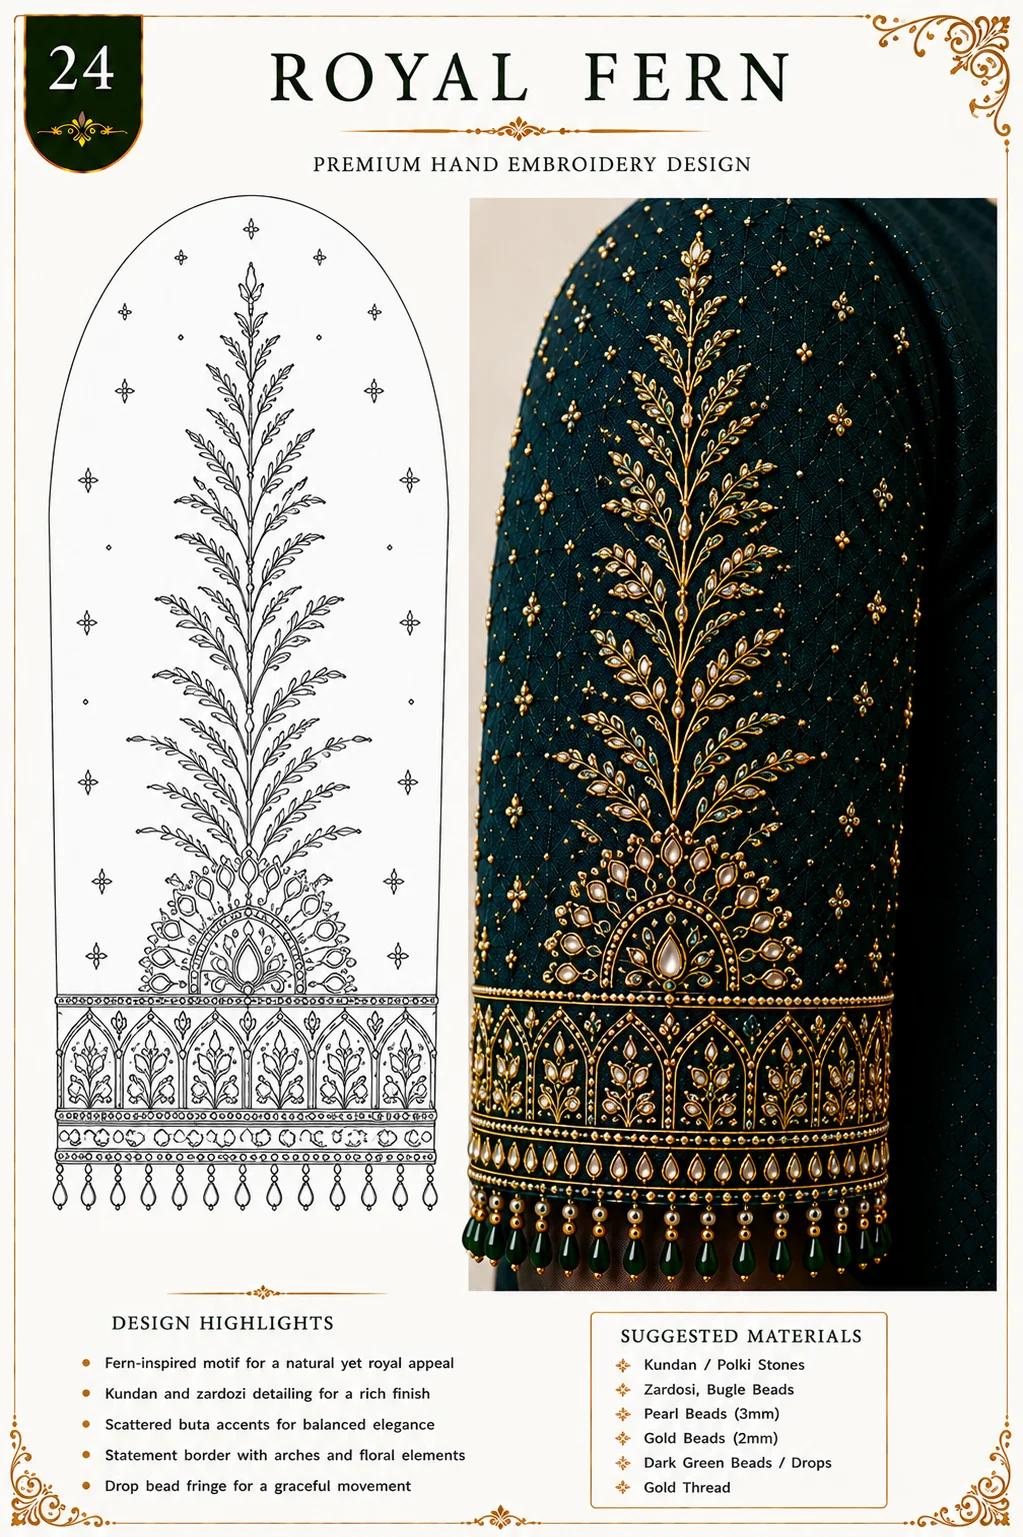
Design 23: A nature-inspired fern pattern that brings a unique, organic texture to the embroidery work.
Royal Fern is a fantastic departure from standard floral work. The fern leaves have a beautiful, feathery quality that's easy to execute with a simple chain stitch. It's a very forgiving design because the leaves don't have to be perfect; they just have to look natural. The arch border anchors the design beautifully. If you want to add more dimension. Use 2 slightly different shades of green thread. This mimics the natural color variation you find in actual ferns, adding a layer of realism to the piece.
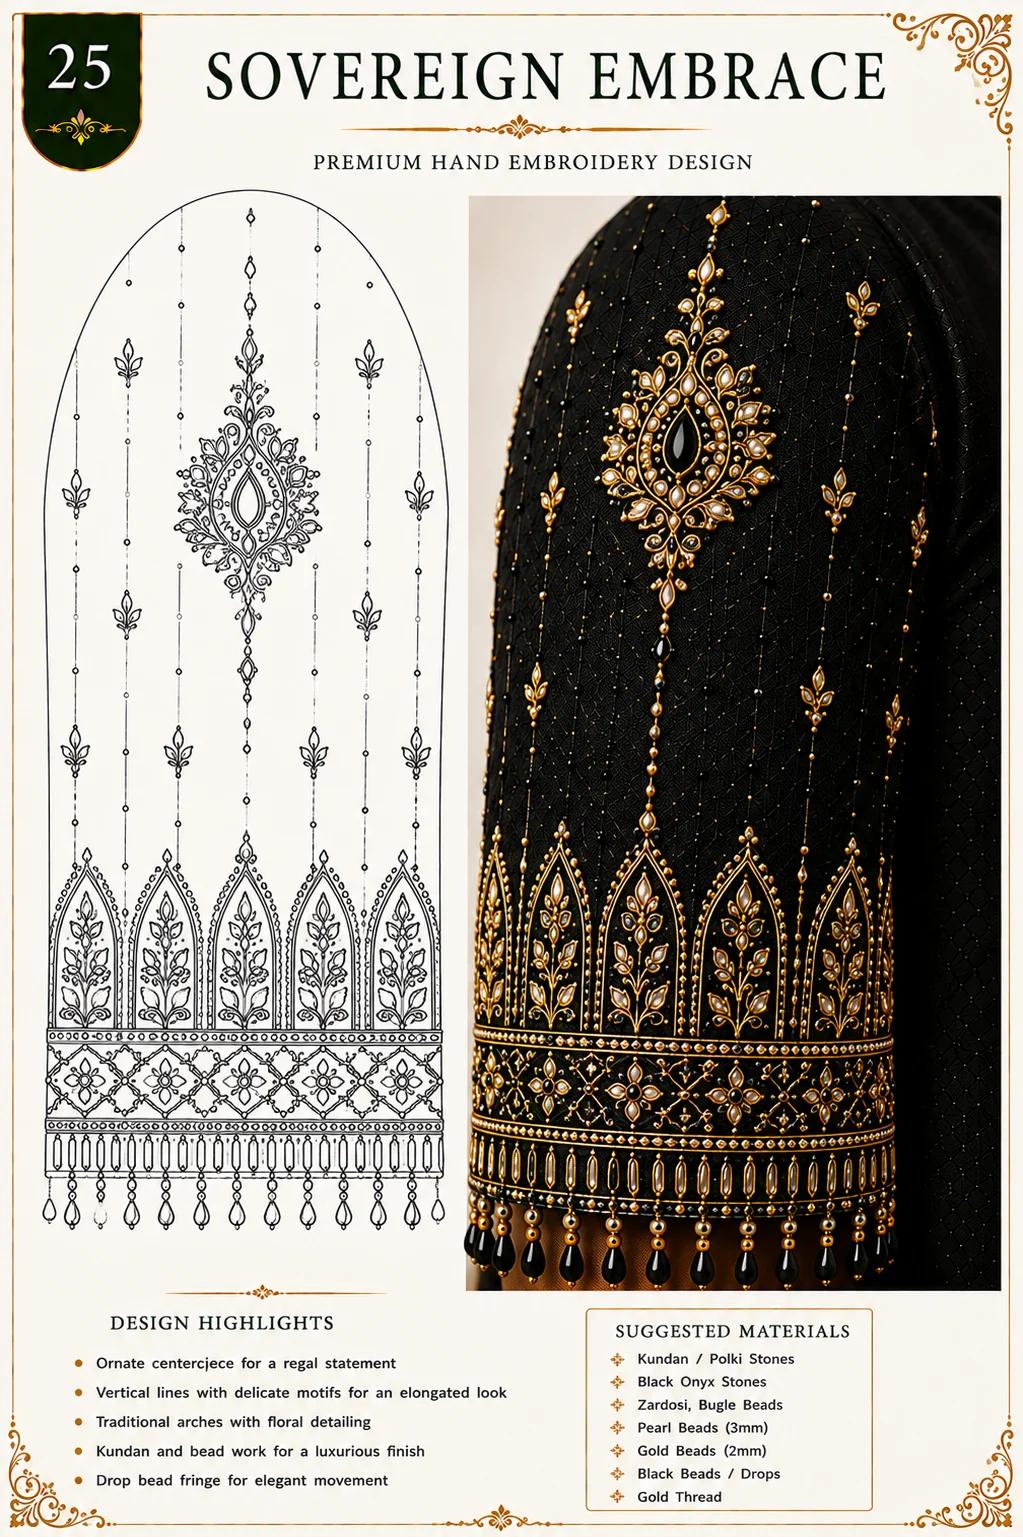
Design 24: A bold and powerful design that features a strong central motif and traditional arch borders.
Sovereign Embrace is, as the name suggests, a powerful design. The central motif is very dominant, which makes it perfect for a sleeve that wants to stand out. The lines are sharp and the borders are well-defined. This isn't a subtle design; it's a statement piece. When working on this. Ensure your outline is strong. A weak outline will make the whole design look limp. Use a thicker thread for the main lines and a thinner one for the internal details to create a clear hierarchy.
Tracing pattern for Design 01
Tracing pattern for Design 02
Tracing pattern for Design 03
Tracing pattern for Design 04
Tracing pattern for Design 05
Tracing pattern for Design 06
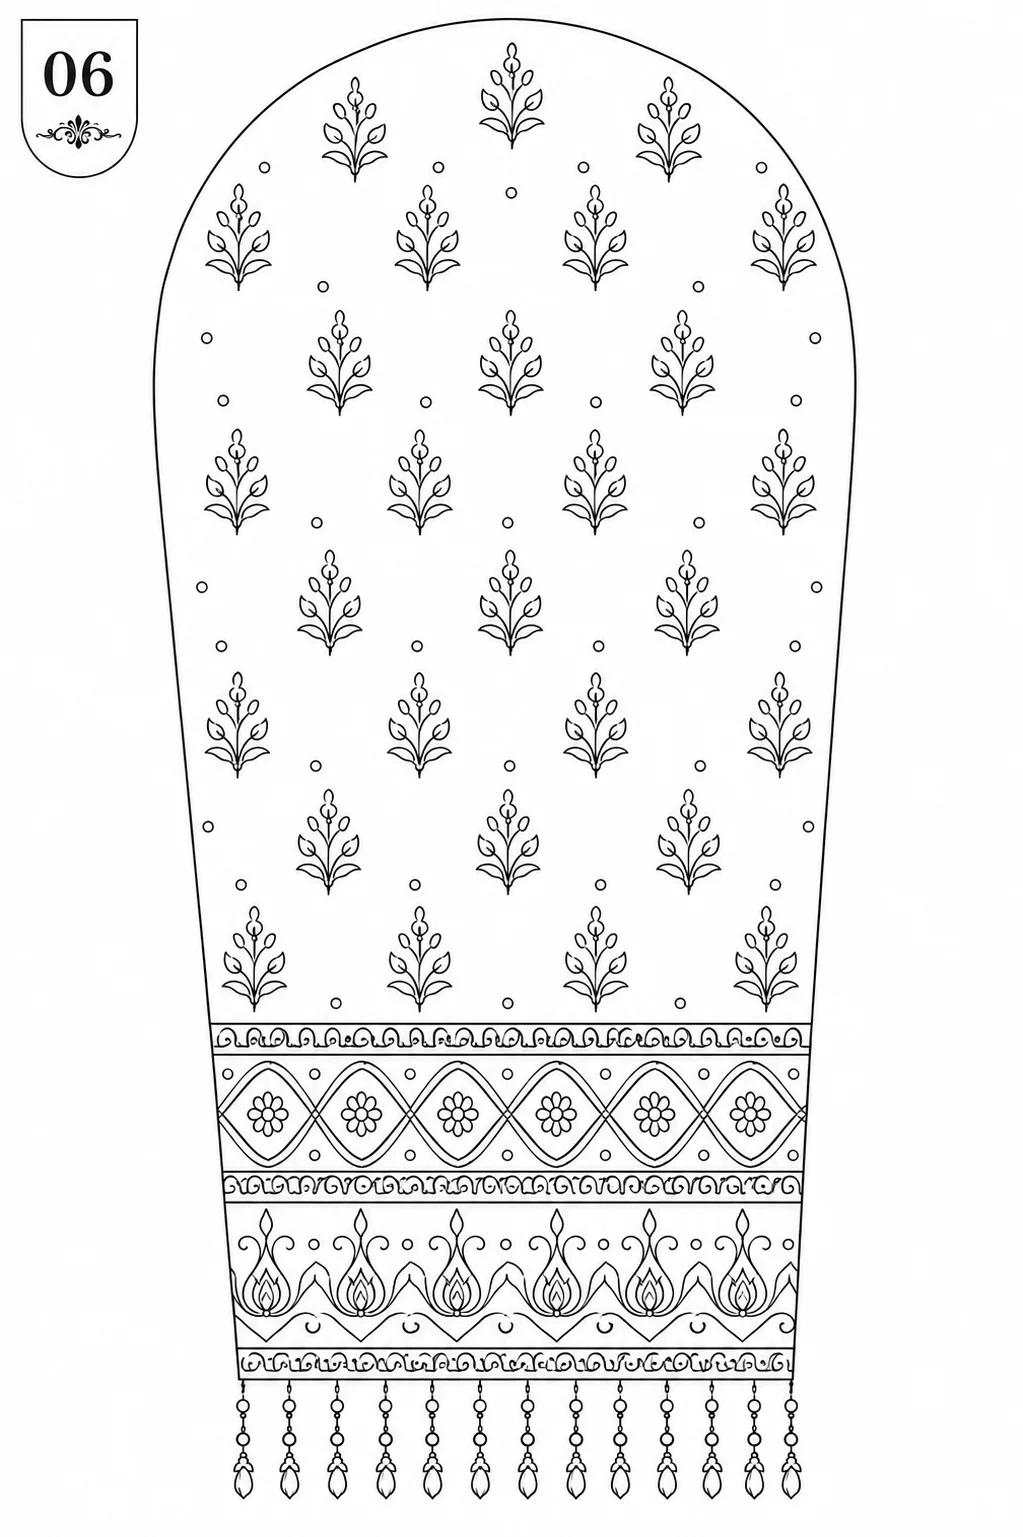
Tracing pattern for Design 07
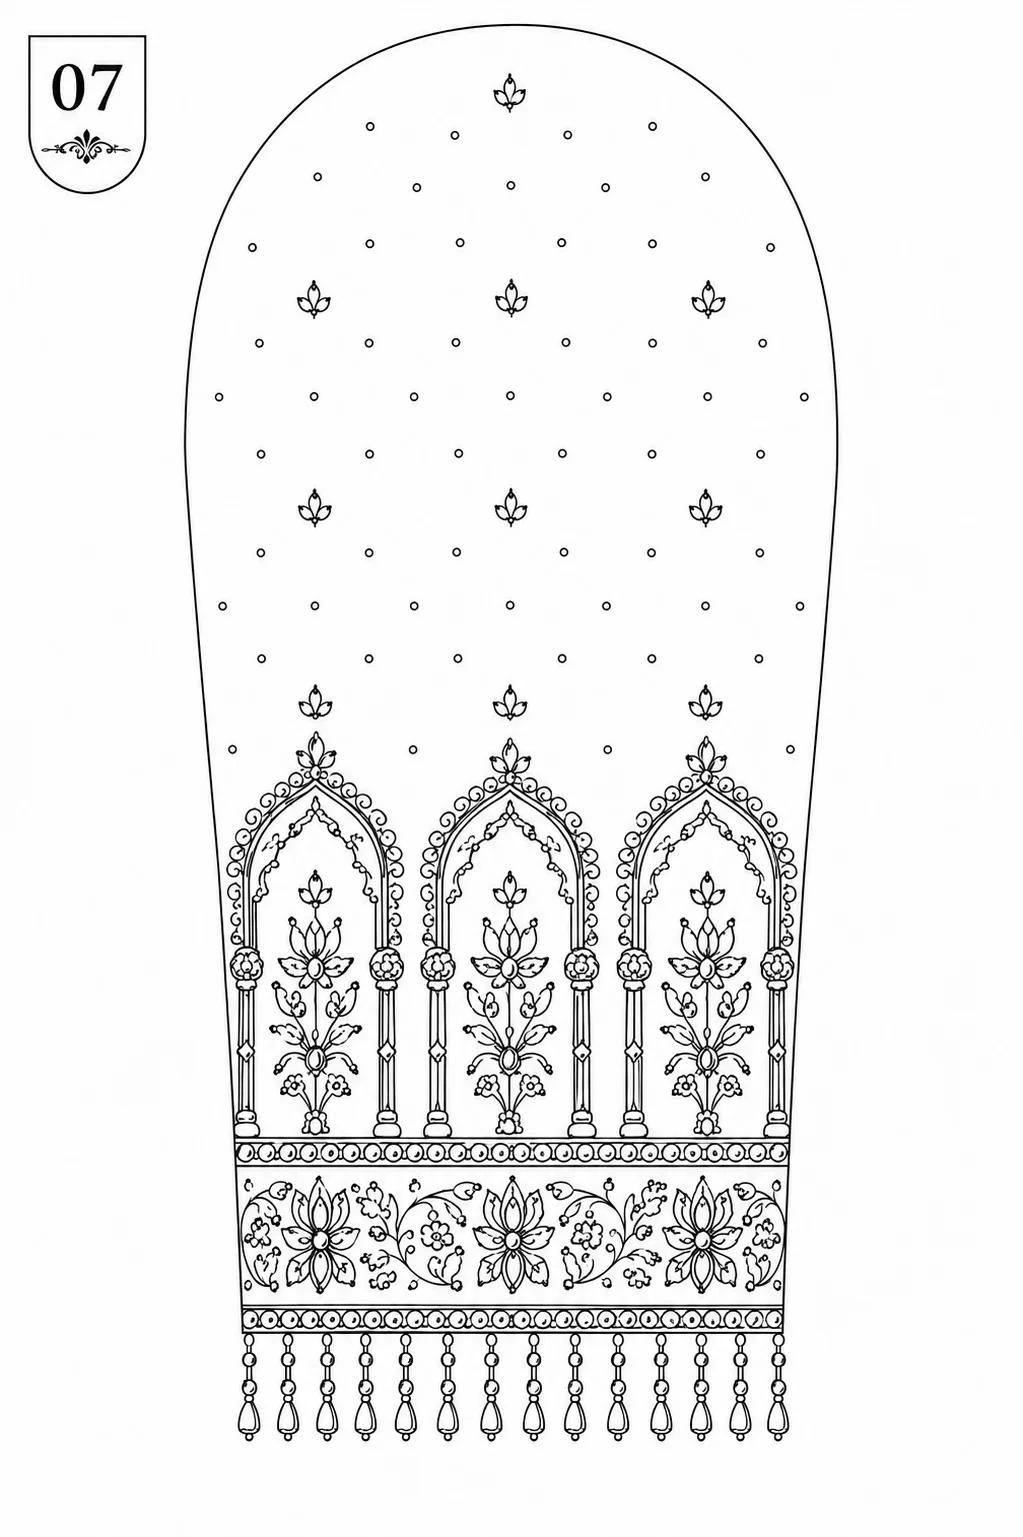
Tracing pattern for Design 08
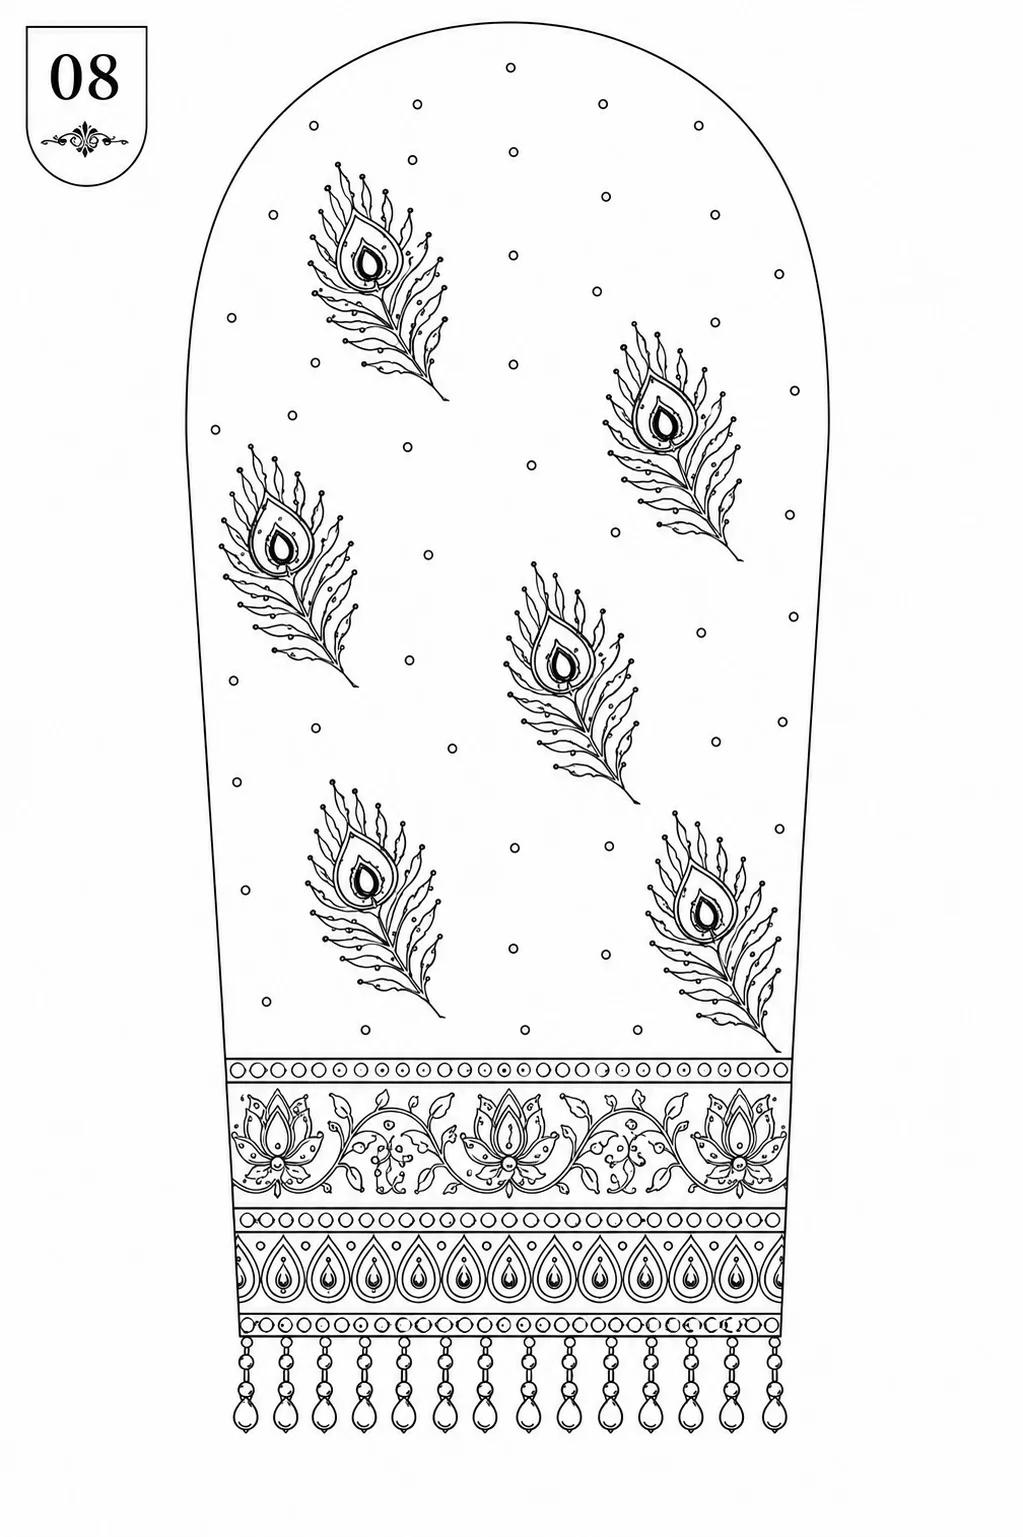
Tracing pattern for Design 09
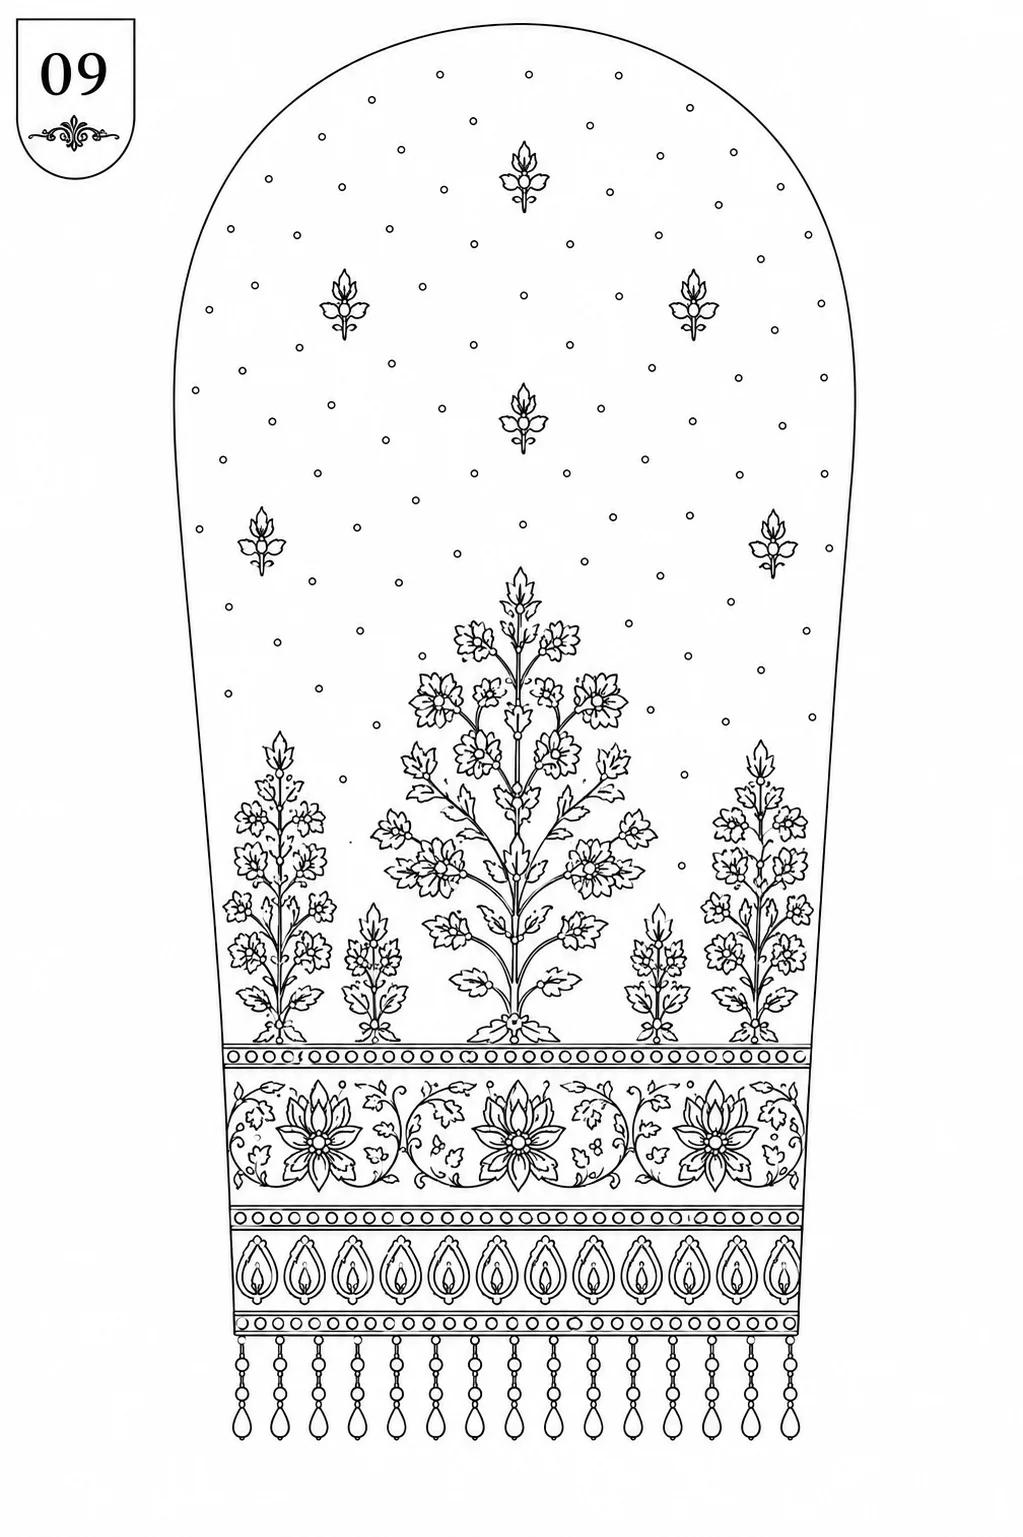
Tracing pattern for Design 10
Tracing pattern for Design 11
Tracing pattern for Design 12
Tracing pattern for Design 13
Tracing pattern for Design 14
Tracing pattern for Design 15
Tracing pattern for Design 16
Tracing pattern for Design 17
Tracing pattern for Design 18
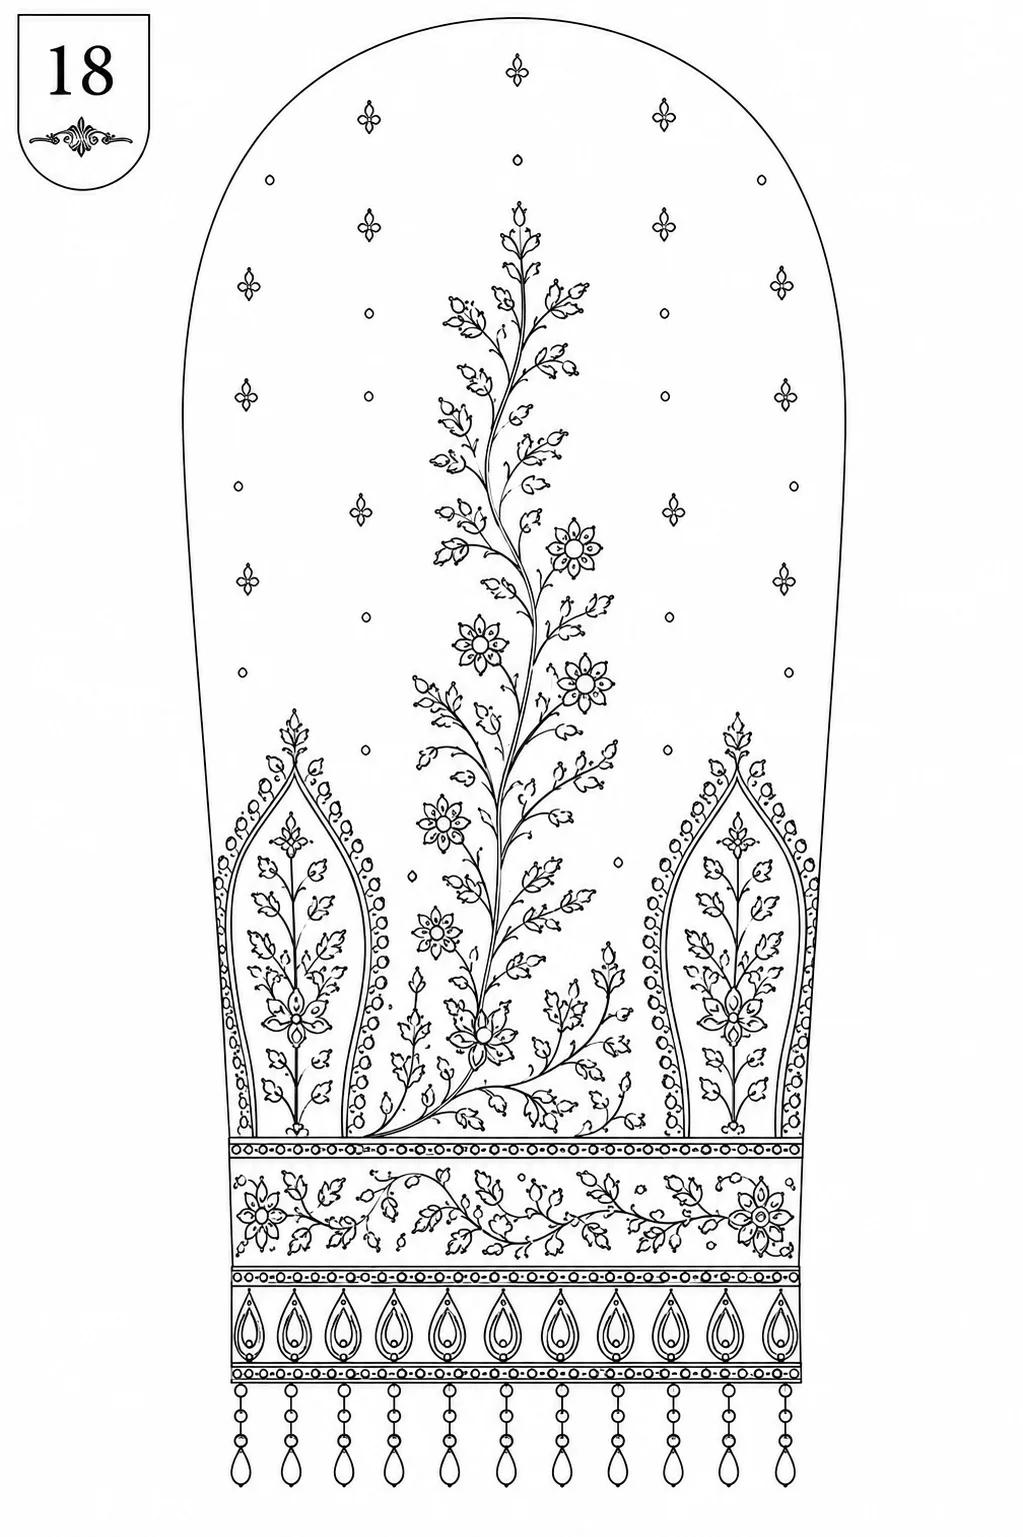
Tracing pattern for Design 19
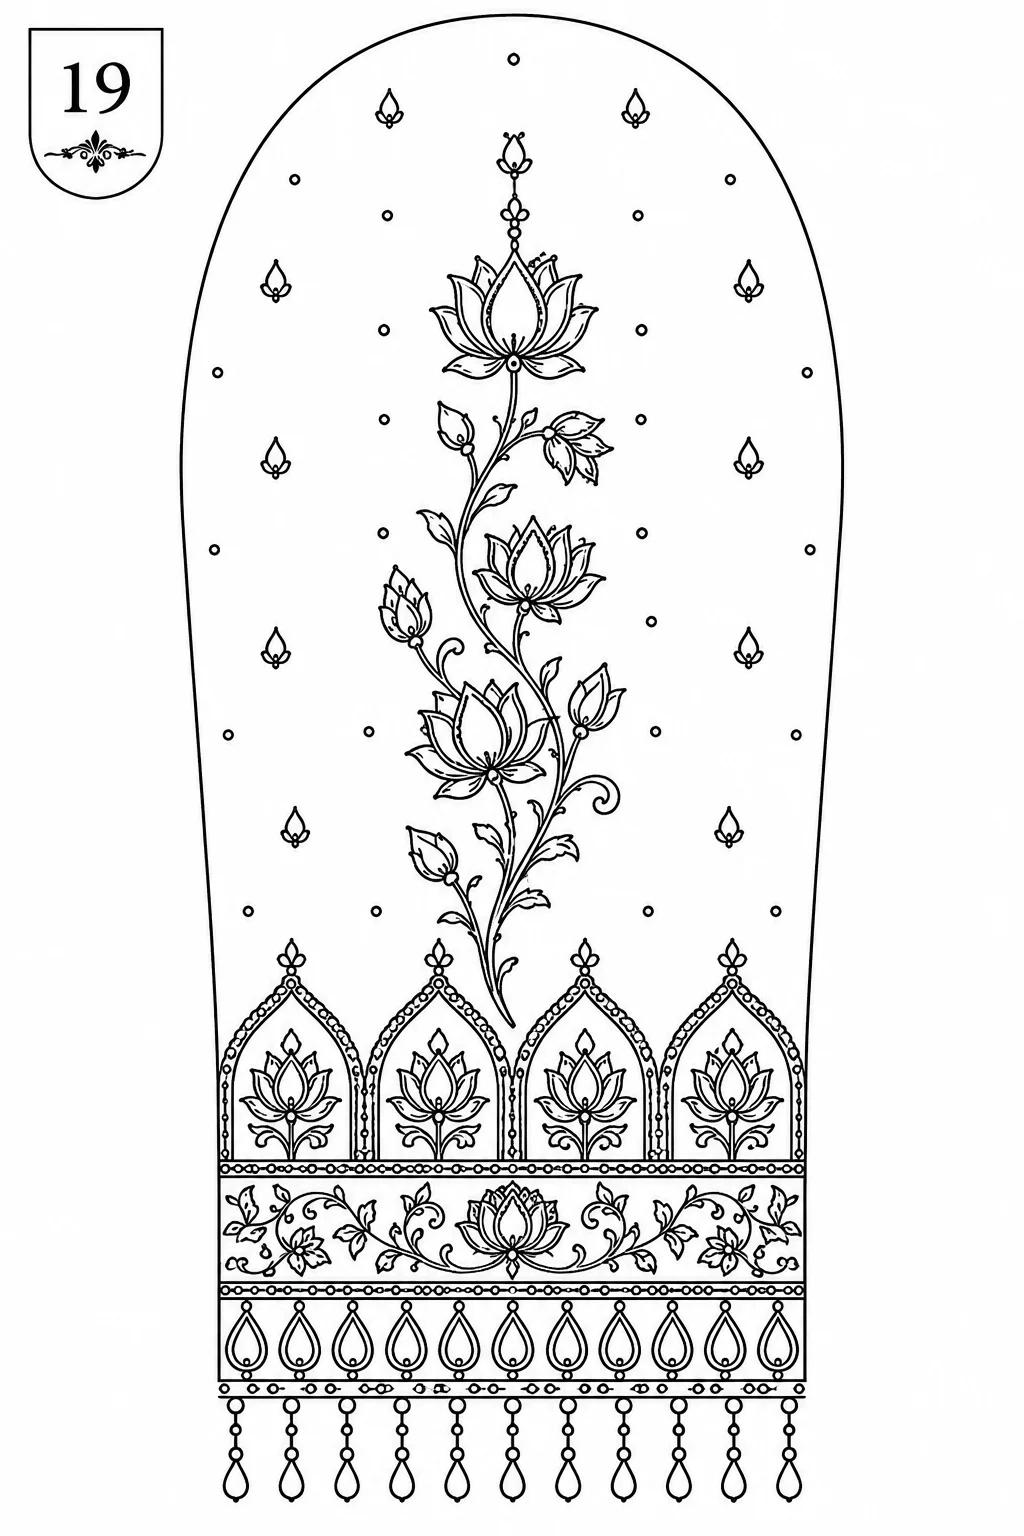
Tracing pattern for Design 20
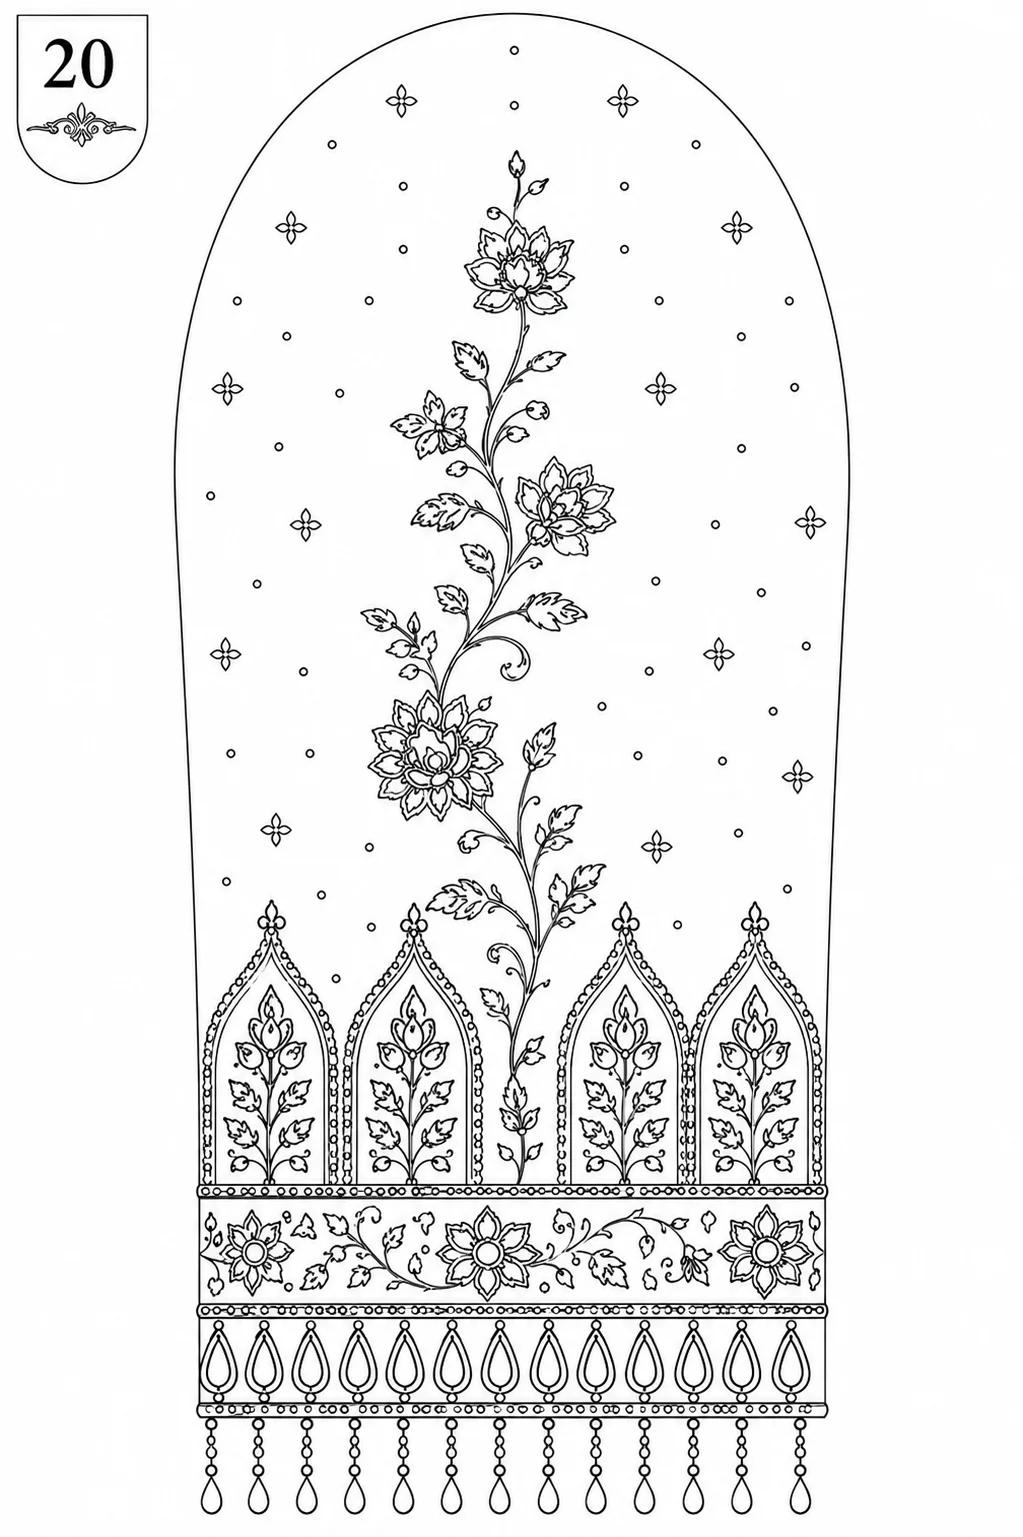
Tracing pattern for Design 21
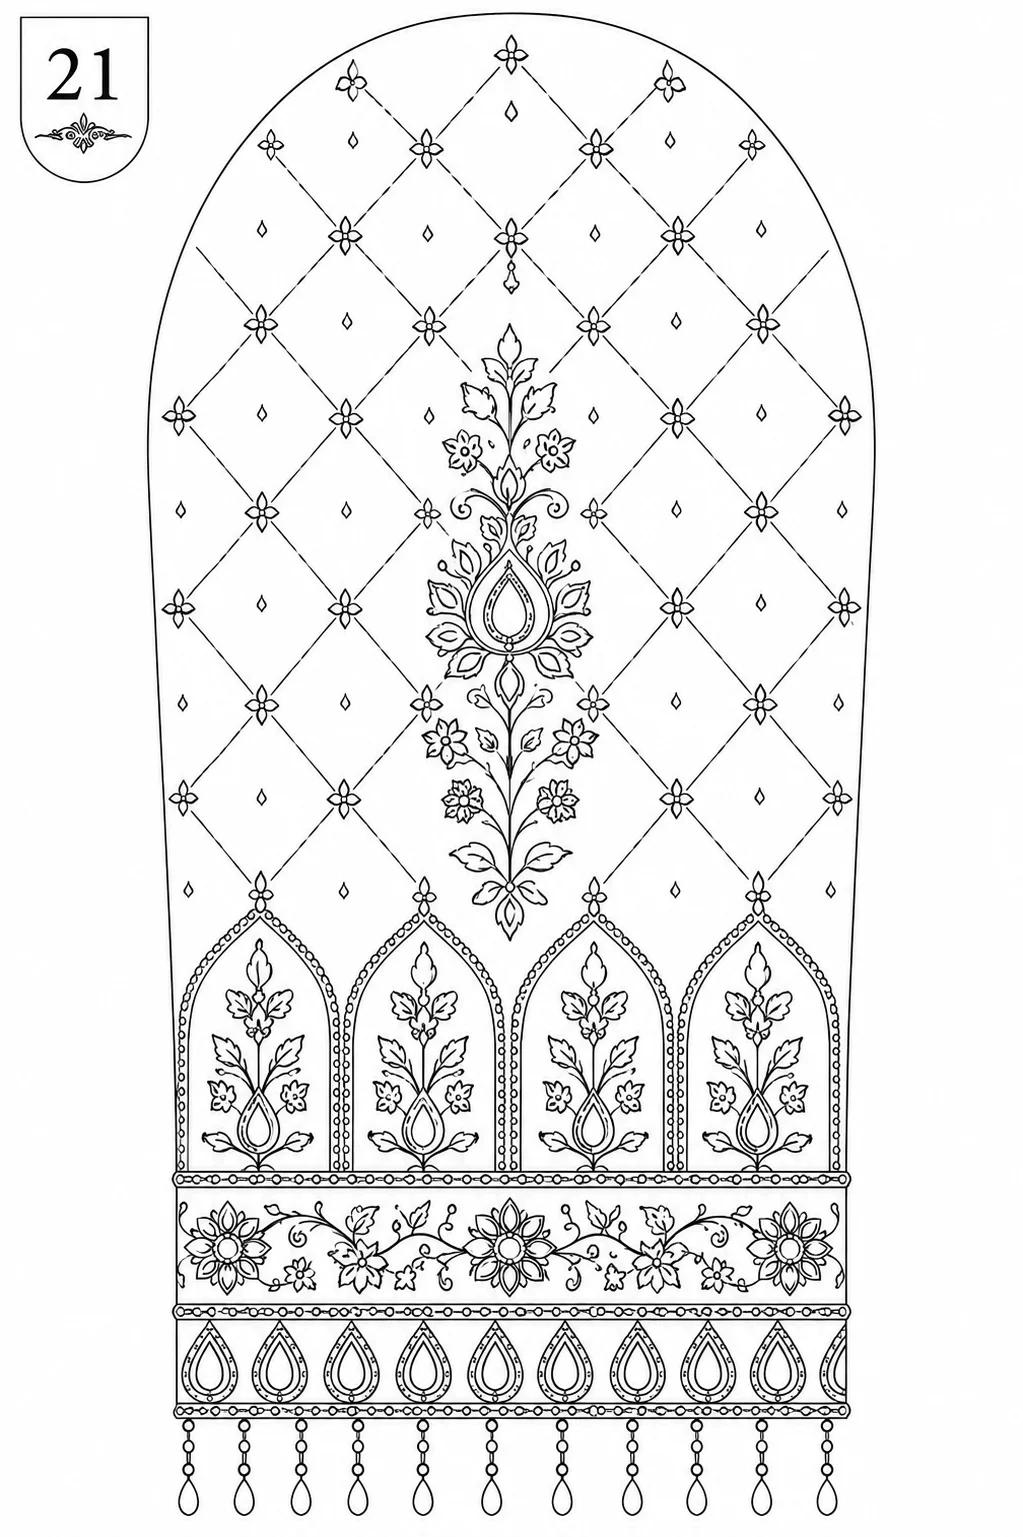
Tracing pattern for Design 22
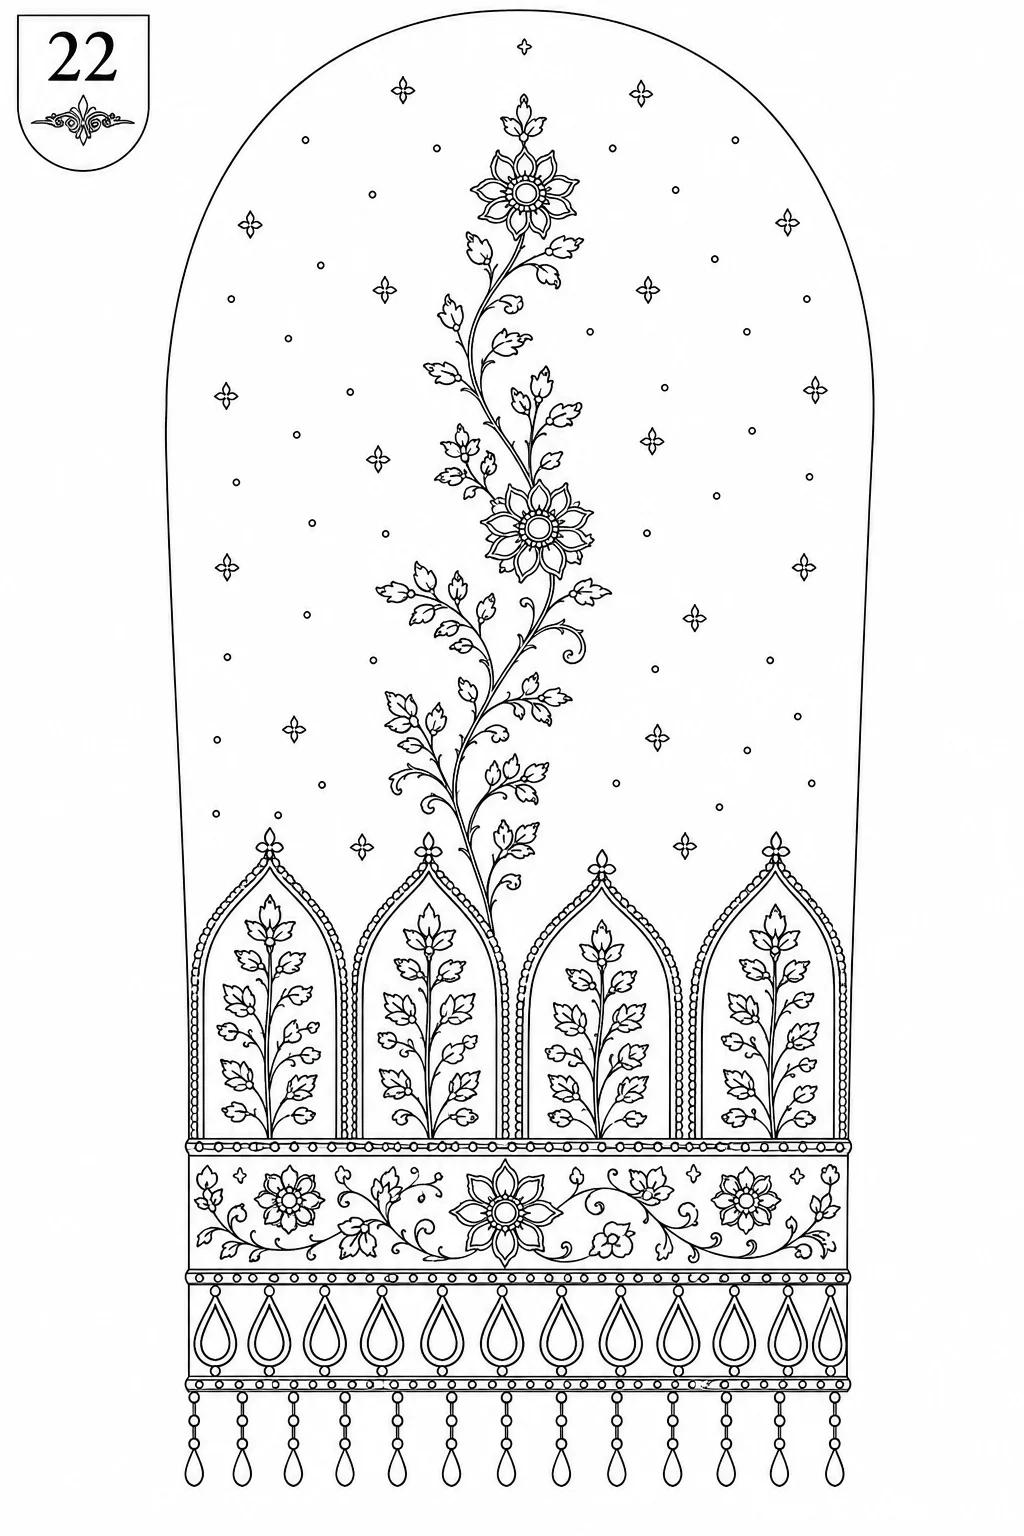
Tracing pattern for Design 23
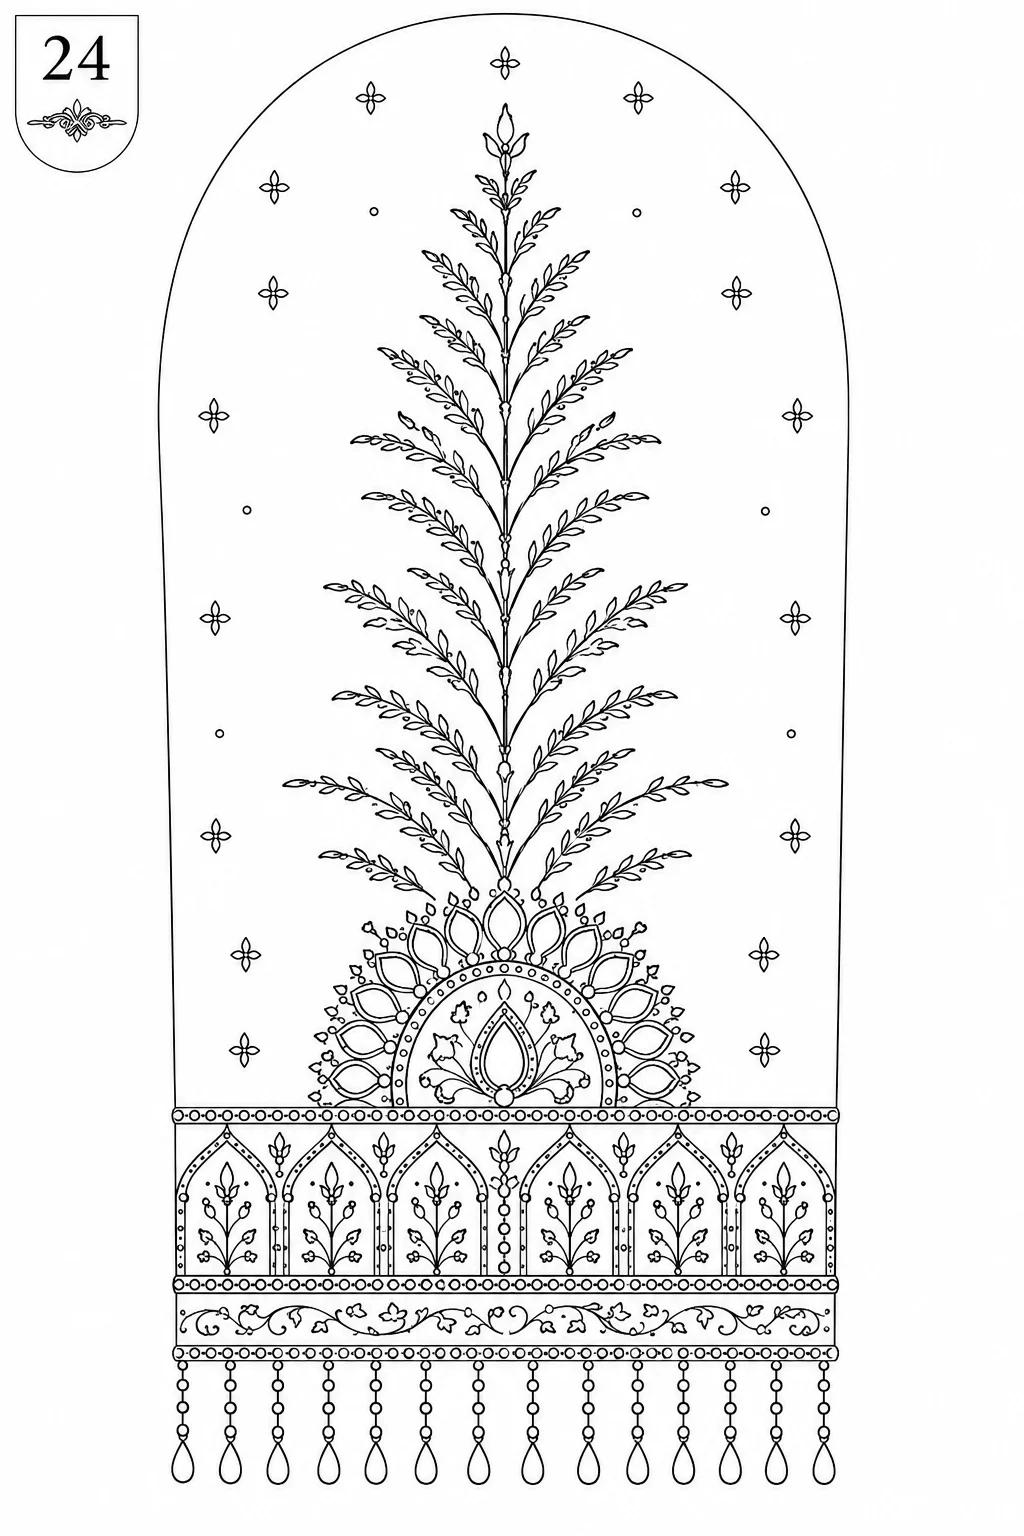
Tracing pattern for Design 25
Frequently Asked Questions
Which material combination works best for heavy bridal sleeves?
For heavy bridal looks, combine Zardosi with Kundan stones and 3mm pearls. This provides both the metallic structure and the soft, elegant fill required for high-end garments.
How do I maintain symmetry on a large sleeve area?
Always start by marking your center line and the primary border. Use a light-box or mobile tracing method to ensure your lattice patterns remain consistent from shoulder to cuff.
Are these 25 designs suitable for beginners?
Think about it — think about it — while the border work is manageable for intermediate users. The overall complexity of these 25 designs is intended for those with solid experience in bead placement and Zardosi layering.
Finalizing your project is just as important as starting it. Always knot your threads securely on the underside and use a bit of fabric glue on the final knot to ensure it never unravels. Your Aari work is a piece of art; treat it with the care that such detail deserves. Go forth and create something beautiful!


